 |
 |
|
 |
|
| Author |
Message |
Nexus6
Community Member

Joined: 15 May 2006
Posts: 473
Location: Off-World Colonies
|
 Posted: Sat Mar 28, 2009 2:53 pm Post subject: Nexus6 Origami Chicken tutorial (PIC HEAVY THREAD)... Posted: Sat Mar 28, 2009 2:53 pm Post subject: Nexus6 Origami Chicken tutorial (PIC HEAVY THREAD)... |
 |
|
OK, I've been trying to get enough info to make this as easy as possible. I apologize if it gets too "dumbed down" for anyone, but I just wanted to make things as clear as possible.
The chicken sculpture begins with what I call "Basic Form IV" or "Bird Base" (be warned that other sources may call it something TOTALLY different). This diagram for Basic Form IV comes from the Unicorn diagram that I found online (yes, making the chicken actually helps us learn to make the unicorn. SCORE!):

I'll update this thread tonight with the rest of the build. Good luck!
_________________

Last edited by Nexus6 on Sun Sep 28, 2014 11:59 pm; edited 3 times in total |
|
| Back to top |
|
|
|
|
 |
|
 |
|
|
|
|
| Author |
Message |
Mr Webber
Community Member

Joined: 13 Apr 2008
Posts: 1824
Location: Terra Australis
|
| Posted: Sat Mar 28, 2009 4:58 pm Post subject: |
|
|
Great work Nexus6, thanks for your patience.
_________________
Formerly offworld66 |
|
| Back to top |
|
|
|
|
|
|
|
|
|
|
|
| Author |
Message |
BeastMaster
Community Member

Joined: 19 Jul 2007
Posts: 994
Location: UK
|
| Posted: Sat Mar 28, 2009 7:55 pm Post subject: |
|
|
great stuff! look forward to having a crack at this! 
_________________
"F*ck it, it's just a movie. Let him worry about it" Harrison Ford |
|
| Back to top |
|
|
|
|
|
|
|
|
|
|
|
| Author |
Message |
Nexus6
Community Member
Joined: 15 May 2006
Posts: 473
Location: Off-World Colonies
|
| Posted: Sat Mar 28, 2009 9:07 pm Post subject: |
|
|
OK, here are the next 5 steps. After this, it gets more tricky, but only SLIGHTLY. I'll try to get the end up tomorrow.

If any of this step is unclear, let me know & I'll try to talk you through it. 
_________________
Last edited by Nexus6 on Mon Sep 29, 2014 12:01 am; edited 1 time in total |
|
| Back to top |
|
|
|
|
|
|
|
|
|
|
|
| Author |
Message |
temponaut
Community Member

Joined: 19 Apr 2006
Posts: 440
Location: Tokyo, Japan
|
| Posted: Sun Mar 29, 2009 8:54 am Post subject: |
|
|
Outstanding!!
Thank you, Nexus6, for undertaking this tutorial for us!
Looking forward eagerly to the rest. 
_________________
"Your old titles mean nothing here... Captain!" |
|
| Back to top |
|
|
|
|
|
|
|
|
|
|
|
| Author |
Message |
Gaff87
Community Member

Joined: 05 Oct 2008
Posts: 1727
Location: United Kingdom
|
| Posted: Sun Mar 29, 2009 9:32 am Post subject: |
|
|
| Thank you Nexus I think i'm gonna have to give this a go. |
|
| Back to top |
|
|
|
|
|
|
|
|
|
|
|
| Author |
Message |
Nexus6
Community Member
Joined: 15 May 2006
Posts: 473
Location: Off-World Colonies
|
| Posted: Tue May 05, 2009 9:27 pm Post subject: |
|
|
OK. Here goes nothing (or everything). Sorry for the big pix, but I wanted it to be as clear as possible. I used a BIG piece of wrapping paper in the hopes it would be easier to see.
Step 16: Fold the legs (seen in Step 15 (or Step 5 in my previous post)) inwards & outwards (See Step 16b for clarification):

Step 16b:

Step 17: Now we have to thin the legs out. Do this by folding the legs (inwards down the length) twice (on the inside & outside of EACH leg (See Step 17b for clarification)):

Step 17b:

Step 18: Fold the top downwards TEMPORARILY (this will make a crease we use for guidance (See Step 18b to measure WHERE to fold to)):

Step 18b:

Step 19: After unfolding the top, REFOLD the tip down past the crease we just made to the one designated on the photo:

Step 20: Now fold each of the designated corners to the center using the crease we made in Step 18/18b:

Step 21: Then fold that top piece down on the same crease:

Step 22: Now fold the entire model in half length-wise down the center (Finished in Step 22b):

Step 22b (ALMOST DONE!):

Step 23: This is tricky to explain if you're origami-impaired. Temporarily unfold the model. Fold the top back at the dotted line, then forward again at the solid line, so that when the model is again folded in half, the top piece begins to point upwards (See Step 23b for clarification):

Step 23b: IN ADDITION, before we're done, the areas marked by the yellow arrow will need to be folded inwards (I did it in Step 28 below):

Step 24: Repeat this type of fold 2 more times on what is now forming the neck (Shown below & in Step 25):

Step 25:

Step 26: Now fold fold the very tip inwards & down to form the head:

Step 27: To form the beak, fold the tip inwards, then create another fold outwards exposing just the very tip (See clarification in Step 27b (NOTE: on the actual size chicken (3.5 in. sq. paper) this last part may be impossible due to the small size)):

Step 27b:

Step 28: Now fold the feet inwards/upwards (other foot in 28b):

Step 28b:

Step 29: On this step, the tail area COULD be folded inwards to shorten it, HOWEVER, on the small models it's really difficult to make it look clean, so I've found that cutting it off with scissors gives a better appearance:

Step 30: FIN.

You'll probably have to try multiple models to get screen-accuracy correct. I didn't even reference the screen chicken for this particular model, so the dimensions are probably off. BUT the main point was to show the various folds & their sequences. You can tweak as needed.
Hope this helps (& hope photobucket doesn't act-a-fool with the pix). I'll try to answer any questions that arise as best I can. Good luck!
_________________
Last edited by Nexus6 on Mon Sep 29, 2014 12:29 am; edited 3 times in total |
|
| Back to top |
|
|
|
|
|
|
|
|
|
|
|
| Author |
Message |
joberg
Community Member
.jpg)
Joined: 06 Oct 2008
Posts: 9447
|
| Posted: Wed May 06, 2009 6:49 am Post subject: |
|
|
| Thanks for sharing Nexus...cool tutorial |
|
| Back to top |
|
|
|
|
|
|
|
|
|
|
|
| Author |
Message |
Gaff87
Community Member
Joined: 05 Oct 2008
Posts: 1727
Location: United Kingdom
|
| Posted: Wed May 06, 2009 8:59 am Post subject: |
|
|
Thank you Nexus!!!
I'm gonna give this ago later on i think, hopefully it'll turn out as good as yours.
Thank you again  |
|
| Back to top |
|
|
|
|
|
|
|
|
|
|
|
| Author |
Message |
BeastMaster
Community Member
Joined: 19 Jul 2007
Posts: 994
Location: UK
|
| Posted: Wed May 06, 2009 6:37 pm Post subject: |
|
|
woweee!  hats down to you Nexus! that is a massive task you've undertaken there, so huge kudos and appreciation for doing this. hats down to you Nexus! that is a massive task you've undertaken there, so huge kudos and appreciation for doing this.
right! gonna have me some origami fun!
_________________
"F*ck it, it's just a movie. Let him worry about it" Harrison Ford |
|
| Back to top |
|
|
|
|
|
|
|
|
|
|
|
| Author |
Message |
Krilltok
Joined: 06 Feb 2013
Posts: 8
|
| Posted: Tue Sep 23, 2014 3:45 am Post subject: |
|
|
Can anyone repost the folding instructions for Gaffs chicken please, I have looked everywhere and cannot a true likeness.
Many thanks |
|
| Back to top |
|
|
|
|
|
|
|
|
|
|
|
| Author |
Message |
Nexus6
Community Member
Joined: 15 May 2006
Posts: 473
Location: Off-World Colonies
|
| Posted: Thu Sep 25, 2014 11:37 pm Post subject: |
|
|
If I still have all the photos, I'll repost them tomorrow evening (OR Saturday morning, depending on when I have better availability).
_________________
|
|
| Back to top |
|
|
|
|
|
|
|
|
|
|
|
| Author |
Message |
Krilltok
Joined: 06 Feb 2013
Posts: 8
|
| Posted: Fri Sep 26, 2014 3:33 am Post subject: |
|
|
| Nexus6 wrote: | | If I still have all the photos, I'll repost them tomorrow evening (OR Saturday morning, depending on when I have better availability). |
Your a star thank you |
|
| Back to top |
|
|
|
|
|
|
|
|
|
|
|
| Author |
Message |
Bwood
Community Member
Joined: 20 Sep 2009
Posts: 843
|
|
| Back to top |
|
|
|
|
|
|
|
|
|
|
|
| Author |
Message |
Krilltok
Joined: 06 Feb 2013
Posts: 8
|
| Posted: Sun Sep 28, 2014 3:19 pm Post subject: |
|
|
Thanks Bwood I have seen this diagram before but the legs are a bit long in this model and the back doesn't quite match, I did fold this model was hoping Nexus6 could shed some light on his own modifications |
|
| Back to top |
|
|
|
|
|
|
|
|
|
|
|
| Author |
Message |
Nexus6
Community Member
Joined: 15 May 2006
Posts: 473
Location: Off-World Colonies
|
| Posted: Mon Sep 29, 2014 12:34 am Post subject: |
|
|
OK, as of right now, the photos seem to be working. To make one that is totally screen-accurate, certain folds may need to be tweaked for varying lengths & whatnot. I wasn't actively looking at screencaps when I did this tutorial, so some of the angles may differ.
Anyway, there it is...
_________________
|
|
| Back to top |
|
|
|
|
|
|
|
|
|
|
|
| Author |
Message |
Krilltok
Joined: 06 Feb 2013
Posts: 8
|
| Posted: Mon Sep 29, 2014 3:15 am Post subject: |
|
|
| Thanks Nexus6 the images are perfect, will post my folded chicken when I get it done |
|
| Back to top |
|
|
|
|
|
|
|
|
|
|
|
| Author |
Message |
Replicant 13
Community Member

Joined: 18 Jul 2011
Posts: 912
Location: OffWorld Park, USNA
|
| Posted: Wed Oct 01, 2014 12:06 am Post subject: PAPER CHASE |
|
|
Thanks NEXUS 6!
I've found references online and elsewhere, but never anything so comprehensive. I've attempted this "simple" little project over the years with limited success.
Now with this extra guide, perhaps we can succeed.
- R13
_________________
.png) Gosh, you've really got some nice toys here . . . Gosh, you've really got some nice toys here . . . |
|
| Back to top |
|
|
|
|
|
|
|
|
|
|
|
| Author |
Message |
Nexus6
Community Member
Joined: 15 May 2006
Posts: 473
Location: Off-World Colonies
|
| Posted: Wed Oct 01, 2014 11:23 pm Post subject: |
|
|
More than happy to help. If there are any questions, I'll do my best to answer them.
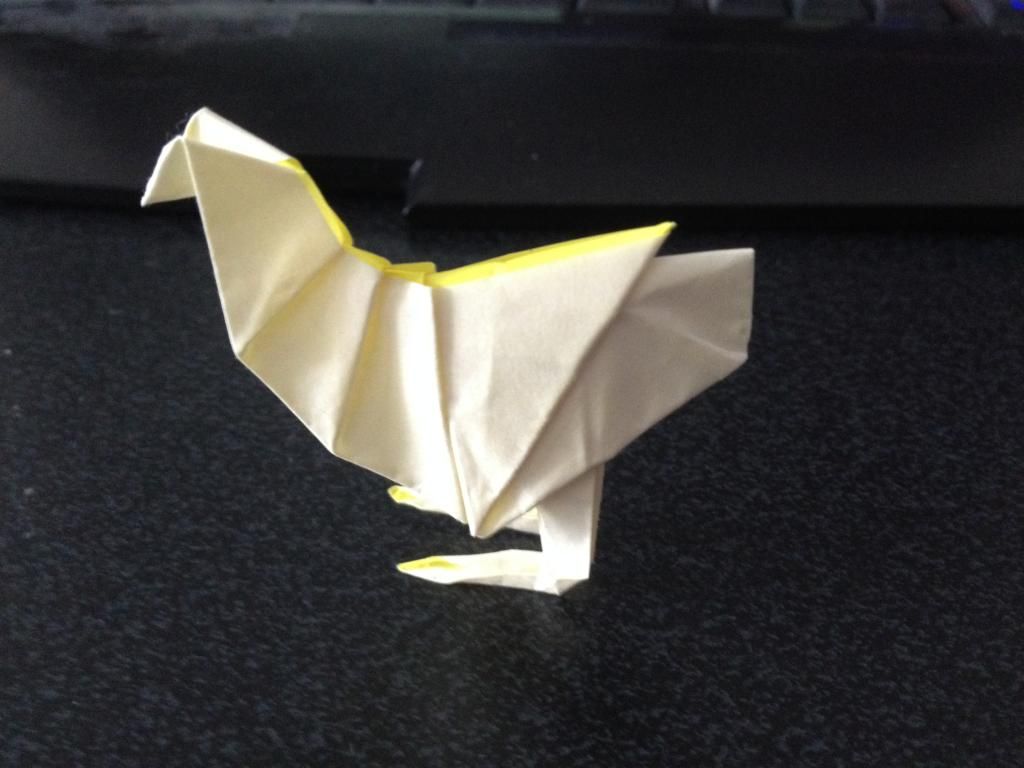
OT: Here's a somewhat lackluster cellphone pic of the chicken (& matchstick-man) I made for my display:

_________________
|
|
| Back to top |
|
|
|
|
|
|
|
|
|
|
|
| Author |
Message |
Krilltok
Joined: 06 Feb 2013
Posts: 8
|
| Posted: Thu Oct 02, 2014 3:53 pm Post subject: |
|
|
Well here's my attempt at Gaffs chicken I used 15cm kami paper (colour folded on the inside). Its a little rough round the edges, feet need work and i did snip the beak to shape for neatness. I did find that the model would not balance if the legs were any further forward as per movie prop.
Nice pic Nexus6 the Stick man is my next project (can do a real nice unicorn every time).
 |
|
| Back to top |
|
|
|
|
|
|
|
|
|
|
|
|
You cannot post new topics in this forum
You cannot reply to topics in this forum
You cannot edit your posts in this forum
You cannot delete your posts in this forum
You cannot vote in polls in this forum
|
|
|
|
|
|
|
|


