 |
 |
|
 |
|
| Author |
Message |
Jedirick
Community Member
Joined: 01 Nov 2006
Posts: 311
|
 Posted: Wed Mar 28, 2007 7:19 pm Post subject: Posted: Wed Mar 28, 2007 7:19 pm Post subject: |
 |
|
Interesting color and texture.
 |
|
| Back to top |
|
|
|
|
 |
|
 |
|
|
|
|
| Author |
Message |
Jedirick
Community Member
Joined: 01 Nov 2006
Posts: 311
|
| Posted: Wed Mar 28, 2007 7:21 pm Post subject: |
|
|
| Looks interesting anyway |
|
| Back to top |
|
|
|
|
|
|
|
|
|
|
|
| Author |
Message |
andy
Community Guide

Joined: 01 Nov 2006
Posts: 6237
Location: Rochester, NY
|
| Posted: Wed Mar 28, 2007 11:04 pm Post subject: |
|
|
| I like the texture...you could also try coating the inside of the mold with some sand before putting the Poly in. If it is the polurathane you are using. it should be paintable with the right kind of paint anyway. |
|
| Back to top |
|
|
|
|
|
|
|
|
|
|
|
| Author |
Message |
Jedirick
Community Member
Joined: 01 Nov 2006
Posts: 311
|
| Posted: Thu Mar 29, 2007 12:58 am Post subject: |
|
|
Urethane foam is funy stuff. The most stable and predictable of the rigid foams but it'll still do some weird stuff. Technically if it is not a self skinning foam it's not supposed to take paint. This took primer but i think it is because it is 15# foam.
I thought about sand but tried metal powder once with foam and as heavy as it was, the foam kick boiled majority of the powder away from the casts facing and trapped it inside the resin where it did no good.
The painted tile effect is very nice but also costly. OK for a one of but it takes about $4 just in texture paint. I don't think even 2 tiles can be painted from contents of one can.
BTW, this ain't my tile. |
|
| Back to top |
|
|
|
|
|
|
|
|
|
|
|
| Author |
Message |
andy
Community Guide
Joined: 01 Nov 2006
Posts: 6237
Location: Rochester, NY
|
| Posted: Thu Mar 29, 2007 1:20 am Post subject: |
|
|
| I can no longer find the link to the company that made the "stone look" polyureathane. They used it to make rock climbing walls and fake stone landscaping as well as to fire and sound proof rooms. Most of the stuff though, was cold grey and maybe not so nice for this idea. My google searches have come up with a lot of different companies, but none with the stuff I want. There is a place in china that makes it by the can, but that would be silly unless you are only making a very few tiles. Most of the stuff I have seen also costs quite a bit to get in the large tanks. If I were to make a large number of the tiles it would make sense at that point. I have yet to get that far yet. I want to try one or two first. the vacuum form ones may be what I am after just to use as is and maybe later make a mold with it. Also if it isn't treated with a fire retardant it is highly flamable. |
|
| Back to top |
|
|
|
|
|
|
|
|
|
|
|
| Author |
Message |
nickdaring
Community Member

Joined: 16 Dec 2006
Posts: 261
|
| Posted: Thu Mar 29, 2007 5:40 am Post subject: |
|
|
In addition to the Ennis tile, I'd say almost half of Decakrds apartment is done in a rough rock texture 16 inch tile of the same color. In some parts of the apartment it takes up the lower wal and in others entire wals are made of this featureless tile.
Nick |
|
| Back to top |
|
|
|
|
|
|
|
|
|
|
|
| Author |
Message |
Jedirick
Community Member
Joined: 01 Nov 2006
Posts: 311
|
| Posted: Thu Mar 29, 2007 7:54 am Post subject: |
|
|
| I'm beating my head agaainst the wall over not saving the EB house virtual tour site photos. I know i saw at least 5 different styles of 16" tiles. meaning plain and variations of filled and hollow portions of the textile block. |
|
| Back to top |
|
|
|
|
|
|
|
|
|
|
|
| Author |
Message |
Jedirick
Community Member
Joined: 01 Nov 2006
Posts: 311
|
| Posted: Thu Mar 29, 2007 7:59 am Post subject: |
|
|
 |
|
| Back to top |
|
|
|
|
|
|
|
|
|
|
|
| Author |
Message |
Jedirick
Community Member
Joined: 01 Nov 2006
Posts: 311
|
| Posted: Thu Mar 29, 2007 8:00 am Post subject: |
|
|
I need to go back and edit these images. I cut the size in half before I posted. Darn things evidently were poster sized!  |
|
| Back to top |
|
|
|
|
|
|
|
|
|
|
|
| Author |
Message |
sethb6025
Community Member

Joined: 22 Dec 2006
Posts: 248
Location: York, PA US
|
| Posted: Thu Mar 29, 2007 12:53 pm Post subject: |
|
|
The finish looks pretty accurate. Thats probably what I'm going to use, cost be damned.
_________________
Wait; I'm having one of those things! You know; a headache with pictures? |
|
| Back to top |
|
|
|
|
|
|
|
|
|
|
|
| Author |
Message |
eltee
Community Member
Joined: 31 Oct 2006
Posts: 437
Location: West Coast USA
|
| Posted: Thu Mar 29, 2007 1:15 pm Post subject: |
|
|
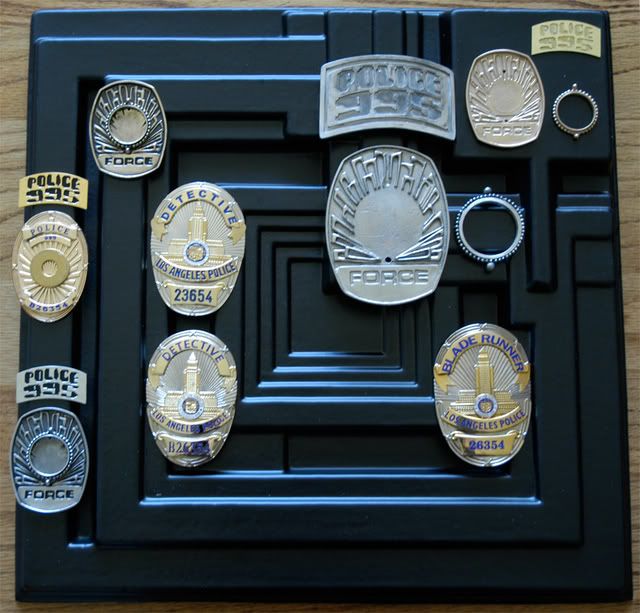
I think mine is a vacuform version. Pretty clean, I used it to photograph my metal badges. Don't know if I will finish/paint it or not.
Last edited by eltee on Thu Mar 29, 2007 1:57 pm; edited 1 time in total |
|
| Back to top |
|
|
|
|
|
|
|
|
|
|
|
| Author |
Message |
andy
Community Guide
Joined: 01 Nov 2006
Posts: 6237
Location: Rochester, NY
|
| Posted: Thu Mar 29, 2007 1:16 pm Post subject: |
|
|
| I want something darker...Rick I think I have most of those photos...I will see what I can come up with tonight when I get back home. |
|
| Back to top |
|
|
|
|
|
|
|
|
|
|
|
| Author |
Message |
IGNITERS
Community Member

Joined: 14 Feb 2007
Posts: 251
Location: EDMONTON
|
| Posted: Thu Mar 29, 2007 1:31 pm Post subject: man..... |
|
|
nice badge tease.....
_________________
I've seen things ....you people appear to be intrested in ... |
|
| Back to top |
|
|
|
|
|
|
|
|
|
|
|
| Author |
Message |
Jedirick
Community Member
Joined: 01 Nov 2006
Posts: 311
|
| Posted: Thu Mar 29, 2007 2:19 pm Post subject: |
|
|
Actually the color is slightly darker than image shows. I'd be happy with a bit more warmth in the color. Thinking maybe an undercoat in a soft yellow may bring out more of a warm tone.
Wish I had a reliable color reference based on original blocks and any variations thereof. |
|
| Back to top |
|
|
|
|
|
|
|
|
|
|
|
| Author |
Message |
Jedirick
Community Member
Joined: 01 Nov 2006
Posts: 311
|
| Posted: Thu Mar 29, 2007 9:53 pm Post subject: |
|
|
Now this is too expensive to consider. I used overpours from film prop projects. Poured a white slow set resin and then layered with a clear set that takes 48 hours to demold time and 4-5 to cure completely. 
However may have come up with a more versatile and economical way to do this.


What I am thinking about doing is using a quickset Smooth-on amber resin to do a partial pour like the white resin above. Then instead of using a clear resin, the partial por could be pulled and a backing of any color solid or transparent acrylic sheet could be used. translucent for backlighting or solid for display contrast. Imagine a black acrylic sheet where the clear is now or a blue translucent...
The sheet of acrylic could be screwed in instead of permanently fixed, giving even more versatility in display!
Thoughts?
Hopefully tomorrow I will do measured pours of, Ultracal30, solid resin and 15lb rigid foam. That will give me an idea of actual cost to produce tiles. |
|
| Back to top |
|
|
|
|
|
|
|
|
|
|
|
| Author |
Message |
andy
Community Guide
Joined: 01 Nov 2006
Posts: 6237
Location: Rochester, NY
|
| Posted: Thu Mar 29, 2007 10:13 pm Post subject: |
|
|
I am beginning to like very much  |
|
| Back to top |
|
|
|
|
|
|
|
|
|
|
|
| Author |
Message |
andy
Community Guide
Joined: 01 Nov 2006
Posts: 6237
Location: Rochester, NY
|
| Posted: Thu Mar 29, 2007 10:44 pm Post subject: |
|
|
here's a few pics I have of the house that might be of help


 [/img] [/img] |
|
| Back to top |
|
|
|
|
|
|
|
|
|
|
|
| Author |
Message |
Art Deckard
Community Member

Joined: 21 Mar 2007
Posts: 280
Location: UK
|
| Posted: Fri Mar 30, 2007 12:43 am Post subject: |
|
|
I think Ricks done a great job. Are you planning to make a lighted block with the sections cut out? Maybe with opalescent glass or perspex?
Most of the shots we see of the EBH blocks are external ones and so they have been weathered by many years of LA sun and rain. The ones inside (don't have any pics to hand) are a lot smoother and the motif is sharply defined. The patterned ones in Deckards pad look a bit wobbly to me probably down to a poor vac job.
As the colouring of concrete (or whatever material you are using) seems complicated and a tad expensive ( due to trial and error) I suppose paint is the way to go. I found this company online who do a 'stone' textured paint. Browse to their colour swatches. Its more of a sandstone look but will do the job.
http://www.charlesproducts.co.uk/index.htm |
|
| Back to top |
|
|
|
|
|
|
|
|
|
|
|
| Author |
Message |
Art Deckard
Community Member
Joined: 21 Mar 2007
Posts: 280
Location: UK
|
| Posted: Fri Mar 30, 2007 12:48 am Post subject: |
|
|
| nickdaring wrote: | In addition to the Ennis tile, I'd say almost half of Decakrds apartment is done in a rough rock texture 16 inch tile of the same color. In some parts of the apartment it takes up the lower wal and in others entire wals are made of this featureless tile.
Nick |
Thats right. As is a lot of the EBH house itself.
Also worth knowing is that the ceiling is 6' 8'' which is a height of 5 blocks. |
|
| Back to top |
|
|
|
|
|
|
|
|
|
|
|
| Author |
Message |
nickdaring
Community Member
Joined: 16 Dec 2006
Posts: 261
|
| Posted: Fri Mar 30, 2007 2:03 am Post subject: |
|
|
How bout mixing sand into your paint mix and then brushing it on.
Sorta like how the old army helmets used little bits of cork in the paint to give a textured surface.
Nick |
|
| Back to top |
|
|
|
|
|
|
|
|
|
|
|
|
You cannot post new topics in this forum
You cannot reply to topics in this forum
You cannot edit your posts in this forum
You cannot delete your posts in this forum
You cannot vote in polls in this forum
|
|
|
|
|
|
|
|


