 |
 |
|
 |
|
| Author |
Message |
amish
Community Guide
Joined: 11 Apr 2006
Posts: 1433
Location: Outside Philadelphia
|
 Posted: Fri Apr 27, 2007 4:18 pm Post subject: Posted: Fri Apr 27, 2007 4:18 pm Post subject: |
 |
|
Understood  Just trying to be a good neighbor...lol Just trying to be a good neighbor...lol
Pete, you know I value your opinion 
edit: That smiley just doesnt look right ^^^
_________________
www.propsummit.com
www.bladerunnerprops.com |
|
| Back to top |
|
|
|
|
 |
|
 |
|
|
|
|
| Author |
Message |
sethb6025
Community Member

Joined: 22 Dec 2006
Posts: 248
Location: York, PA US
|
| Posted: Sat Apr 28, 2007 6:45 pm Post subject: Seth's entries |
|
|
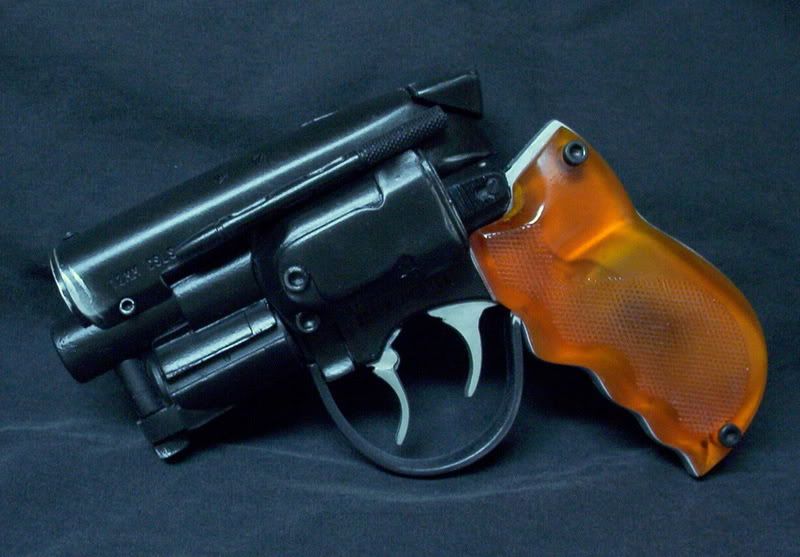
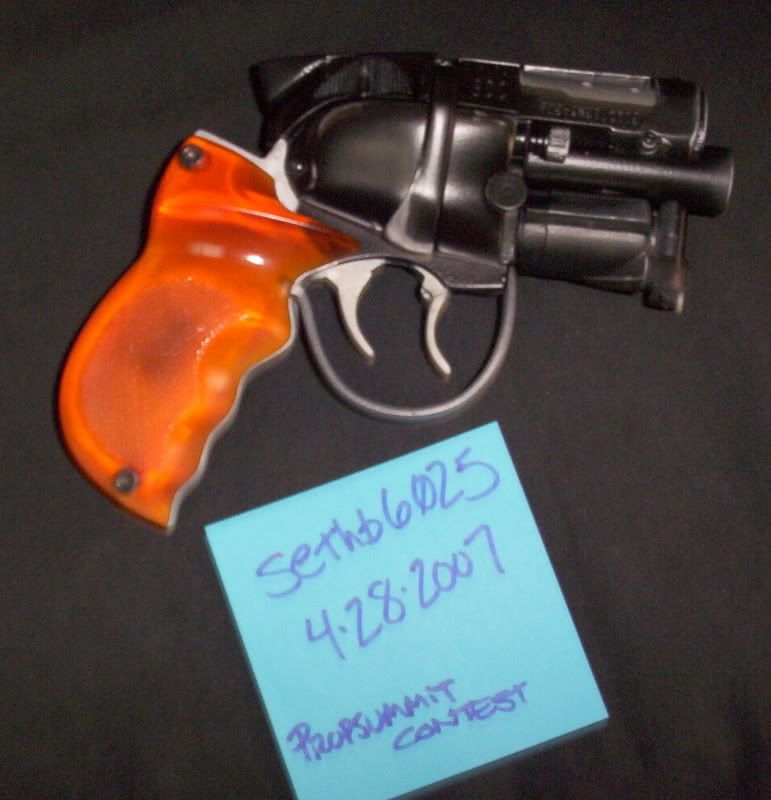
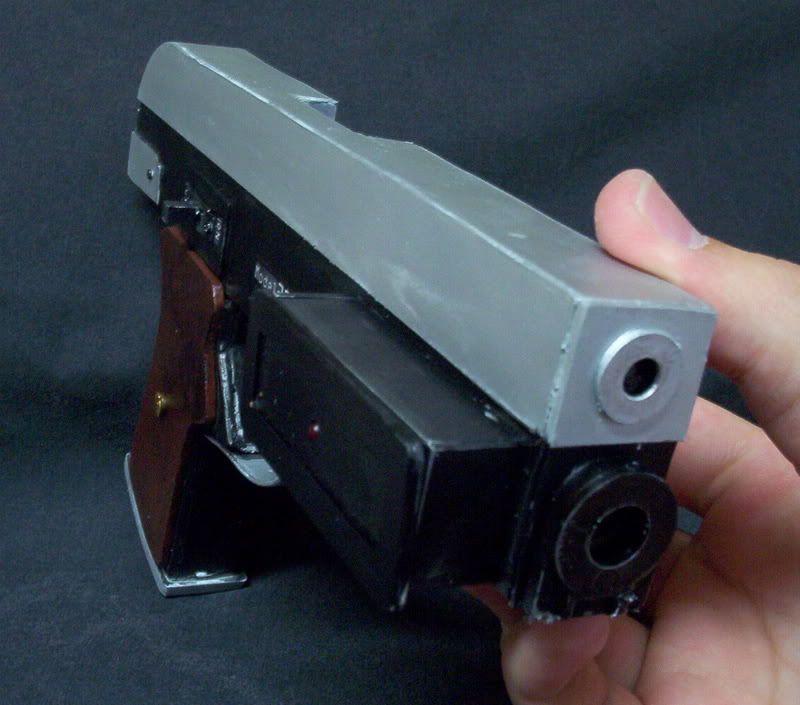
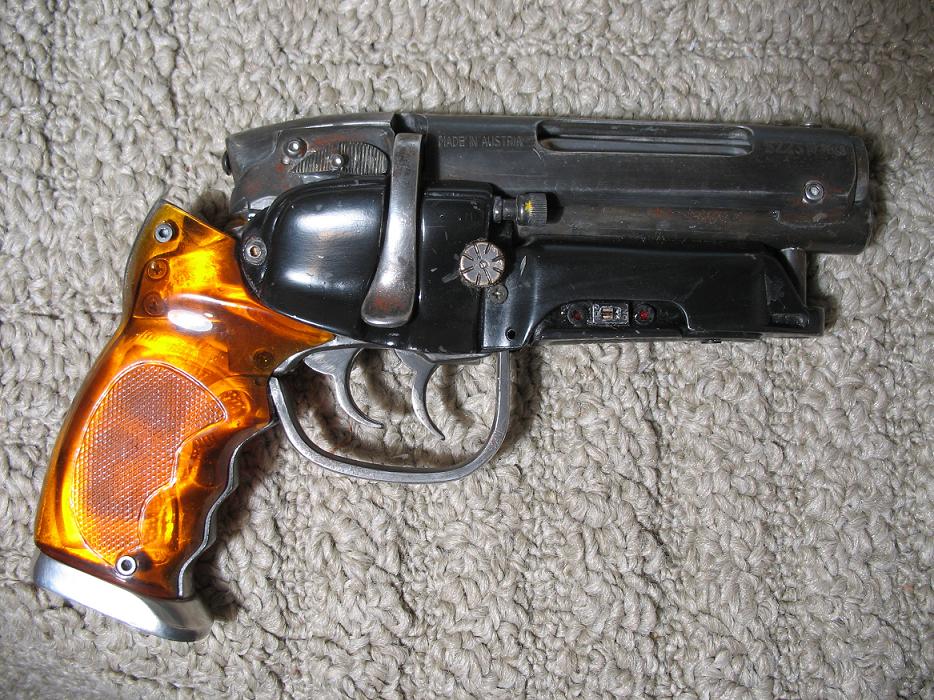
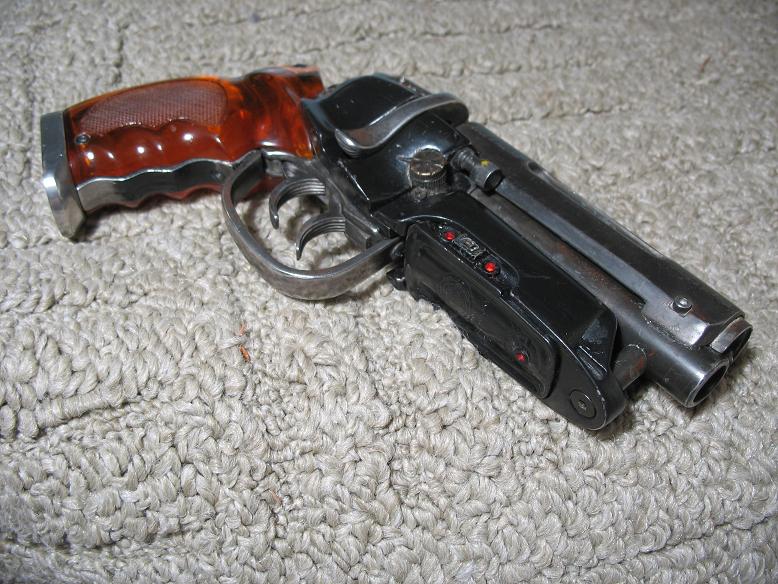
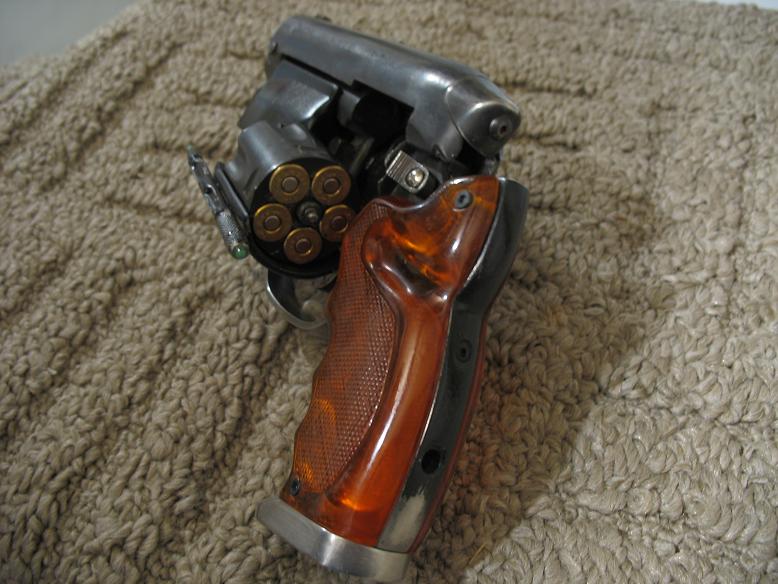
First off I am proud to present my Rick Ross SNUB, two tone weathered & I sanded the grip so the "metal" area is flush with the orange grip shape, it feels nice in your hand. I have to add LED's still, but am having a friend do the wiring so I don't screw it up.

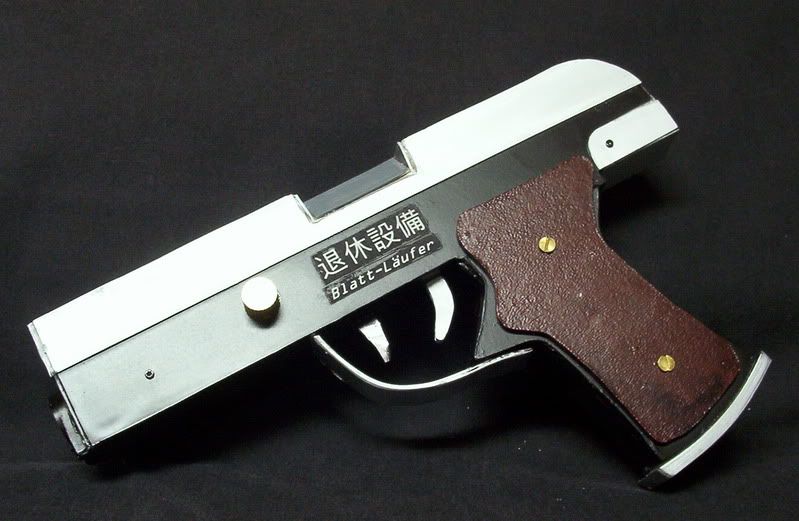
Here is my custom scratch-build, I wanted to try a more squarish, hard-lined design as opposed to the more organic look of the real pistol. The "battery" is removable for neat-ness.  Its not the prettiest thing on earth, but at my pace it would be months before I could submit something perfect. Its not the prettiest thing on earth, but at my pace it would be months before I could submit something perfect.

_________________
Wait; I'm having one of those things! You know; a headache with pictures? |
|
| Back to top |
|
|
|
|
|
|
|
|
|
|
|
| Author |
Message |
IGNITERS
Community Member

Joined: 14 Feb 2007
Posts: 251
Location: EDMONTON
|
| Posted: Tue May 01, 2007 8:27 pm Post subject: IGNITERS entry...(with name and date) |
|
|
well,here is my entry with a couple updates(I forgot to put the name card sorry ,i will add tomorrow)since I already have posted photos of it on this site you can see the subtle differences mostly lighting lol and I made my own scope knob ,changed out more of the screws for accurate ones so ...enjoy! (NOW WITH UPDATE OF NAME AND DATE)


_________________
I've seen things ....you people appear to be intrested in ...
Last edited by IGNITERS on Fri May 04, 2007 12:04 pm; edited 1 time in total |
|
| Back to top |
|
|
|
|
|
|
|
|
|
|
|
| Author |
Message |
Birdie
Community Member
Joined: 15 May 2006
Posts: 99
|
| Posted: Tue May 01, 2007 9:39 pm Post subject: |
|
|
Here's my custom magnum. I always wanted to do an all-black, and since I'm fascinated by the Japanese/Chinese elements of the movie, I figured Tokyo Blade runner was the way to go.


Last edited by Birdie on Wed May 02, 2007 1:51 pm; edited 1 time in total |
|
| Back to top |
|
|
|
|
|
|
|
|
|
|
|
| Author |
Message |
amish
Community Guide
Joined: 11 Apr 2006
Posts: 1433
Location: Outside Philadelphia
|
|
| Back to top |
|
|
|
|
|
|
|
|
|
|
|
| Author |
Message |
darkknight0667
Community Guide

Joined: 11 Apr 2006
Posts: 799
Location: Land O Lakes, FL
|
| Posted: Wed May 02, 2007 9:08 am Post subject: |
|
|
It's gonna be a bitch to judge. I've already changed my mind twice. And that's just this morning. Fantastic work so far, everyone. I'm looking forward to seeing what else is entered.
_________________
Pete |
|
| Back to top |
|
|
|
|
|
|
|
|
|
|
|
| Author |
Message |
Timmay!

Joined: 05 May 2007
Posts: 9
Location: The wilds of Oregon
|
| Posted: Mon May 07, 2007 6:09 pm Post subject: Mine! |
|
|
Tom encouraged me to enter this in the contest, so here ya go...
This is one of the original Rick Ross PKD Snub kits that I bought from him back in 2001. Over the years, I've contemplated various ways to finish off my PKD kits (as they sat languishing in storage) in different and interesting schemes. When Rick re-issued the Snub and the Magnum recently, it started the gears turning in my head anew, and for the past month or two I've had a real itch to build a kit... and I really wanted to see what I could do with this one.


I re-molded the grips and cast them in tinted resin to produce the ivory grips that I had envisioned. I also wanted to do manufacturer's logo grip medallions, very much like Smith & Wesson. So I picked up a couple books on monograms, found one that I thought I could work with, modified it slightly, and then took it to a place that makes rubber stamps. Now usually when a stamp is made, the stamp itself is reversed, so the impression that it makes reads right. Well, I reversed my artwork... so when they made the stamp, IT read right. I then molded it and cast up my grip medallions:

Other than that, the build was pretty much straight-forward. I did drill out and replace all of the screws with real steel ones, and I also replaced the thumbscrews on the side and the bottom. The blue LEDs were original to Rick's first issue Snub kits. As for the color, I knew I wanted something kinda' different, as well as something in a bit of a "warm" tone, to compliment the ivory grips. After sampling a couple different colrs, I settled on Testor's Model Master "Burnt Metal" Buffing Metalizer.
 |
|
| Back to top |
|
|
|
|
|
|
|
|
|
|
|
| Author |
Message |
sethb6025
Community Member
Joined: 22 Dec 2006
Posts: 248
Location: York, PA US
|
| Posted: Mon May 07, 2007 8:24 pm Post subject: |
|
|
Man, that is beautiful! I love the grips & logo. 
_________________
Wait; I'm having one of those things! You know; a headache with pictures? |
|
| Back to top |
|
|
|
|
|
|
|
|
|
|
|
| Author |
Message |
Once-bitten
Banned!
Joined: 18 Apr 2007
Posts: 1317
|
| Posted: Tue May 08, 2007 8:15 am Post subject: |
|
|
Awesome Job!
Looking at this makes me want to order another snubbie from Rick...and I havent even recieved my first one yet! Have to be patient until tomorrow... |
|
| Back to top |
|
|
|
|
|
|
|
|
|
|
|
| Author |
Message |
Noeland
Community Guide
Joined: 24 Oct 2006
Posts: 1328
|
| Posted: Tue May 08, 2007 6:21 pm Post subject: |
|
|
| Quote: | | It's gonna be a bitch to judge. |
You ain't kidding.  Nice to see that snubbie here. Nice to see that snubbie here.
Question - The testors "buffing" paint, is it difficult to use? I never have. I'm guessing it was airbrushed on?
_________________
I don't have enough blasters! |
|
| Back to top |
|
|
|
|
|
|
|
|
|
|
|
| Author |
Message |
Timmay!
Joined: 05 May 2007
Posts: 9
Location: The wilds of Oregon
|
| Posted: Tue May 08, 2007 8:17 pm Post subject: |
|
|
| Noeland wrote: | | Question - The testors "buffing" paint, is it difficult to use? I never have. I'm guessing it was airbrushed on? |
Yeah, it's strictly airbrush applied. Using it isn't any different than any other paint... it's a pretty potent lacquer though, so I would highly recommend adequate ventilation 
About 10 minutes after you spray it on you can buff it with a soft cloth, and that brings it to life. They have a clearcoat that they recommend applying after that, but in my opinion it kinda' kills the effect, so I leave it off. If you do that though, you gotta be careful not to handle the painted surfaces too much or they will start to dull. |
|
| Back to top |
|
|
|
|
|
|
|
|
|
|
|
| Author |
Message |
andy
Community Guide

Joined: 01 Nov 2006
Posts: 6237
Location: Rochester, NY
|
| Posted: Tue May 08, 2007 9:52 pm Post subject: |
|
|
It is getting harder and harder to pick my favorites. Maybe I should have convinced Amish to have a second and third place prize as well. I may have to dig up some stuff to add to the prizes. Great stuff guys. I am also for extending the contest to the end of May if anybody else needs time to finish and even let upgrades and finishing touches be done to those already entered.
Andy |
|
| Back to top |
|
|
|
|
|
|
|
|
|
|
|
| Author |
Message |
superjedi
Community Member

Joined: 02 Apr 2007
Posts: 389
Location: Newport News, VA
|
| Posted: Thu May 10, 2007 7:51 pm Post subject: |
|
|
I used the metalizer spray paints. I think the results were really nice.
Same procedure: spray it on, wait a while (I waited about an hour), then buff with a soft cloth. I didn't use a clear coat either.
_________________
I find your lack of faith disturbing. . . |
|
| Back to top |
|
|
|
|
|
|
|
|
|
|
|
| Author |
Message |
KarlBud420
Community Member
Joined: 19 Apr 2006
Posts: 125
Location: Ashburn, VA
|
| Posted: Fri May 11, 2007 1:48 pm Post subject: |
|
|
Man, I've really got to pick up an airbrush soon.
I'm using Rustoleum rattle cans for most of my blaster paintwork and it's a real bitch to get a perfect finish on them.
Those metalizer paints look great!
My entry will be ready just as soon as I can figure out how to wire my LEDs (never done electrical stuff before so I'll be amazed if I don't shock myself to death or burn my hands with the soldering iron) and find a solution to the ammo clip power switch problem.
I see a bunch of people scratch built their switch boxes, but if possible, I'd like to have a functioning switch that is the right size/shape to fit between the lights. 
If anyone has a lead on the switch, let me know...of course, you might want to wait until after the contest.
It's been a long, tough road but the end is in sight for your humble narrator...
Bruce[/i][/u] |
|
| Back to top |
|
|
|
|
|
|
|
|
|
|
|
| Author |
Message |
KarlBud420
Community Member
Joined: 19 Apr 2006
Posts: 125
Location: Ashburn, VA
|
| Posted: Tue May 15, 2007 8:04 pm Post subject: |
|
|
Well, after months of sitting in its box, the motivation struck me to finally get working on this when I heard about the PropSummit BR blaster building contest.
It was painted with real gun blue and Rustoleum high gloss enamel for the black parts.
So without further adieu, I proudly present my (almost) finished all metal BR blaster.
First, a couple of overall shots of both sides:


The back end:

The hammer area with extra space drilled out:

The front end probe:

And with probe retracted via the cocking lever:

The underside of the cylinder cover was Dremeled out to reveal the cylinder per Karl's excellent WorldCon photos. That's a real Weaver 344 scope knob that I scored from eBay a while back before the supply got real scarce.

The slide stopping groove was also Dremeled out although I didn't drill out the molded screw since I was having trouble finding button head hex screws in town:

Added the little screws on the ammo clip with the little grey disc made out of Aves Apoxie Sculpt:

Ammo clip magnetic attachment system:

LEDs lit up (the most nerve wracking part of this build as I had never done any electronics work, but I got that sucker to light up and then figured out the switch system, hah!)

Modified front trigger (drilled groove and cut down the front tab as shown in the photos):

I still need to stop by the hardward store for a large hex screw for the bottom of the ammo clip (I'm still using the phillips head included with the kit) and I had hoped to find a proper sized switch box to go in between the LEDs on the right side, and may get around to custom sculpting one from Aves, but for now I'm content.
As everyone else has said, it's a heavy bugger! I thought it was bad before I put the bullets in it, but after, it's a real beast.
Thanks for looking!
Forgot the dated picture:

Bruce |
|
| Back to top |
|
|
|
|
|
|
|
|
|
|
|
| Author |
Message |
darkknight0667
Community Guide
Joined: 11 Apr 2006
Posts: 799
Location: Land O Lakes, FL
|
| Posted: Wed May 16, 2007 2:40 pm Post subject: |
|
|
OKay! Enough already!
I didn't sign on for this "hard decision" crap. Tom told me this would be an easy gig. Couldn't we have just had one really talented guy and then a bunch of hacks? But NOOOOOO! You guys want to make me work for this decision, don't you?
Curse all of you incredibly talented buggers. 
_________________
Pete |
|
| Back to top |
|
|
|
|
|
|
|
|
|
|
|
| Author |
Message |
amish
Community Guide
Joined: 11 Apr 2006
Posts: 1433
Location: Outside Philadelphia
|
|
| Back to top |
|
|
|
|
|
|
|
|
|
|
|
| Author |
Message |
airhead
Community Member
Joined: 31 Oct 2006
Posts: 43
Location: Indiana, USA
|
| Posted: Sat May 26, 2007 7:04 pm Post subject: Yet another sidkit |
|
|
Well you get a bunch of pewter-type parts.

I wanted a working firing pin, so I "machined" one out of a nail, using my drill and a couple of files. It's epoxied into the bolt.

Things have been sitting around polished and partly painted. I tried some cold blue and got an interesting effect, but not exactly what I was looking for, so I experimented with the Testors metallizer paints. The frame and cyclinder are titanium.


The black parts are gloss Dupli-Color. The kit came short a bunch of screws, so I had to dig to find matches. No little metric allen head cap screws in town. I'm still waiting to find one to attach the safety thumb slide on the Styer receiver. It's painted with the burnt metal -darker, and the barrel is stainless.

Now that I see the effect of the metallizers, I think that I may strip the buttplate and grip frame - they are both black now - and use the darker burnt metal. It looks close to a dark gun blue and the airbrush puts just enough down to color the metal without dimming the polish.
 |
|
| Back to top |
|
|
|
|
|
|
|
|
|
|
|
| Author |
Message |
KarlBud420
Community Member
Joined: 19 Apr 2006
Posts: 125
Location: Ashburn, VA
|
| Posted: Sun May 27, 2007 8:30 am Post subject: |
|
|
I've said it before, but it bears repeating:
Those Testors Metalizer paints look great!
I like the uniform application and coverage as opposed to the unpredictable results of gun blue.
Good job airhead!
I'm glad the decision is for someone else to make and not me.
Bruce |
|
| Back to top |
|
|
|
|
|
|
|
|
|
|
|
| Author |
Message |
amish
Community Guide
Joined: 11 Apr 2006
Posts: 1433
Location: Outside Philadelphia
|
| Posted: Sun May 27, 2007 10:01 am Post subject: |
|
|
Good lord this is going to be really tuff!!! Right now I wish I had a kit for everyone as it would make life so much easier!!!
All of the entries are top notch!
_________________
www.propsummit.com
www.bladerunnerprops.com |
|
| Back to top |
|
|
|
|
|
|
|
|
|
|
|
|
You cannot post new topics in this forum
You cannot reply to topics in this forum
You cannot edit your posts in this forum
You cannot delete your posts in this forum
You cannot vote in polls in this forum
|
|
|
|
|
|
|
|


