 |
 |
|
 |
|
| Author |
Message |
jinxed
Community Member
Joined: 28 Sep 2010
Posts: 50
|
 Posted: Sun Oct 17, 2010 6:00 pm Post subject: Gathering tools for my first kit build. Coyle blaster #28!! Posted: Sun Oct 17, 2010 6:00 pm Post subject: Gathering tools for my first kit build. Coyle blaster #28!! |
 |
|
So I have in my possession a RACprops blaster kit #28/50. Thanks Rich!
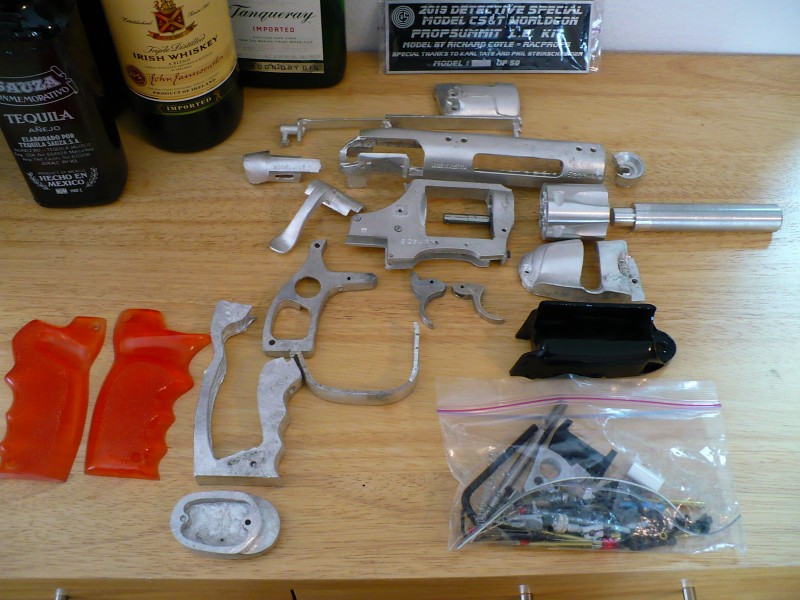
I cannot tell you how excited I am to get going on the build. This being my first kit, and basically my first prop build period...I want to go in as prepared as possible.
I have read through Rich's photobucket build instructions over and over to familiarize myself with the pieces, parts, steps and tips. I have done the same with the appropriate build threads here. In the meantime I've been gathering the tools and setting up a workspace.
I am nearly ready to go, but for one stumbling block. Drill bits and taps. I have sourced a couple locally, but a couple ain't gonna cut it.
From Rich's instructions I have put together the following list:
Bits/taps:
#21 - 10/32 (found)
#30 - 8/32
#43 - 4/40 (found)
#44 - 3/48
Additional wire gauge bits:
#12
#21
#33
#35
#40
#46
#50
As you can see...I am a "bit" short. OK...a lot short.
I have hit all the local hardware places, Lowes, Home Depot, ACE...no luck. I can only assume I'll need to go online for the rest, but where?
We do have a Grainger local, but I think they they are wholesale to business only. Need to call tomorrow to verify that.
I can see this being an ongoing interest, so if there is a good reliable place for this stuff your experience is appreciated.
I will document my progress once it starts.
Thanks!
Brad |
|
| Back to top |
|
|
|
|
 |
|
 |
|
|
|
|
| Author |
Message |
steevy
Community Member
Joined: 25 Jul 2007
Posts: 389
|
| Posted: Sun Oct 17, 2010 7:16 pm Post subject: |
|
|
I see you have the booze ready in case frustration sets in.  |
|
| Back to top |
|
|
|
|
|
|
|
|
|
|
|
| Author |
Message |
racprops
Community Member

Joined: 30 Oct 2006
Posts: 2450
Location: Phoenix AZ
|
| Posted: Sun Oct 17, 2010 7:28 pm Post subject: |
|
|
Are you in the US or somewhere else...(Sorry poor memoury, cheap chips...)
Rich
_________________
I never have enough time to do all I want to do! |
|
| Back to top |
|
|
|
|
|
|
|
|
|
|
|
| Author |
Message |
jinxed
Community Member
Joined: 28 Sep 2010
Posts: 50
|
| Posted: Sun Oct 17, 2010 8:01 pm Post subject: |
|
|
| racprops wrote: | Are you in the US or somewhere else...(Sorry poor memoury, cheap chips...)
Rich |
Hey Rich! I'm in Denver. I just sent you a PM too. |
|
| Back to top |
|
|
|
|
|
|
|
|
|
|
|
| Author |
Message |
Robotprops
Community Member

Joined: 11 Apr 2010
Posts: 280
Location: Vancouver, B.C.
|
| Posted: Mon Oct 18, 2010 12:37 am Post subject: |
|
|
Grainger here (Canada) sells to anyone. The prices aren't the best though. If you have the equivalent of a KMS Tools, Princess Auto or Summit Tools you can get a really decent set of taps and dies for a really reasonable price.
Invest in a nice set of fine files, micro drivers(hex) and a good selection of fine wet/dry sandpapers. Keep your Dremel and all of its accessories handy.
Good luck on the build! Can't wait to see it. |
|
| Back to top |
|
|
|
|
|
|
|
|
|
|
|
| Author |
Message |
propsjonnyb
Community Member
Joined: 16 Jul 2009
Posts: 476
Location: Helmdon, Northamptonshire UK
|
| Posted: Mon Oct 18, 2010 5:37 am Post subject: |
|
|
If your not familiar with drilling and tapping, I'd recommend using a Drill press and tapping tool, MicroMark do an excellent hobbyists set , as well as all the drill bits and tools - all available mail order - I would strongly suggest getting a small bottle of cutting oil as well, pewter is a very soft metal to work with , so please don't use power tools, if you have too - be very careful as it's very easy to damage a pewter part, all it take is a second - and we've all done it !! OH Yes even me !!
A variable speed Dremmel is an ideal multipurpose tool and so many accessories are available , if you haven't a dremmel, then hand tools are second best ( I actually prefer to hand drill and tap as it allows me better control - but that's a personal preference ) so make sure your press is set up correctly, that you piece is protected and secured in a vice and that you drill and tap in sequence - that way your sure to drill the right hole and tap it with the correct tap , you may find it easier to drill a small pilot hole in all the marked drill points. If you've never done it before, try it out on a scrap test piece first.
I would suggest cleaning and filing all the flash of the parts prior to drilling.
Unless you are expert with a Dremel , I would suggest filing and sanding by hand , use a fine assorted riffer file set and get at least four grades of wet/dry sanding paper - course, medium , fine and very fine (600+) and some very fine steel wool (000) take great care when coming close to the lettering and markings as you don't want to accidentally file or sand them off!
You are trying to get to a smooth 'mirror' finish on all the pieces , personally I'd file all pieces down first , then work sanding all pieces in turn with each grade , finishing off with the steel wool. Now on to polishing , wash and degrease all pieces first and allow to dry - ideally bench polishing is best - but if you haven't got one, not to worry , you can achieve almost the same effect with commercial car polishing products you can buy at any car accessories shop. Auto Glym or Ambusol are two car body polishing products , use lint free cloths ( like J-cloths ) to lightly apply the polish, polish off with a clean one, buff until you get a 'mirror' shine with plenty of elbow grease. The more time you take with the last two sanding stages and polishing , the better your final finish !!
Last edited by propsjonnyb on Mon Oct 18, 2010 7:27 am; edited 1 time in total |
|
| Back to top |
|
|
|
|
|
|
|
|
|
|
|
| Author |
Message |
racprops
Community Member
Joined: 30 Oct 2006
Posts: 2450
Location: Phoenix AZ
|
| Posted: Mon Oct 18, 2010 5:59 am Post subject: |
|
|
Very good advice thanks propsjonnyb.
Rich
_________________
I never have enough time to do all I want to do! |
|
| Back to top |
|
|
|
|
|
|
|
|
|
|
|
| Author |
Message |
joberg
Community Member
.jpg)
Joined: 06 Oct 2008
Posts: 9447
|
| Posted: Mon Oct 18, 2010 7:08 am Post subject: |
|
|
Good luck with the project and I'm eager (as well as other on the board) to see the pics of your progress. It's always a good idea to invest into good tools: it'll make your work less frustrating and the result that much better  |
|
| Back to top |
|
|
|
|
|
|
|
|
|
|
|
| Author |
Message |
racprops
Community Member
Joined: 30 Oct 2006
Posts: 2450
Location: Phoenix AZ
|
| Posted: Mon Oct 18, 2010 7:41 am Post subject: |
|
|
I will add, on the smaller taps, the 4/40 and smaller do not buy imported taps, get good USA Made taps.
Second: use taping oil on every tap run.
And turn in three times and back up two and if the tap starts to tighten or resist BACK it all the way out and clean the tap.
The biggest problem with taps is the flutes get clogged with the cutting chips and can bind and then break off inside your work, backing it out and cleaning it a couple of times can save all your work.
I am glad I did this kit run, as many now can see just how much work goes into building these models, a ton of work in making the masters and molds, but there still is a ton of work cleaning up and finishing the parts and assembly.
One last tip, do not let the idea it is made of metal throw you, think of it as a very hard plastic and go ahead and sand it…most ways of working with plastic model can work with these.
Rich
_________________
I never have enough time to do all I want to do! |
|
| Back to top |
|
|
|
|
|
|
|
|
|
|
|
| Author |
Message |
jinxed
Community Member
Joined: 28 Sep 2010
Posts: 50
|
| Posted: Mon Oct 18, 2010 9:26 am Post subject: |
|
|
This is great info guys, thank you!
This is my first prop kit, and first time working with pewter, but I have done some metal work and machining. I worked manufacturing bicycle frames for a few years. We were building with steel, aluminum, and titanium though. So I've done much of the processes needed, but never with this metal. AND the company obviously had a fully stocked machine shop. Boy do I miss that. We had an account at Grainger, so that's why I was guessing it was wholesale.
As for hand drilling...I like the idea of a slow controlled drill, but how do you keep it level? My drill press is a 5 speed, and I was guessing the slowest would be best?
Obviously tapping is hand operation, and I will use my diamond files for clean up and shaping. I do have a table disk/belt sander to level the bottom of the grips/frame, and any other major shaping that would need to be done.
Speaking of that...I was "tuning" the outer grip frame mating it with the grips...is it normal for pewter to creak when you bend it?
I will be sure to take several pictures and document my first leap into this. |
|
| Back to top |
|
|
|
|
|
|
|
|
|
|
|
| Author |
Message |
racprops
Community Member
Joined: 30 Oct 2006
Posts: 2450
Location: Phoenix AZ
|
| Posted: Mon Oct 18, 2010 11:00 am Post subject: |
|
|
Drill press is a very good idea, and oil the drill bit as well it has the same problems taps do of filling the flutes and jamming.
Drill a little and back off and clear the bit.
Yes it will "sound off" a little...
Rich
_________________
I never have enough time to do all I want to do! |
|
| Back to top |
|
|
|
|
|
|
|
|
|
|
|
| Author |
Message |
propsjonnyb
Community Member
Joined: 16 Jul 2009
Posts: 476
Location: Helmdon, Northamptonshire UK
|
| Posted: Mon Oct 18, 2010 12:24 pm Post subject: |
|
|
| The hobby drill press and tapping guide from Micromark is ideal as it keeps the drill and cutting tap at exactly the right angle for tapping , but if you haven't got a press then use a set square and a couple of blocks of wood as a guide to keep it level and straight , I completely agree with Rich as to regularly backing out and cleaning the taps, a small screwdriver is ideal for this, Pewter is a 'soft' metal in the sense that it will 'give' it can be marked easily with a blunt screwdriver - parts will bend and 'bruse' easily so exercise care , try not to use a lot of force but gentle controlled pressure works well , the 'creaking is a sign that you're near to the shear force point - any more force and pressure beyond that point and the piece will break - also don't use a high speed drill as heat will build up and the pewter will melt and don't leave any piece near a heat source either , the higher temperatire will effect it snd make the piece 'brittle' and could damage it beyond repair . Rich's comment about treating it as a hard plastic is a good one, do not try to treat it like a piece of steel or aluminium and when drilling or polishing use a slow speed, it lends it self to be worked with hand tools very well , which is why its used extensively in the jewelry world and in replica modelling. You metal working skills will do you well, if in doubt go slowly and use hand tools would be the best piece of advice I could give you. |
|
| Back to top |
|
|
|
|
|
|
|
|
|
|
|
| Author |
Message |
nathant
Joined: 18 Oct 2010
Posts: 1
|
| Posted: Mon Oct 18, 2010 5:11 pm Post subject: |
|
|
| Robotprops wrote: | Grainger here (Canada) sells to anyone. The prices aren't the best though. If you have the equivalent of a KMS Tools, Princess Auto or Summit Tools you can get a really decent set of taps and dies for a really reasonable price.
Invest in a nice set of fine files, micro drivers(hex) and a good selection of fine wet/dry sandpapers. Keep your Dremel and all of its accessories handy.
Good luck on the build! Can't wait to see it. |
@ Robotprops: thanks for the shout-out; I work at KMS and it's cool to see all the different things that people do with our stuff.
@ jinxed: We do ship to the US quite regularly; taps and dies are here. We do also carry Auto Glym and a few of the harder-to-find tools. Our 1-800 number (1-800-567-8979) works from the States too and if our guys in Hand Tools can't find what you're after, they can point you in the right direction.
Nathan @ KMS |
|
| Back to top |
|
|
|
|
|
|
|
|
|
|
|
| Author |
Message |
A GUN SHOOTER
Joined: 10 Mar 2011
Posts: 5
|
| Posted: Sun Mar 13, 2011 5:25 am Post subject: |
|
|
Thread necromancy - ARISE!
Im now looking into expanding my toolbase in preparation for a Coyle Kit. Is this the drilling/tapping guide you were referring to Jonny?
http://www.micromark.com/MicroLux-Tapping-Fixture,8363.html
Looks good and they ship international. I might have to order the drills and taps there too as our metric units over here are confusing. :/
edit - I cant believe I just used the words metric and confusing in the same sentence. |
|
| Back to top |
|
|
|
|
|
|
|
|
|
|
|
| Author |
Message |
propsjonnyb
Community Member
Joined: 16 Jul 2009
Posts: 476
Location: Helmdon, Northamptonshire UK
|
| Posted: Thu Mar 24, 2011 8:19 am Post subject: |
|
|
Yes , that's the one ! very easy to use and perfect results every time!
I mostly use metric now , as imperial is unfortunately dying out , Rich has quoted all the metric sizes for all the holes tap and dies and I think on the original first run forum page, listed all the correct sizes for the taps and dies . I marked all the holes with the correct drill/tap size , then drilled all of one size hole first , then tapped all those , then changed drill bits on the to next size ,then tapped those etc until I had drilled and tapped all holes , doing it in sequence like this means you are less likely to miss a hole or tap a hole incorrectly. |
|
| Back to top |
|
|
|
|
|
|
|
|
|
|
|
|
You cannot post new topics in this forum
You cannot reply to topics in this forum
You cannot edit your posts in this forum
You cannot delete your posts in this forum
You cannot vote in polls in this forum
|
|
|
|
|
|
|
|


