 |
 |
|
 |
|
| Author |
Message |
Ki-Djowac
Community Member
Joined: 23 Feb 2012
Posts: 164
Location: Belgium
|
 Posted: Sun Sep 30, 2012 8:37 am Post subject: Total Recall gun Posted: Sun Sep 30, 2012 8:37 am Post subject: Total Recall gun |
 |
|
Hi y'all,
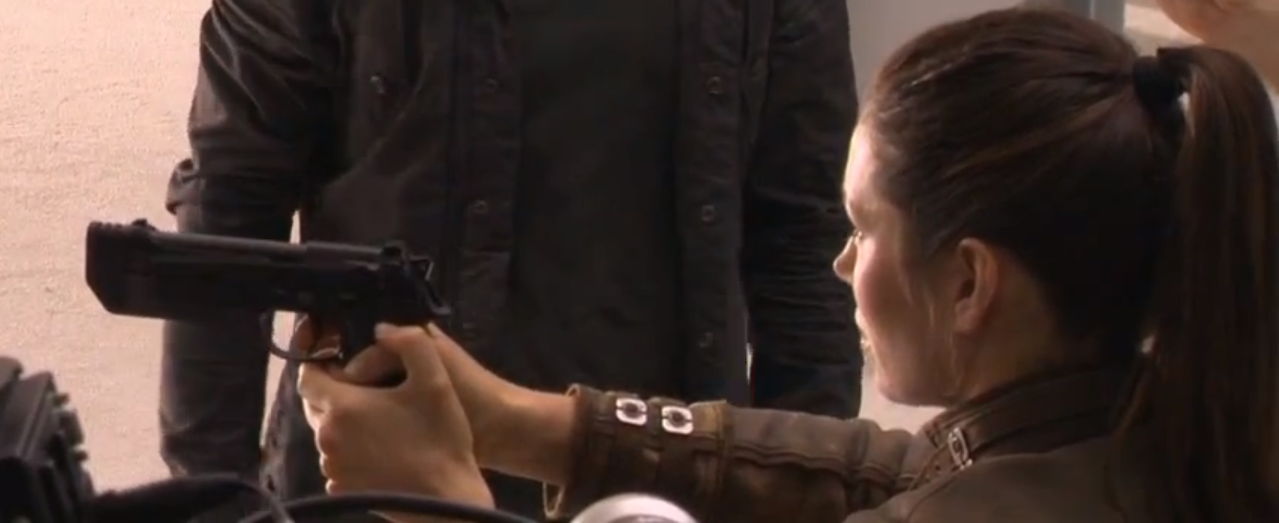
So, me and Jevaho went to the movie theatre some time ago to see Total Recall. There was Jessica Biel, Kate Beckingsale and ... ehm... euh ... lemme think...  Anyways, there were also some kickass guns which we liked. The idea started rolling to build one of them guns. Anyways, there were also some kickass guns which we liked. The idea started rolling to build one of them guns.
http://www.imfdb.org/wiki/Total_Recall_(2012)
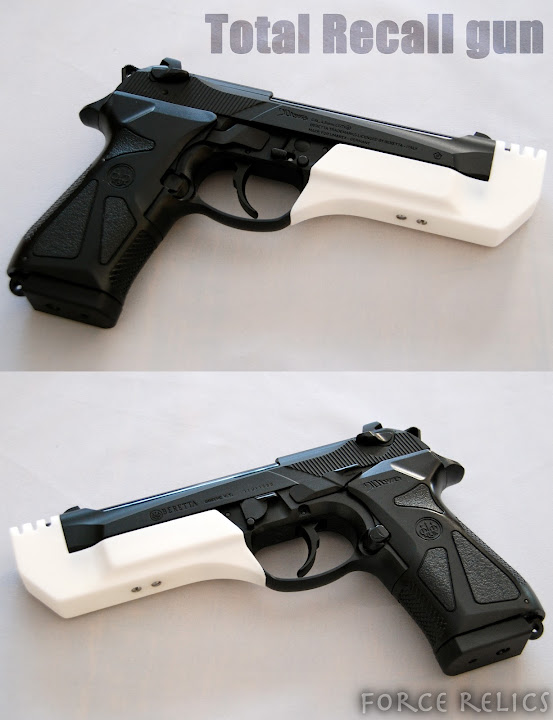
The first one that jumped was the modified Chiappa Rhino 50DS. This proved to be a too big a challenge for now. The other one that came to mind was the 'Jessica gun' which was basically a Beretta 90two with a custom compensator. After some research it turned out Umarex had one of these in a 4,5mm steel bb version. The idea to have a shooting Total Recall gun proved too much fun and so the Total Recall Beretta 90two gun prop came to life.
First point of business was to get a Umarex Beretta 90two 4,5mm steel bb gun which was easy enough. After that is was a matter of studying the print screens from the trailer and getting as much intel on this as possible. There wasn't much around except for the self made print screens and some documantary stuff on youtube. Some pics which i used to study the gun :

The base for this project :

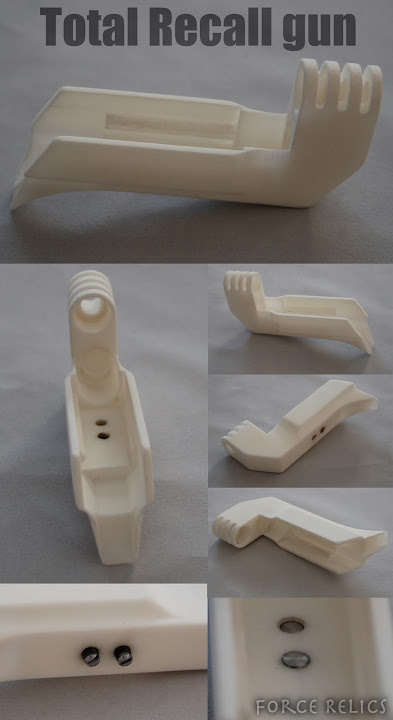
After the Beretta was bought i spent about 1,5 week or so measuring and 3D modelling the compensator. It proved a bit of a challeng as the Beretta had moving parts (no blowback) and i wanted to keep it moving smooth with or without compensator.
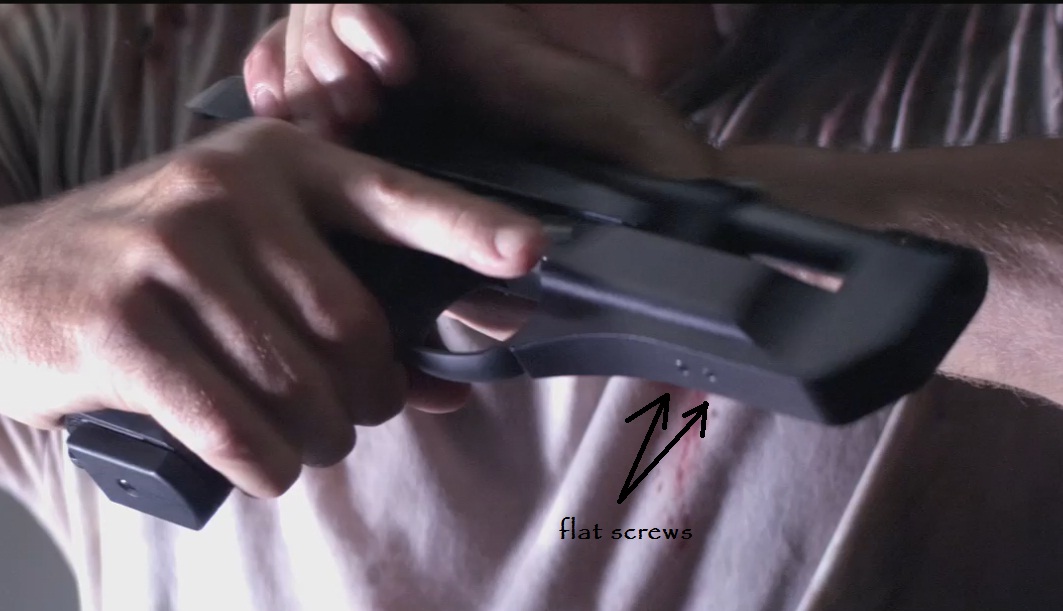
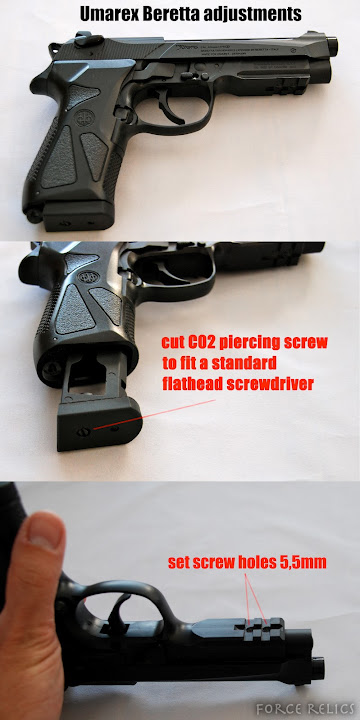
What was done to the Umarex Beretta to make it a bit more accurate :
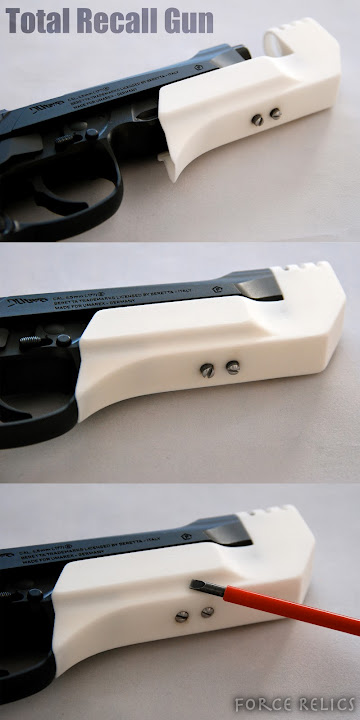
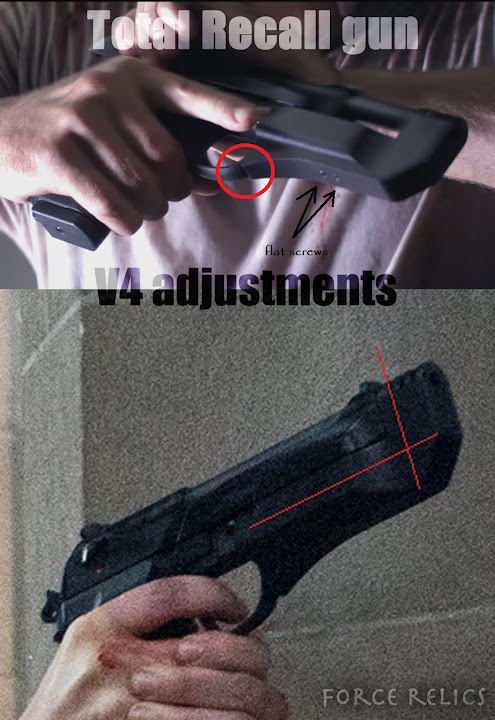
First the CO2 piercing screw was cut and made into a flathead screw. A very easy mod, if not the easiest i've ever done. Secondly, there were some 5,5mm holes drilled where the 2 set screws need to sit in to keep the compensator in place while firing. Also when aiming for screen accuracy the screws were probably there for that same reason. Determining where these holes needed to be made was done in a later stage of the build.
The 3D printed model came in friday and i noticed i was a bit off here and there. 1 mm in the wrong spot and things just don't fit anymore. After the first fit i spent about 10 hours over the next 2 days sanding and carefully dremelling the prototype model. Final result of all this sanding and dremelling :
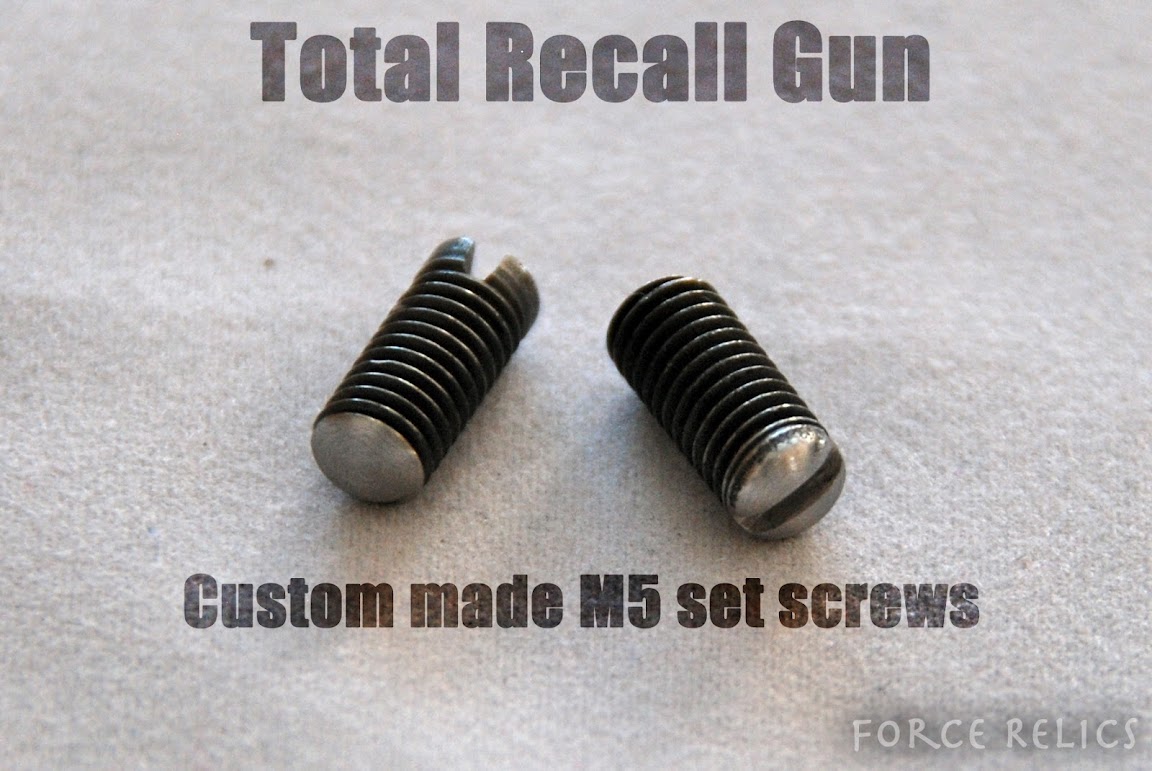
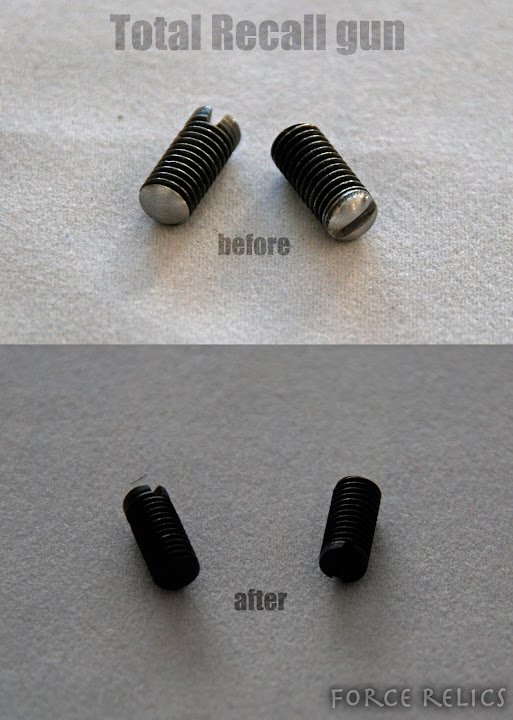
Made 2 custom M5 steel set screws. These were made from standard cut down black steel bolts. Jevaho will bring his gun bleuing stuff over sometime to get hem black again.
The compensator model was tapped with an M5 threading bit and fitted onto the Beretta. At this point the place where the set screw holes in the Beretta needed to be drilled was determined also.

Next up is gun bleuing the set screws and looking for the right kind of black to spraypaint the model and i'm done. 
If there's enough interest i might consider looking into a run, but this will take some time as this prototype needs to re-modelled to avoid some of the intensive sanding and dremmeling that was done here. After that it's back to ordering, fitting, possibly a third re-model, ordering and fitting, ... etc... etc...  |
|
| Back to top |
|
|
|
|
 |
|
 |
|
|
|
|
| Author |
Message |
joberg
Community Member
.jpg)
Joined: 06 Oct 2008
Posts: 9447
|
| Posted: Sun Sep 30, 2012 12:36 pm Post subject: |
|
|
Excellent work Ki-Djowac (I didn't see the gun on the first pic you posted  ) Did you use Shapeway for your 3D piece? ) Did you use Shapeway for your 3D piece?
Eager of course to see it all finished and maybe firing |
|
| Back to top |
|
|
|
|
|
|
|
|
|
|
|
| Author |
Message |
Ki-Djowac
Community Member
Joined: 23 Feb 2012
Posts: 164
Location: Belgium
|
| Posted: Sun Sep 30, 2012 1:49 pm Post subject: |
|
|
Shapeways indeed
I'll look into doing a small vid once done |
|
| Back to top |
|
|
|
|
|
|
|
|
|
|
|
| Author |
Message |
joberg
Community Member
Joined: 06 Oct 2008
Posts: 9447
|
| Posted: Sun Sep 30, 2012 8:11 pm Post subject: |
|
|
| Sounds good! How was the finish on the Shapeway piece?...not too much sanding I hope (apart from the stuff you re-modeled). |
|
| Back to top |
|
|
|
|
|
|
|
|
|
|
|
| Author |
Message |
Ki-Djowac
Community Member
Joined: 23 Feb 2012
Posts: 164
Location: Belgium
|
| Posted: Mon Oct 01, 2012 12:19 am Post subject: |
|
|
Finish was good. Apart from re-modeling i noticed that some lines were printed lightly and they had to be sanded regardless. This would have been minor sanding though.
I'm going to re-model the design and order another one, but i expect this is the case every time. Still very durable and strong stuff though so i don't mind the minor sanding that much.  |
|
| Back to top |
|
|
|
|
|
|
|
|
|
|
|
| Author |
Message |
joberg
Community Member
Joined: 06 Oct 2008
Posts: 9447
|
| Posted: Mon Oct 01, 2012 5:44 am Post subject: |
|
|
Thanks for the info Ki-Djowac  |
|
| Back to top |
|
|
|
|
|
|
|
|
|
|
|
| Author |
Message |
Ki-Djowac
Community Member
Joined: 23 Feb 2012
Posts: 164
Location: Belgium
|
| Posted: Tue Oct 02, 2012 12:11 am Post subject: |
|
|
| You're welcome |
|
| Back to top |
|
|
|
|
|
|
|
|
|
|
|
| Author |
Message |
Ki-Djowac
Community Member
Joined: 23 Feb 2012
Posts: 164
Location: Belgium
|
| Posted: Tue Oct 23, 2012 8:05 am Post subject: |
|
|
Major update :
got the V2 prototype to a finished state just to see where the color scheme would take me and how the screws would look in the design. I tried a sidegloss black, but that was a bad call on my part. What you see is a flat black and compliments the gun alot better.

Some details :
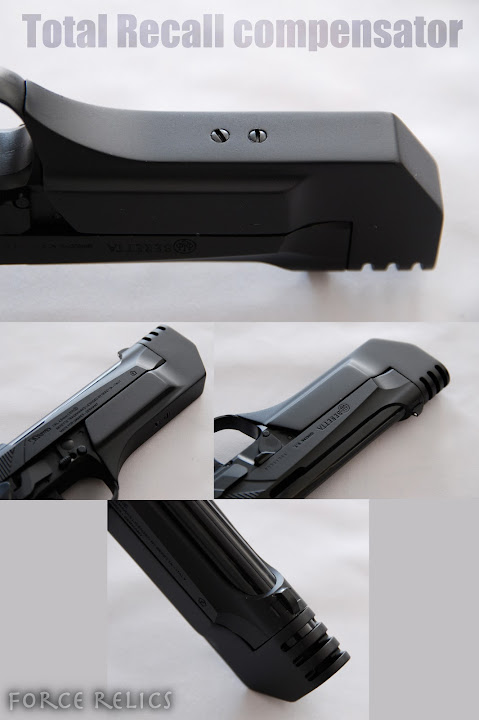
It took me a couple of layers of flat black with the necessary sanding jobs of 600grid in between layers. The look of the screws was achieved by using gun bleuing techniques. Basically purchased a gun blueing kit on e-bay and blackened the screws with it.
V2 had some issues so V4 was designed and printed. V2 needed a careful 10 hour dremmeling job to adjust weaver rail fit, barrel line-up, trigger guard fit, etc ...
Also screen accuracy came into play with V4 and i tried to achieve a more screen accurate corner cut on the front as well as a more accurate trigger guard connection. Lowered the bottom part a couple of mm's too. Pics below show what i mean :
After this was done, V4 was printed and we're almost there. I overdid the trigger guard adjustment in the design and it needs to sit a couple of mm's back towards the trigger guard. Need to try and maintain that straight corner cut that is seen in the print screen pics. Rest of it seems to be done at this point.


Test-fired it today with the V2 compensator in place. Emptied a full CO2 canister with bb's and it fires just as good as before. I was thinking that it may chip off some paint on the front, but nothing happened. It's safe to say the paint job is there to stay |
|
| Back to top |
|
|
|
|
|
|
|
|
|
|
|
| Author |
Message |
joberg
Community Member
Joined: 06 Oct 2008
Posts: 9447
|
| Posted: Tue Oct 23, 2012 6:52 pm Post subject: |
|
|
Most excellent job on that one Ki-Djowac Like the 1st version (trigger gard is hugged by your add-on). I then looked at other screen cap on line and noticed that, in the movie, the add-on piece is not tight against the gard(like your 2nd version).
Eager to see the result on that one also. As for the mat finish it was clearly a good decision since the overall look of the Beretta is mat/satin black |
|
| Back to top |
|
|
|
|
|
|
|
|
|
|
|
| Author |
Message |
Ki-Djowac
Community Member
Joined: 23 Feb 2012
Posts: 164
Location: Belgium
|
| Posted: Thu Oct 25, 2012 12:23 am Post subject: |
|
|
Thx for the input joberg
The V5 should be the final push towards completion. I hope to have the design adjusted and a final V5 print done in the first half of next month after which we'll check into doing a little run |
|
| Back to top |
|
|
|
|
|
|
|
|
|
|
|
| Author |
Message |
joberg
Community Member
Joined: 06 Oct 2008
Posts: 9447
|
| Posted: Thu Oct 25, 2012 7:17 am Post subject: |
|
|
I went to Brussels to visit my family in early October and I was still amazed how easy it is to buy gun replica/airsoft. If I had known I would've bought the same weapon(impossible to find it here in Ottawa, Canada  ). ).
Good luck with the run and the sale |
|
| Back to top |
|
|
|
|
|
|
|
|
|
|
|
| Author |
Message |
Ki-Djowac
Community Member
Joined: 23 Feb 2012
Posts: 164
Location: Belgium
|
| Posted: Fri Oct 26, 2012 12:31 am Post subject: |
|
|
Thx
True, in Belgium we can import/buy airsoft/CO2 guns without too much hassle. Although stores for this are spread thin.
I bought the one you see in the pics in Oostende at the coast. Very small shop, but filled from the ground to the sealing with collectables and a section of CO2 guns and airsoft replicas. |
|
| Back to top |
|
|
|
|
|
|
|
|
|
|
|
| Author |
Message |
joberg
Community Member
Joined: 06 Oct 2008
Posts: 9447
|
| Posted: Fri Oct 26, 2012 7:35 am Post subject: |
|
|
| Thanks for the tip...where in Oostende? My Father would be interested to buy a few weapons(he's an antique weapon collector to boot) |
|
| Back to top |
|
|
|
|
|
|
|
|
|
|
|
| Author |
Message |
Ki-Djowac
Community Member
Joined: 23 Feb 2012
Posts: 164
Location: Belgium
|
| Posted: Fri Oct 26, 2012 12:43 pm Post subject: |
|
|
| joberg wrote: | | Thanks for the tip...where in Oostende? My Father would be interested to buy a few weapons(he's an antique weapon collector to boot) |
Let me link you up :
http://www.timmsshop.com/
small corner shop at the end of the main shopping street. Paid about 120 € at the time i believe.
Another source (cheaper) for (as far as i can tell) the same gun would be this one :
http://www.sportwaffen-schneider.de/product_info.php/products_id/24164 |
|
| Back to top |
|
|
|
|
|
|
|
|
|
|
|
| Author |
Message |
joberg
Community Member
Joined: 06 Oct 2008
Posts: 9447
|
| Posted: Fri Oct 26, 2012 5:38 pm Post subject: |
|
|
| Thanks for the info Ki-Djowac...I'll ask my Father to check it out |
|
| Back to top |
|
|
|
|
|
|
|
|
|
|
|
| Author |
Message |
Ki-Djowac
Community Member
Joined: 23 Feb 2012
Posts: 164
Location: Belgium
|
| Posted: Sat Oct 27, 2012 3:44 pm Post subject: |
|
|
| No problem, good luck |
|
| Back to top |
|
|
|
|
|
|
|
|
|
|
|
| Author |
Message |
Ki-Djowac
Community Member
Joined: 23 Feb 2012
Posts: 164
Location: Belgium
|
| Posted: Sat Nov 10, 2012 5:14 pm Post subject: |
|
|
V5 came in yesterday and i must say, we're there. I'll put pics up soon.
As we're nearing the completion of this compensator project, we're also got pricing in mind. I'll put up an interest thread in the appropriate section ,but we're looking at :
75 € + shipping for a pre-fitted, pre-sanded, pre-threaded + 2 blackened custom set screws.
120 € + shipping for a completely finished version which includes all of the above and 1 layer of primer followed with 3 layers of matt black.
I'll be doing a run of 10 maximum or less depending on interest. |
|
| Back to top |
|
|
|
|
|
|
|
|
|
|
|
| Author |
Message |
Ki-Djowac
Community Member
Joined: 23 Feb 2012
Posts: 164
Location: Belgium
|
| Posted: Sun Nov 11, 2012 6:52 am Post subject: |
|
|
V5 pics :


Proably gonna finish V5 during the week (i hope) |
|
| Back to top |
|
|
|
|
|
|
|
|
|
|
|
| Author |
Message |
joberg
Community Member
Joined: 06 Oct 2008
Posts: 9447
|
| Posted: Sun Nov 11, 2012 4:10 pm Post subject: |
|
|
| Spiffy for sure Ki-Djowac Eager to see it all in black. |
|
| Back to top |
|
|
|
|
|
|
|
|
|
|
|
| Author |
Message |
Ki-Djowac
Community Member
Joined: 23 Feb 2012
Posts: 164
Location: Belgium
|
| Posted: Mon Nov 12, 2012 1:23 am Post subject: |
|
|
Yup, me too
Gonna see if i can find the time to start finalizing the prototype and announce the run soon. |
|
| Back to top |
|
|
|
|
|
|
|
|
|
|
|
|
You cannot post new topics in this forum
You cannot reply to topics in this forum
You cannot edit your posts in this forum
You cannot delete your posts in this forum
You cannot vote in polls in this forum
|
|
|
|
|
|
|
|


