 |
 |
|
 |
|
| Author |
Message |
superjedi
Community Member

Joined: 02 Apr 2007
Posts: 389
Location: Newport News, VA
|
 Posted: Tue Oct 19, 2010 7:14 pm Post subject: Posted: Tue Oct 19, 2010 7:14 pm Post subject: |
 |
|
Starrigger, looks cool!
Are you modeling this in electron-space, or are there physical repros in the works?
_________________
I find your lack of faith disturbing. . . |
|
| Back to top |
|
|
|
|
 |
|
 |
|
|
|
|
| Author |
Message |
Starrigger
Community Member
Joined: 16 Aug 2009
Posts: 202
|
|
| Back to top |
|
|
|
|
|
|
|
|
|
|
|
| Author |
Message |
superjedi
Community Member
Joined: 02 Apr 2007
Posts: 389
Location: Newport News, VA
|
| Posted: Wed Oct 20, 2010 4:14 pm Post subject: |
|
|
Steve,
I checked the other thread, nice work!
I'd love to have one of those chairs, too. 
_________________
I find your lack of faith disturbing. . . |
|
| Back to top |
|
|
|
|
|
|
|
|
|
|
|
| Author |
Message |
Pro Mod
Community Member
Joined: 13 Aug 2010
Posts: 108
Location: Manchester, England
|
|
| Back to top |
|
|
|
|
|
|
|
|
|
|
|
| Author |
Message |
joberg
Community Member
.jpg)
Joined: 06 Oct 2008
Posts: 9447
|
| Posted: Sun Jan 20, 2013 6:37 pm Post subject: |
|
|
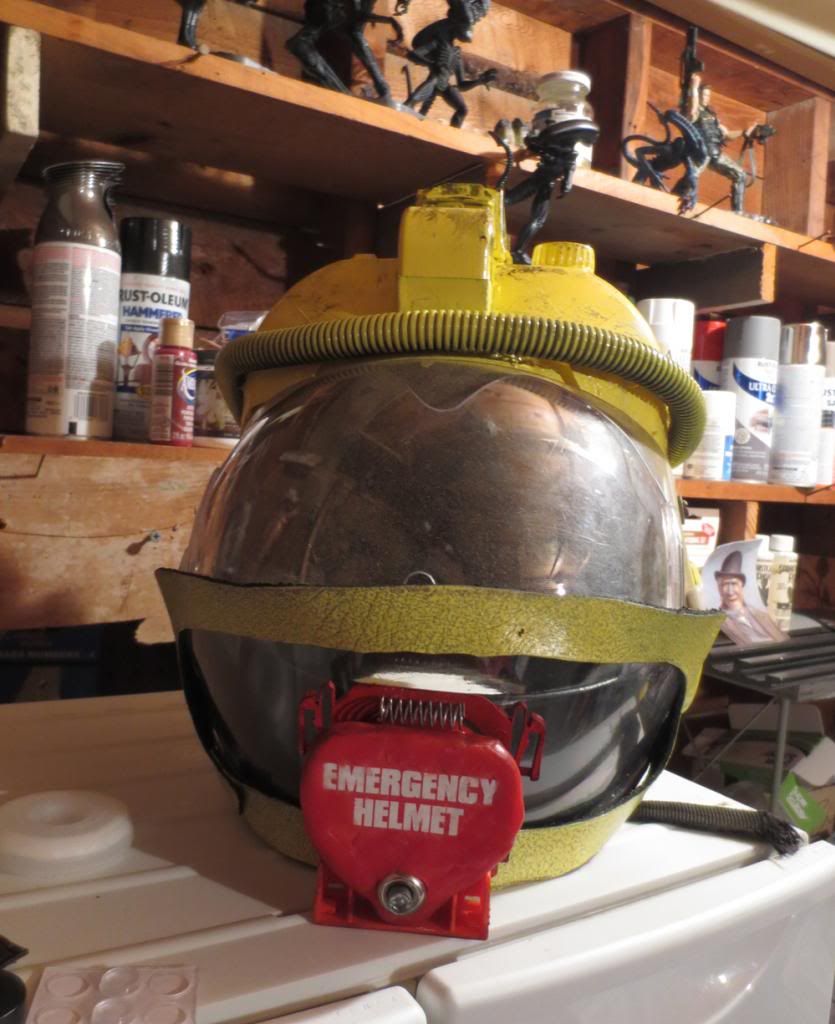
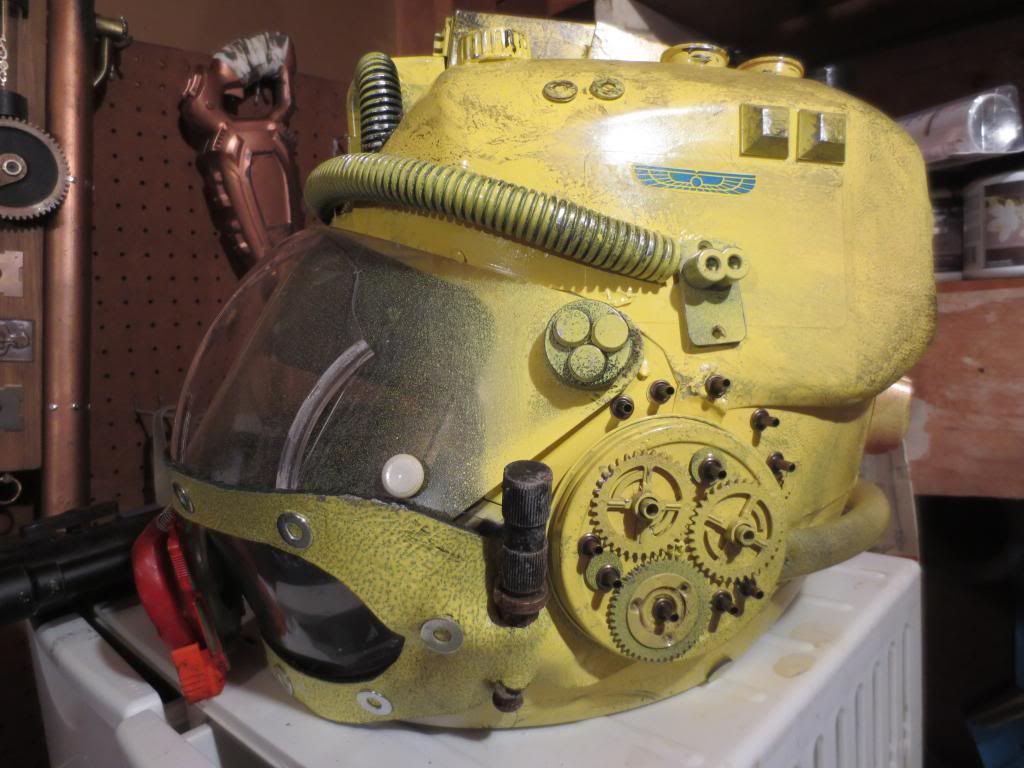
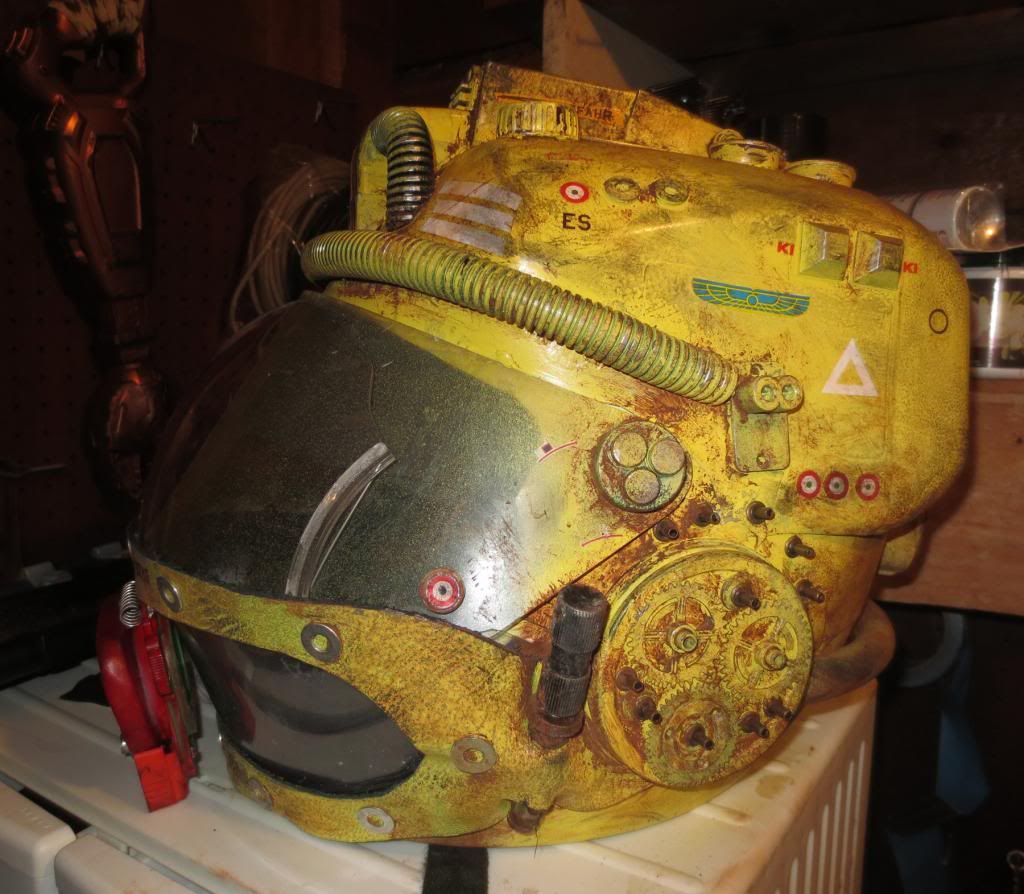
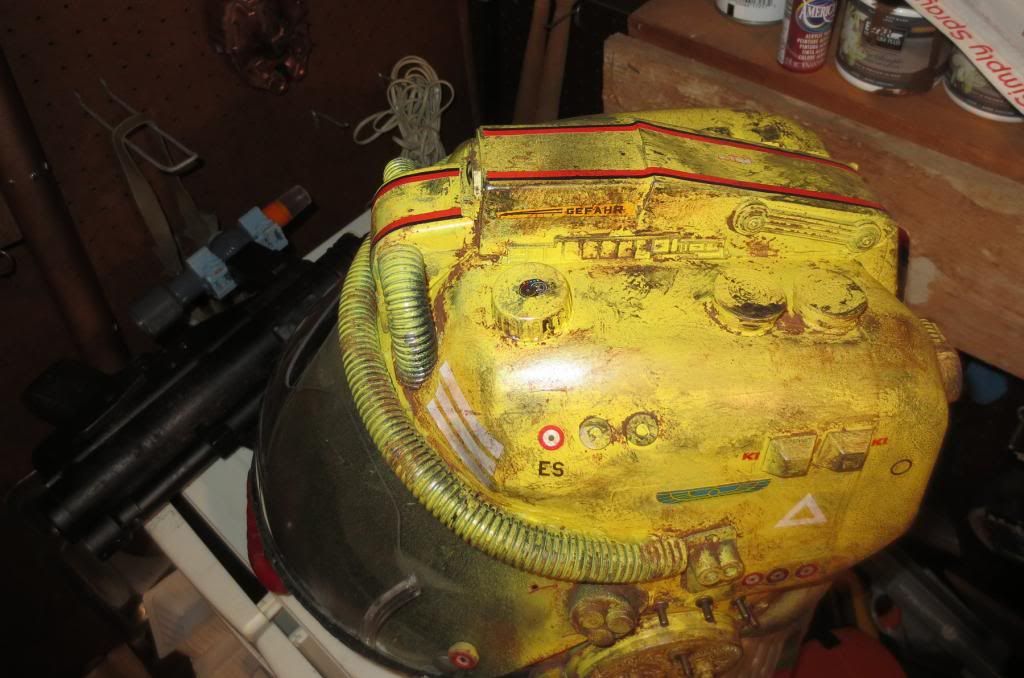
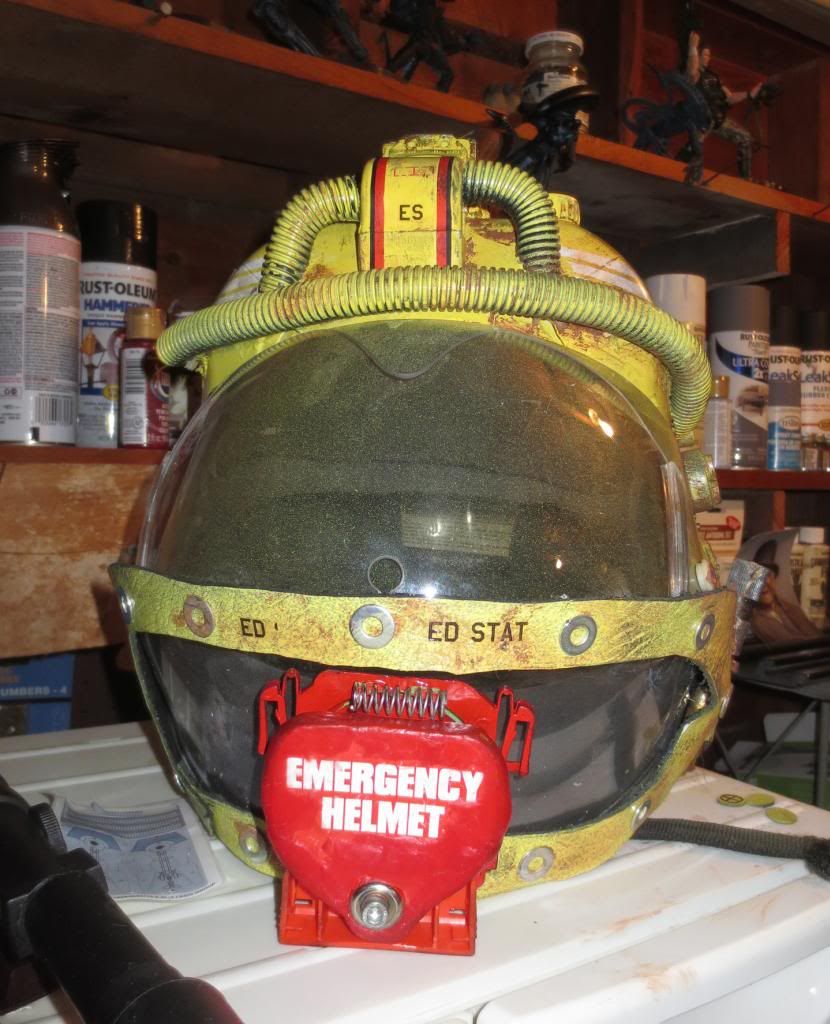
TFS Pro Mod...yes, the emergency helmet was part of a thread here on Propsummit a few years ago (pics from every angles) I don't know if it was Steve, or Morganthirteen or someone else who provided us with the pics (if I've forgotten somebody I apologize).
As for the torch, no good pics exist and I must say, that yours are the only one I know that are showing some side details: very cool pics on that one for sure   |
|
| Back to top |
|
|
|
|
|
|
|
|
|
|
|
| Author |
Message |
Starrigger
Community Member
Joined: 16 Aug 2009
Posts: 202
|
| Posted: Sun Jan 20, 2013 7:56 pm Post subject: |
|
|
| joberg wrote: | TFS Pro Mod...yes, the emergency helmet was part of a thread here on Propsummit a few years ago (pics from every angles) I don't know if it was Steve, or Morganthirteen or someone else who provided us with the pics (if I've forgotten somebody I apologize).
As for the torch, no good pics exist and I must say, that yours are the only one I know that are showing some side details: very cool pics on that one for sure |
It was this thread wasn't it? Fred posted some great images of the helmet, but as for the torch, I have not seen much.
There are actually two torches that were used. the one in Pro Mod's great pictures were for the one that hung over the heads of the rear command seats and the "outrigger" stations
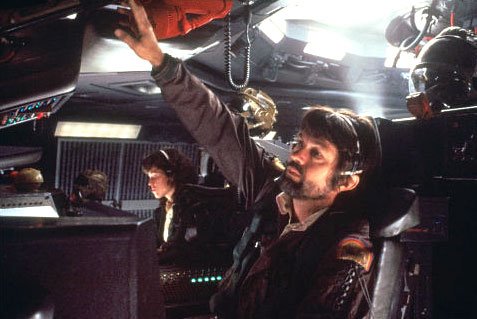
(upper right hand corner)
and then there the ones that sat next to Kane, these were bigger.
 |
|
| Back to top |
|
|
|
|
|
|
|
|
|
|
|
| Author |
Message |
joberg
Community Member
Joined: 06 Oct 2008
Posts: 9447
|
| Posted: Mon Jan 21, 2013 7:42 am Post subject: |
|
|
How could I forget Fred  (mes excuses Fred)...and thanks Starrigger for the pics; you're right, there was 2 kinds, one with an extended base (the long torch wich is small) and the short base (wich is bigger) if that makes sense One of my friend seems to think that these were used for diving. He worked for a number of years diving in the Atlantic repairing oil platforms and he saw some of those used by divers and staff. (mes excuses Fred)...and thanks Starrigger for the pics; you're right, there was 2 kinds, one with an extended base (the long torch wich is small) and the short base (wich is bigger) if that makes sense One of my friend seems to think that these were used for diving. He worked for a number of years diving in the Atlantic repairing oil platforms and he saw some of those used by divers and staff. |
|
| Back to top |
|
|
|
|
|
|
|
|
|
|
|
| Author |
Message |
retrogarde
Community Member
Joined: 29 Dec 2012
Posts: 131
Location: Maine
|
| Posted: Tue Apr 02, 2013 6:10 am Post subject: |
|
|
I am making an Emergency Helmet as set decoration for a project I'm working on. It won't be 100% accurate, but hopefully it will capture enough of the character to be recognizable to Alien fans. I'll post some progress pictures when I get a chance.
I'd sure love to find one of those flashlights too! |
|
| Back to top |
|
|
|
|
|
|
|
|
|
|
|
| Author |
Message |
joberg
Community Member
Joined: 06 Oct 2008
Posts: 9447
|
| Posted: Tue Apr 02, 2013 7:15 am Post subject: |
|
|
We'll be watching for sure Retrogarde; not a lot of people have tackled that helmet for good reasons. As far as the flash light is concerned, there's no news on that front I'm afraid  |
|
| Back to top |
|
|
|
|
|
|
|
|
|
|
|
| Author |
Message |
retrogarde
Community Member
Joined: 29 Dec 2012
Posts: 131
Location: Maine
|
| Posted: Tue Apr 02, 2013 11:18 am Post subject: |
|
|
Indeed! I'm scratchbuilding mine out of found items so it will be more of an homage than an exact copy. After reading through this whole thread and realizing just how hard it would be to track down the original parts, I decided that it was still worth trying to make one even if it isn't perfect. For the most part I'm happy with my progress, but that red cap on the front is a real bugger.
I'm in the planning stages for an indie web mini-series set on the fringes of the Alien universe (i.e. no Giger aliens or Fox trademarks), and this site has been a huge inspiration. I've modified a drinking bird, made half a dozen Aspen Beer cans, recreated the Balaji cigarette package and tracked down the tupperware cups and Slim Jim ashtray. I've also recreated the airlock latch from the Sulaco (though not as expertly as Mike Rush!) and some Colonial Marine bits. I'm working on a very accurate Dropship helmet at the moment as well as a not-so-accurate Nostromo pistol (again for set decoration).
If the mini-series doesn't pan out I'm still going to have a pile of fun Alien(s) props to enjoy, right? |
|
| Back to top |
|
|
|
|
|
|
|
|
|
|
|
| Author |
Message |
joberg
Community Member
Joined: 06 Oct 2008
Posts: 9447
|
| Posted: Tue Apr 02, 2013 5:12 pm Post subject: |
|
|
Thatisityougottapostpics   Yep, you did it with all those props you made...and it's true, if it doesn't pan out, you'll have all those for a nice collection Yep, you did it with all those props you made...and it's true, if it doesn't pan out, you'll have all those for a nice collection  Eager to see what you got. Eager to see what you got. |
|
| Back to top |
|
|
|
|
|
|
|
|
|
|
|
| Author |
Message |
retrogarde
Community Member
Joined: 29 Dec 2012
Posts: 131
Location: Maine
|
| Posted: Wed Apr 03, 2013 5:26 am Post subject: |
|
|
So here goes!
First is a shot of the front of the helmet with my drinking bird, ash tray and an Aspen Beer can (plus a friend up above):
Right off the bat I need to say that this is still early in the build. I'm a long way from being done, in fact I'm a long way from even being able to weather it, so please excuse the Nostromo Yellow paint job.
This next photo shows some of the detail on the top of the helmet. These bits range from rubber furniture bumpers (the square ones) to plastic bottle caps and old sewing machine parts.
I still need the two ribbed tubes on the front that make right angles off the center ridge, but my design is lacking the flat space where they connect above the top visor on the original so I will need to get creative with tapering the sides where they meet the vertical surface.
The red plug on the front needs to be modified. I made the pear shaped bit out of foam but it has the wrong texture. I'm considering removing it and spraying it with rubber or covering it with wax. Regardless it needs something to make it more uniform.
Thoughts so far? |
|
| Back to top |
|
|
|
|
|
|
|
|
|
|
|
| Author |
Message |
joberg
Community Member
Joined: 06 Oct 2008
Posts: 9447
|
| Posted: Wed Apr 03, 2013 7:09 am Post subject: |
|
|
I think that you got the overall look for sure. I like the way you recycled old pieces of plastic to use them as wiggets (greeblies). Love the visor and you did a fairly good job on that red piece.
Keep up the good work! |
|
| Back to top |
|
|
|
|
|
|
|
|
|
|
|
| Author |
Message |
retrogarde
Community Member
Joined: 29 Dec 2012
Posts: 131
Location: Maine
|
| Posted: Wed Apr 03, 2013 8:10 am Post subject: |
|
|
Thanks! It started life as a cheap motorcycle helmet with portions of two plastic milk jugs glued on the top. Now that it is coming along I think it will look enough like the original to be recognized.
Mine is technically wearable too, but i'm not sure if it will get any screen time in that capacity just yet. I have a day dream of fleshing out Dallas and Parker's military back story using these helmets, the pistol that Kane carried, heck even the jeep-like vehicle that was in the "garage". I feel like there's more than enough to expand on the universe with these little tidbits. |
|
| Back to top |
|
|
|
|
|
|
|
|
|
|
|
| Author |
Message |
retrogarde
Community Member
Joined: 29 Dec 2012
Posts: 131
Location: Maine
|
| Posted: Thu Apr 11, 2013 6:00 am Post subject: |
|
|
I thought I'd posted these already!
I've since added a bunch of extra details including the "right angle" tubing on the forehead, the "garden hose" along the neck, and some greeblies on the ear section. More painting as well. I'll post updated photos soon. |
|
| Back to top |
|
|
|
|
|
|
|
|
|
|
|
| Author |
Message |
joberg
Community Member
Joined: 06 Oct 2008
Posts: 9447
|
| Posted: Thu Apr 11, 2013 7:44 am Post subject: |
|
|
Looks good...do mind the "used look"; generaly you'll have to go with layers of many tones and colours to achieve it.
Try not to be to "organized" and go for the random (us humans have a tendency to go for the routine of matching one side like the other).
I don't know what you're using as a wash, but don't be shy in your choice of colour (browns, silver, rust) and ask yourself questions: is the helmet solid plastic, or metal and if so, when I grab it, where do I put my hands and where are my hands now that I'm putting it on my head, am I touching a particular spot again and again, etc...
Keep up the good work and post pics of your progress |
|
| Back to top |
|
|
|
|
|
|
|
|
|
|
|
| Author |
Message |
retrogarde
Community Member
Joined: 29 Dec 2012
Posts: 131
Location: Maine
|
| Posted: Thu Apr 11, 2013 8:20 am Post subject: |
|
|
Yeah, this is a very rough first pass. Based on Stephen210's description earlier in the thread I am using olive drab, black, silver (as well as a bit of copper) on top of the yellow base coat. Now I know Stephen said it wasn't actually yellow, but that is the way it reads on film and I want to be sure to keep some of that. But I agree, the dirt and scratches need to feel organic, not just slapped on with a paint brush.
I think the red front cap looks a lot better after the wax was applied. Still not 100% but at least it looks utilitarian.
I have a bunch of water slide decals saved up to use on this as well, since the original was just covered with markings. Again I'm not looking to match it exactly. This is more of a later model, say 2163 or so. My project is set in 2179, so this will be a well worn piece of equipment that came with the ship.
I'm also going to attempt a scratch build of one of the orange flashlights. It's just too iconic to ignore! |
|
| Back to top |
|
|
|
|
|
|
|
|
|
|
|
| Author |
Message |
retrogarde
Community Member
Joined: 29 Dec 2012
Posts: 131
Location: Maine
|
| Posted: Mon Apr 22, 2013 5:36 am Post subject: |
|
|
More progress on the helmet:

The greeblies on the ear piece still need to be painted and weathered, and I still need to add the two tubes above the WY logo. There is a large blank space to the right of that logo that needs something, but I'm not sure what yet.
The stripes across the top of the mohawk are about to go on as well, and some water slide decals. Then more weathering. Always more weathering! |
|
| Back to top |
|
|
|
|
|
|
|
|
|
|
|
| Author |
Message |
joberg
Community Member
Joined: 06 Oct 2008
Posts: 9447
|
| Posted: Mon Apr 22, 2013 7:01 am Post subject: |
|
|
| Starting to get the look for sure and as you said, always layering that used look Keep us posted. |
|
| Back to top |
|
|
|
|
|
|
|
|
|
|
|
| Author |
Message |
retrogarde
Community Member
Joined: 29 Dec 2012
Posts: 131
Location: Maine
|
| Posted: Thu Apr 25, 2013 5:31 am Post subject: |
|
|
Lots more work done on the Emergency Helmet. I have a bottle of brown paint that "went bad", resulting in a watery mix with what almost looks like coffee grounds: perfect for aging industrial projects! You can see a good bit of it in the area between the visor and the ear protector, as though grease and grime had built up there over the years. I applied an eclectic selection of water slide decals (rangling from Klingon battleships and German airplanes to Vietnam era helicopters and Japanese motorcycles). I took some major artistic liberties at that stage, but the rub-on decals on the original were no less bizarre. Finally, a layer of charcoal dust was applied and set with a matte spray finish.
Here you can see the two stripes along the crest of the helmet.
From the front. The red plug still isn't actually attached (I keep leaning it against the helmet for photos).
Off to the side in a couple of these photos you can see my Nostromo pistol, another project lurching along slowly...
Too much? Too little? I appreciate the input! |
|
| Back to top |
|
|
|
|
|
|
|
|
|
|
|
|
You cannot post new topics in this forum
You cannot reply to topics in this forum
You cannot edit your posts in this forum
You cannot delete your posts in this forum
You cannot vote in polls in this forum
|
|
|
|
|
|
|
|


