 |
 |
|
 |
|
| Author |
Message |
greendevil303
Community Member
Joined: 28 Jun 2014
Posts: 17
|
 Posted: Sat Jun 28, 2014 9:47 pm Post subject: reporting in Posted: Sat Jun 28, 2014 9:47 pm Post subject: reporting in |
 |
|
Hello, all. Been a rabid fan of BR since its release (my favorite film of all time) and wanted to say hey. Lots of ridiculous talent here and hoping to show some of mine soon. Well, maybe not ridiculous talent, but talent nonetheless.
Just a quick bio. 43 years old. Recently divorced (officially yesterday) dad. Marine Corps and Army veteran. Been scale modeling since I was a wee lad. Graduated gunsmithing school 2 years ago.
Purchased an Offworld blaster (my first BR prop) from an RPF member at the beginning of the year. Took it apart and had a box-o-gun for the last 2-3 months. Finally got around to working on it. Lot of stripping paint from metal parts. Lot of sanding and finishing. Still need to acquire more metal parts to finish.
Looking forward to meeting y'all and talking shop! |
|
| Back to top |
|
|
|
|
 |
|
 |
|
|
|
|
| Author |
Message |
hirohawa
Community Member

Joined: 18 May 2006
Posts: 1067
|
| Posted: Sun Jun 29, 2014 12:52 am Post subject: |
|
|
Welcome.
You're gonna love it here! |
|
| Back to top |
|
|
|
|
|
|
|
|
|
|
|
| Author |
Message |
Staar
Community Member

Joined: 04 Feb 2008
Posts: 757
Location: AUSTRALIA
|
| Posted: Sun Jun 29, 2014 12:56 am Post subject: |
|
|
Welcome mate!
Regards
MARK
_________________
 |
|
| Back to top |
|
|
|
|
|
|
|
|
|
|
|
| Author |
Message |
ocd
Community Member
Joined: 24 Nov 2010
Posts: 115
Location: Royal Oak MI
|
| Posted: Sun Jun 29, 2014 3:02 pm Post subject: do you know WHICH version OFW blaster you have? |
|
|
Welcome aboard.
Metal parts for OFW blasters are a must.
Just remember it was NOT designed for this and weight CAN become an issue. 46/8 oz seems to be the max the frame will handle with out breaking.
Check out the prop shop aria for Coyle OFW metal replacement parts .
I've got 3 versions of the OFW blaster. In my opinion the first issue was the strongest and easiest to modify.
It was molded in BLACK PVC for the most part once you striped in you don't need to paint it as you can polish it to a nice semi gloss.
My 10 year old nephew "field tested" one of mine off and on during his annual summer visit with the instructions if it broke just bring it in and we will repair it for next days replicant hunting.
Have fun modifying it, and don't be afraid of breaking it as it is very repairable.
_________________
"No choice pal,..."
"Questions?,..." |
|
| Back to top |
|
|
|
|
|
|
|
|
|
|
|
| Author |
Message |
greendevil303
Community Member
Joined: 28 Jun 2014
Posts: 17
|
| Posted: Sun Jun 29, 2014 4:18 pm Post subject: |
|
|
Thanks for the welcome, guys 
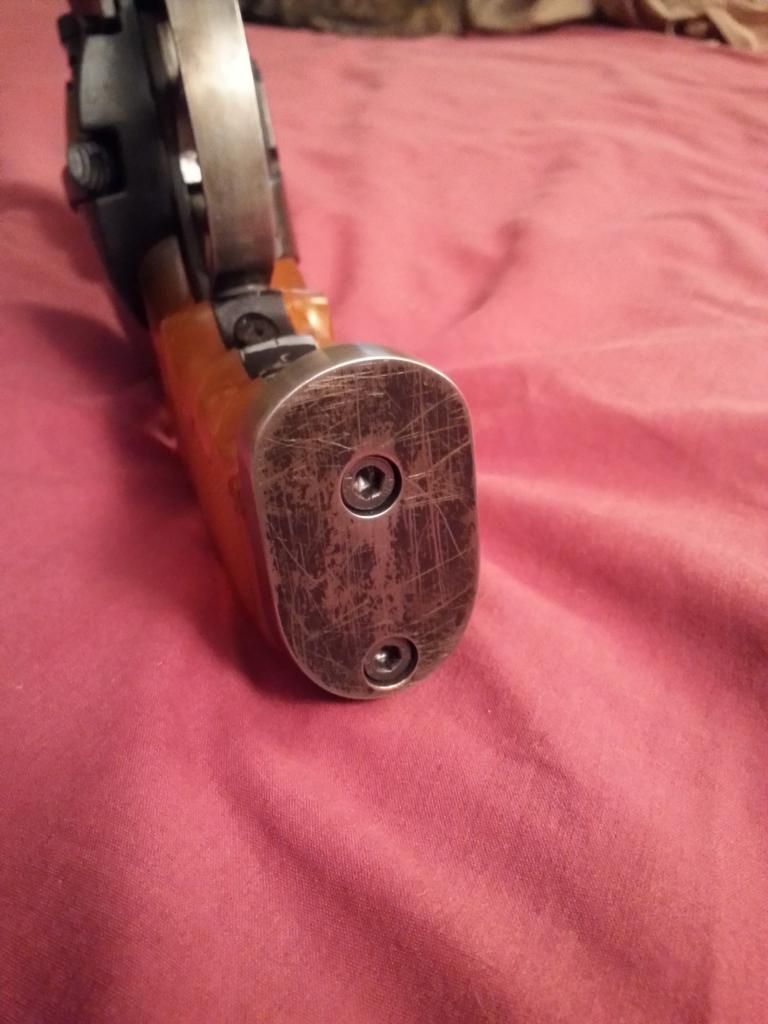
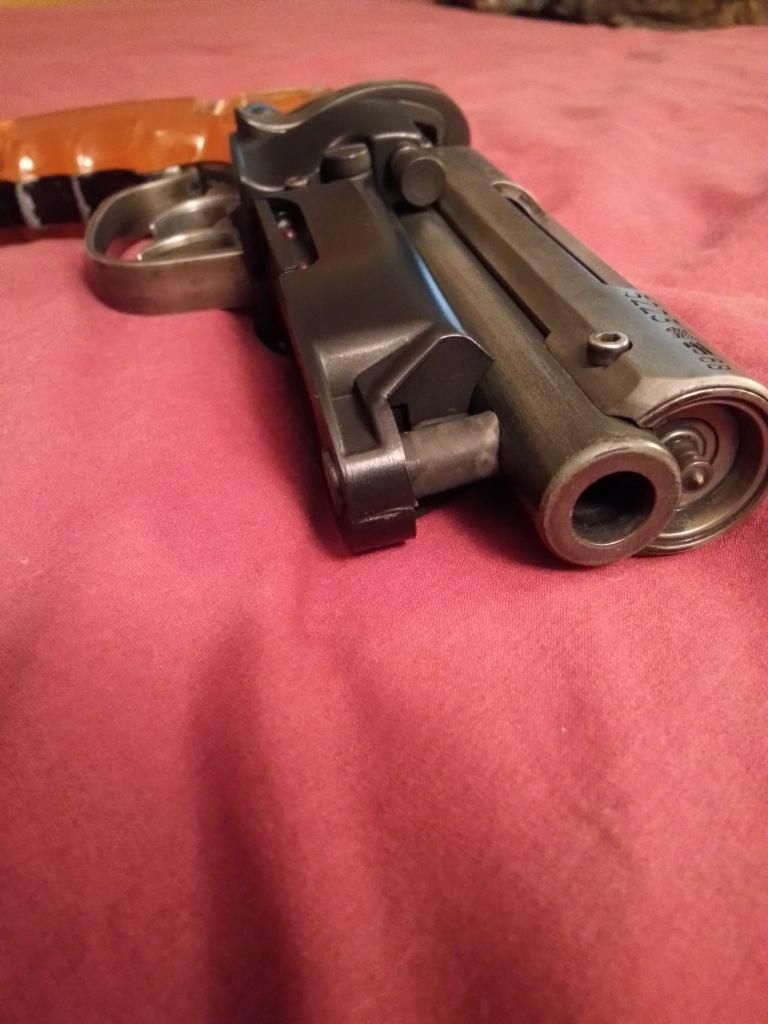
This is my WIP. Started as an out-of-the-box Offworld PKD I purchased on eBay back in January from a member of the RPF. I have to say for the price I was a bit mortified upon taking it out of the box but I knew it was destined for bigger and better things lol (Apologies for the so-so pics. I had to use my phone)
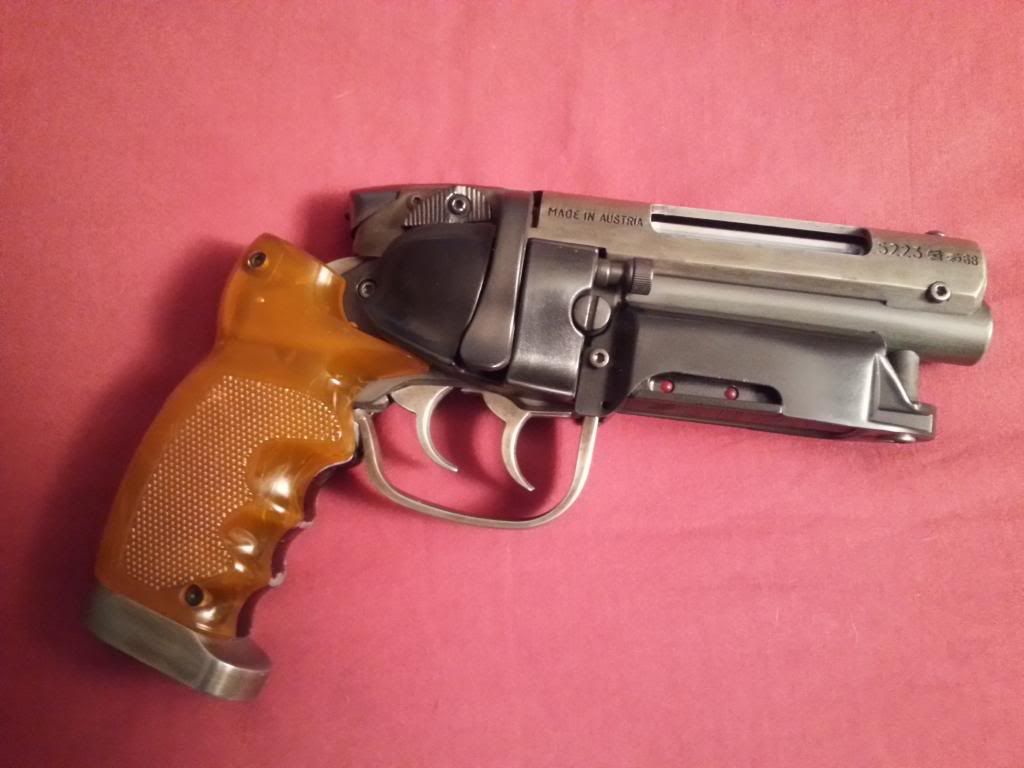
I completely disassembled the gun and stripped the paint off of all the metal except for the upgraded Offworld outer grip. All the metal was treated in a hot vinegar bath to take off the steel sheen and give it a more subdued patina look. I also treated the metal with multiple coats of cold bluing solution and lightly buffed with 0000 steel wool. After that, light coats of oil. I added deliberate rust/pitting spots with a bluing pen.
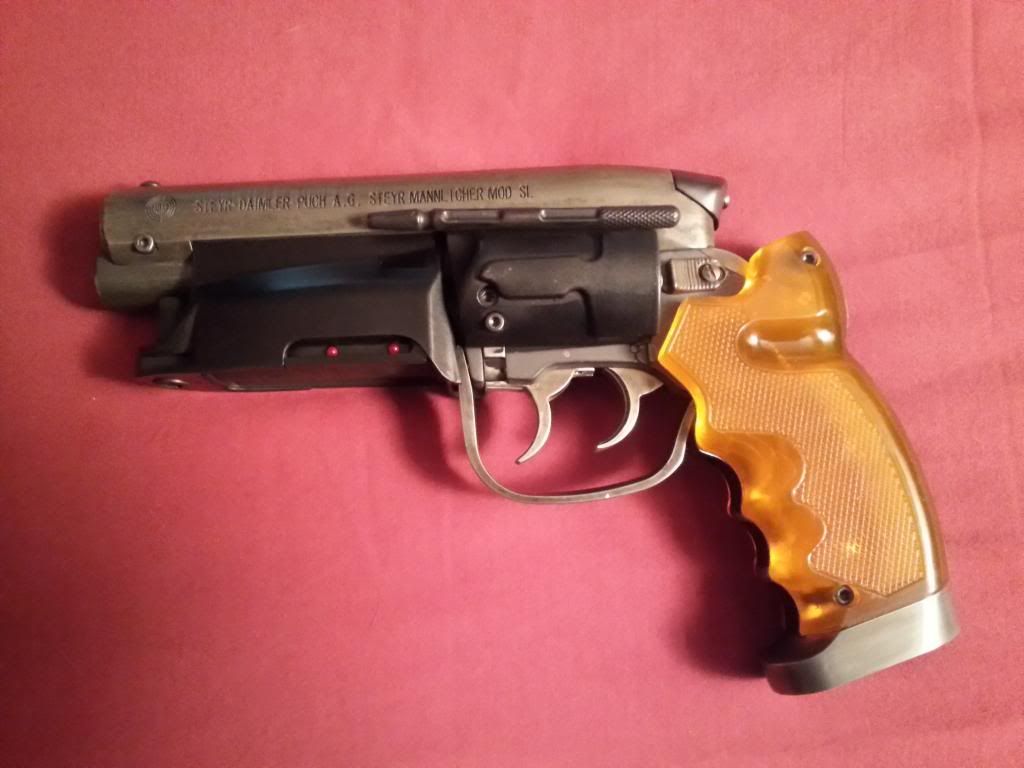
My only real nightmare with this job was an attempt to silver solder the trigger guard to the outer grip (to keep it from flopping around), only to find that the trigger guard was in fact a casting, which broke at the joint under the heat. Fortunately there was enough of a lip left on it for me to JB Weld it in place (should have done that in the first place). Lesson learned.
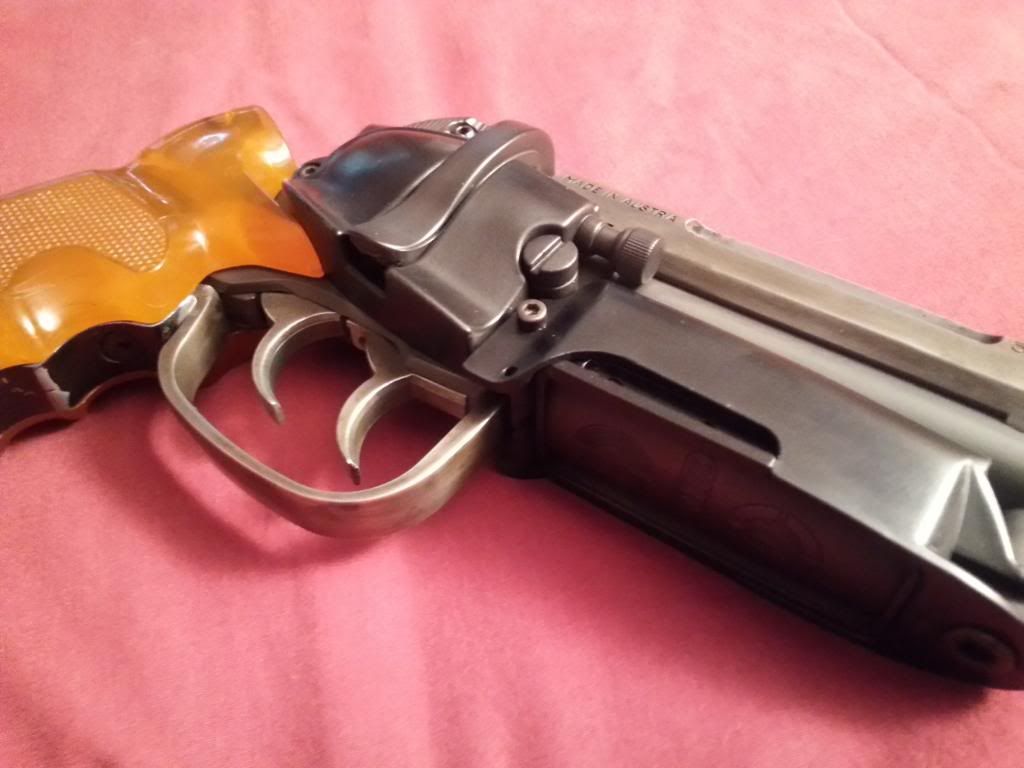
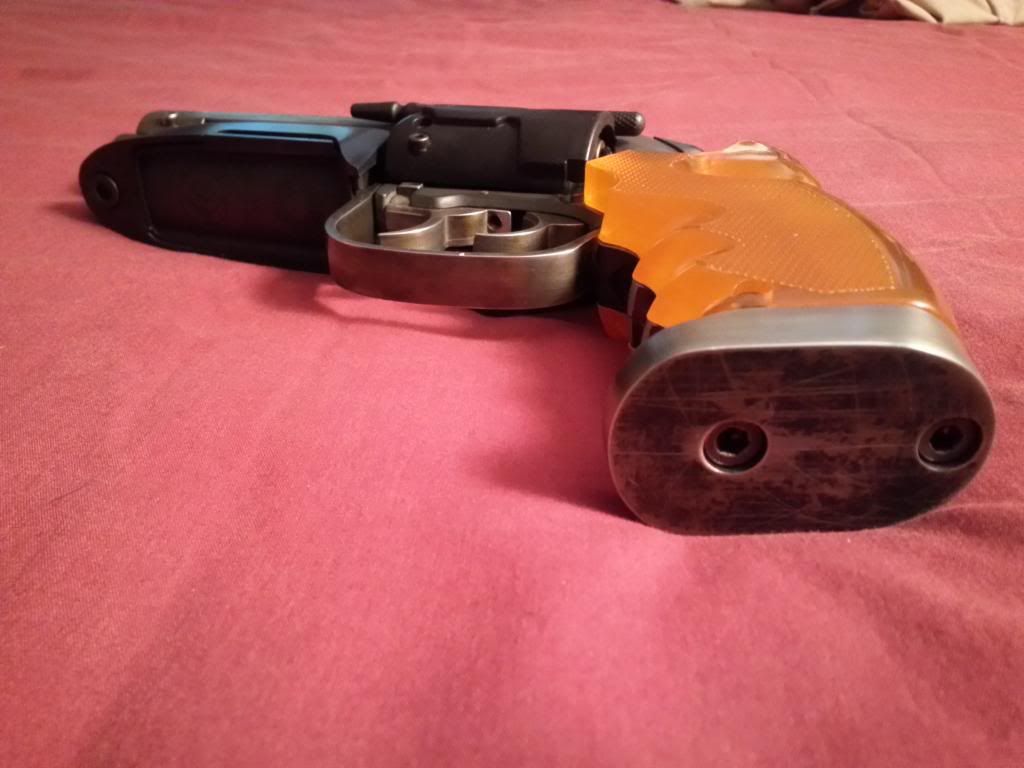
The plastic parts of the Bulldog were stripped of paint and re-shot with a dark grey-green primer and wet sanded with 0000 steel wool. They were then rubbed with powdered graphite and sealed with a clear matte finish.
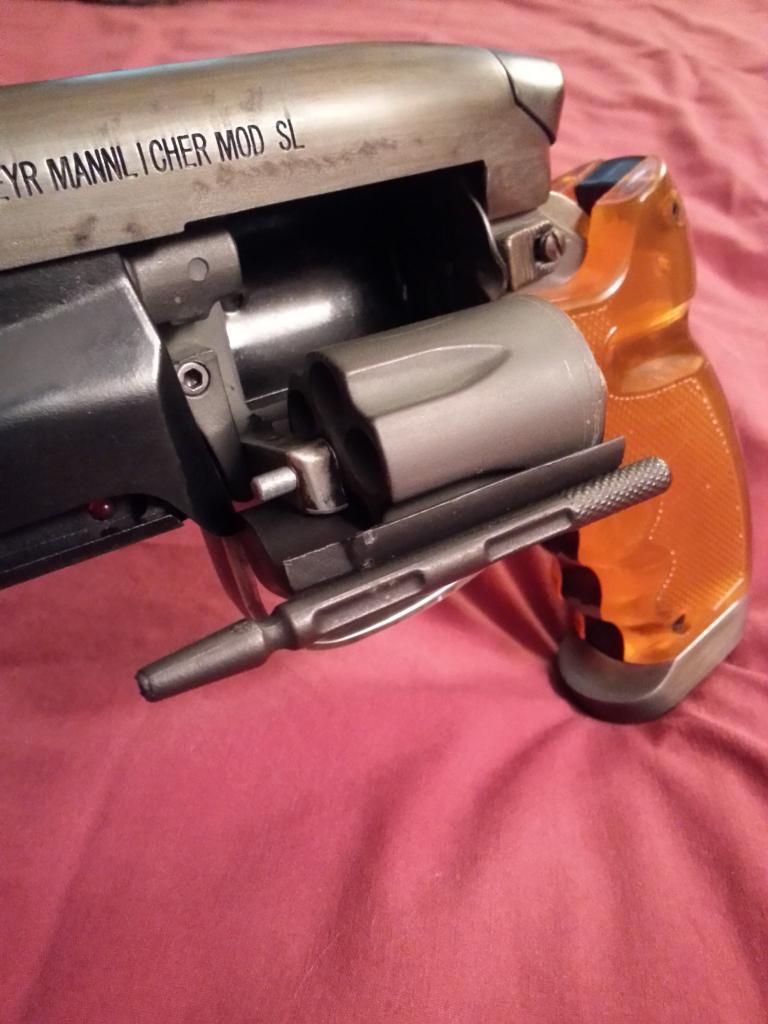
The steel grip cap was stripped of the chrome finish and sanded and buffed. I shot the bottom with flat black and used tape to lift random patches. Also gave it a quick scrap on the garage floor. Then I hit the entire piece with a quick bluing and the steel wool.
I dug through my reloading box and found a few .357 mag casings and shoved them into the cylinder chambers. Operative word is "shoved" lol

Lastly, I buffed the grip panels with Turtle Wax headlight cream and a soft rag. They became much more clearer, contrary to what my photos show.
Well, there it is. My first PKD customization in the works. I will be purchasing some Coyle parts in the next couple of weeks and doing some replacements/additions. I will post pics as it progresses. Hope you guys like it  |
|
| Back to top |
|
|
|
|
|
|
|
|
|
|
|
| Author |
Message |
joberg
Community Member
.jpg)
Joined: 06 Oct 2008
Posts: 9447
|
| Posted: Sun Jun 29, 2014 4:28 pm Post subject: |
|
|
Welcome greendevil303. And what a PKD you have there. Mighty fine job if you ask me  Eager to see what's next on your plate. Eager to see what's next on your plate. |
|
| Back to top |
|
|
|
|
|
|
|
|
|
|
|
| Author |
Message |
greendevil303
Community Member
Joined: 28 Jun 2014
Posts: 17
|
| Posted: Sun Jun 29, 2014 4:43 pm Post subject: |
|
|
Thanks.
I do have a question about reinforcement on the area where the grip ties into the Bulldog receiver frame. I notice its a weak spot and has a bit of flex and was wondering if anyone has found a solution? It's not horrible but it's there. I was thinking about machining a steel spacer and mounting it inside of the frame? |
|
| Back to top |
|
|
|
|
|
|
|
|
|
|
|
|
You cannot post new topics in this forum
You cannot reply to topics in this forum
You cannot edit your posts in this forum
You cannot delete your posts in this forum
You cannot vote in polls in this forum
|
|
|
|
|
|
|
|


