 |
 |
|
 |
|
| Author |
Message |
8th_Passenger
Community Member

Joined: 28 Nov 2009
Posts: 443
Location: Hertfordshire, UK
|
 Posted: Sat Nov 08, 2014 2:05 pm Post subject: Posted: Sat Nov 08, 2014 2:05 pm Post subject: |
 |
|
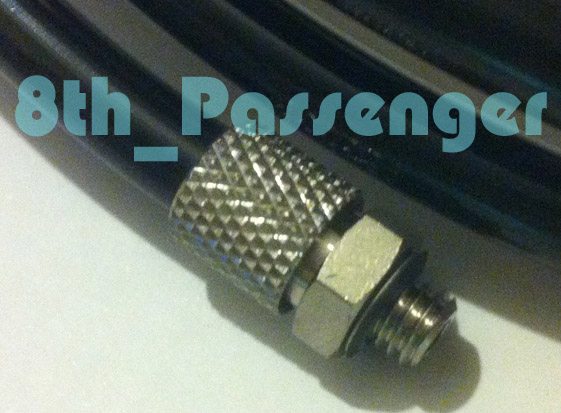
Here's a small update.
Gas and air threads are not my forte but I'm getting to grips with them.
I finally got a reducer that fits the thread on my propane gas bottle. luckily they are still in use.
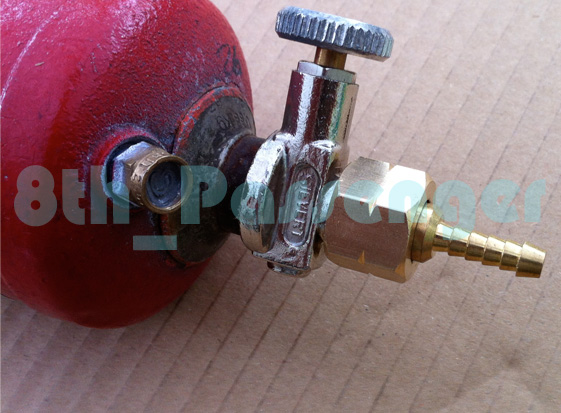
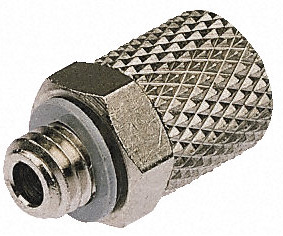
I also got a fitting that connects the plastic pipe to the copper tube (the outside feed from the propane bottle). The closest I could find was an airbrush fitting (which I bought).
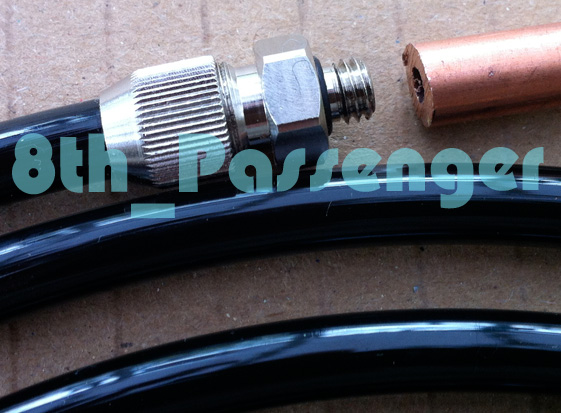
But once I new what I was looking for I found an alternative which has a more accurate knurling pattern on (which I need to buy). The copper pipe needs to be soldered to the threaded end of the fitting!
So it lays out something like this.
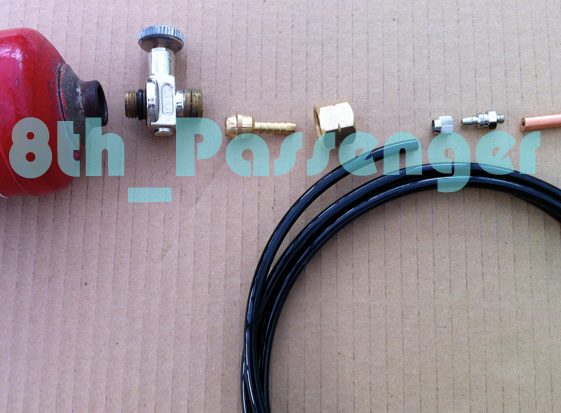
There are still issues with the connections to the propane bottle that I need to resolve.
Part of me would like the pilot to work but it needs to be safe.
Colin
_________________
Ripley: What's it key on?
Ash: Micro changes in air density. |
|
| Back to top |
|
|
|
|
 |
|
 |
|
|
|
|
| Author |
Message |
Master Blaster
Community Member
.jpg)
Joined: 25 Feb 2014
Posts: 38
|
| Posted: Sun Nov 09, 2014 1:10 am Post subject: |
|
|
| Love this progress. Did you have to jerry rig the reducer to fit the thread? |
|
| Back to top |
|
|
|
|
|
|
|
|
|
|
|
| Author |
Message |
8th_Passenger
Community Member
Joined: 28 Nov 2009
Posts: 443
Location: Hertfordshire, UK
|
| Posted: Sun Nov 09, 2014 4:08 am Post subject: |
|
|
Master Blaster I found the correct threaded fitting. BSP 3/8" left hand thread. The description says it has a 4mm tail but its more like 6mm (just short of 7mm at its widest point) with an internal bore of 3mm.
The black tube I have is 6mm with a 4mm bore. The tube is not that flexible being polyurethane so I may need a bit of heat to soften it to connect it to the tail.
There may be a different connector I can find so I don't have to heat the tube,
Also I could turn the brass tail down in a lathe.
Colin
_________________
Ripley: What's it key on?
Ash: Micro changes in air density. |
|
| Back to top |
|
|
|
|
|
|
|
|
|
|
|
| Author |
Message |
joberg
Community Member
.jpg)
Joined: 06 Oct 2008
Posts: 9447
|
| Posted: Sun Nov 09, 2014 9:50 am Post subject: |
|
|
Good stuff Colin...yeah, for the pilot light to work you want it safe to use  |
|
| Back to top |
|
|
|
|
|
|
|
|
|
|
|
| Author |
Message |
8th_Passenger
Community Member
Joined: 28 Nov 2009
Posts: 443
Location: Hertfordshire, UK
|
| Posted: Thu Nov 13, 2014 3:48 pm Post subject: |
|
|
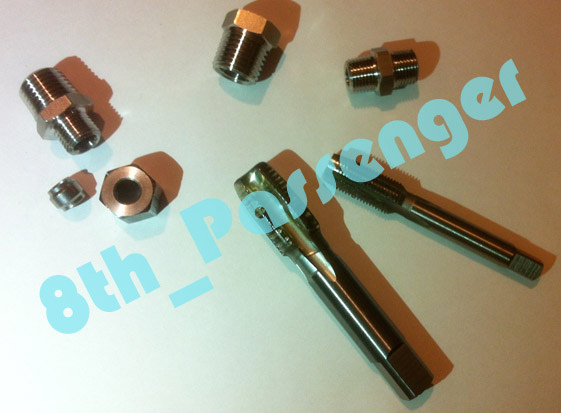
Time for another quick update.
I bought the fitting to replace the air brush fitting. A better match I think. Not exact but closer. Maybe I could turn smooth ends on either ends of the knurling.
I also bought the fittings I need for the white tank. Again these are ballpark estimations judged against printed out photos of the tank at 1:1.
I bought the relative taps too.
My plan at the moment is to completely fabricate the white tank. Unless some turn up on ebay.
I will turn up the tank shape then fit the fittings in position.
I'll then mould the whole thing as one.
When I do the cast I'll lay the real fittings in the mould. They will be screwed into either end of some hexagonal bar running through the tank.
This will keep them in position and hopefully give it a more realistic weight.
This way there is no way it can spin once the fast cast is around it. I can lock-tight the fitting into the end of the hexagonal bar.
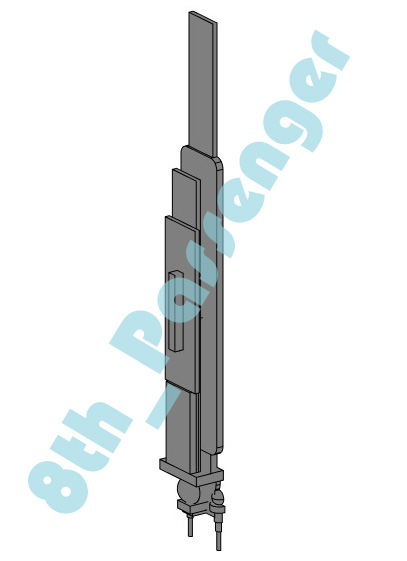
So it will look something like this.
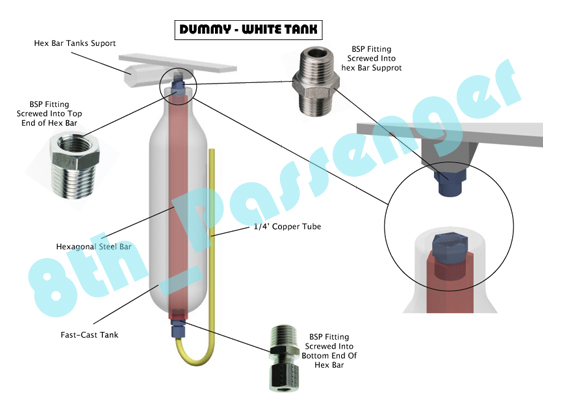
The double ended fitting will be fixed into the hex bar which is attached the the internal frame. This then allows me to remove the tank from the main unit.
That's the plan!
Colin
_________________
Ripley: What's it key on?
Ash: Micro changes in air density. |
|
| Back to top |
|
|
|
|
|
|
|
|
|
|
|
| Author |
Message |
joberg
Community Member
Joined: 06 Oct 2008
Posts: 9447
|
| Posted: Thu Nov 13, 2014 5:51 pm Post subject: |
|
|
Great plans Colin...as for the trick to bend copper tubes: soapy water into the tube, then put it in the freezer (24hours will do).
Remove from freezer and bend. Thaw, remove soapy water and voilà!
The perfect bend! |
|
| Back to top |
|
|
|
|
|
|
|
|
|
|
|
| Author |
Message |
8th_Passenger
Community Member
Joined: 28 Nov 2009
Posts: 443
Location: Hertfordshire, UK
|
| Posted: Sat Nov 22, 2014 3:20 pm Post subject: |
|
|
Thanks Joberg,
I'd not heard of filling a tube with soapy water and freezing it. I can see the logic. I don't have a freezer big enough to try it.
The method I have used is filling the cavity with sand and bending round a former after annealing.
The wall thickness on the copper tube is quite thick so its possible I might not need reinforcement. But best to be safe than sorry.
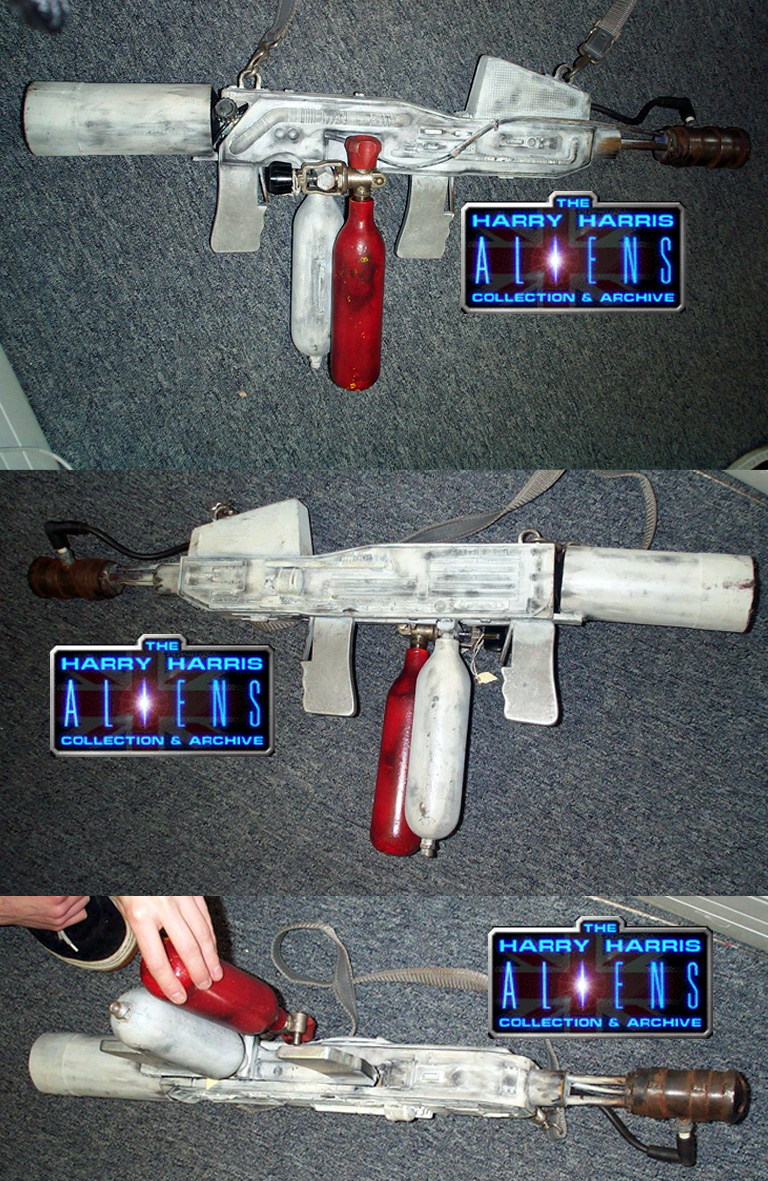
Here's a few interesting things about the White Tank!
It looks like the top has been shortened on some units. Or maybe it's just the one Propstore used to have. I assume all the tanks were interchangeable for refilling so got swapped around.
We can see it best in these photo's of Harry Harris'. Note how the neck of the white tank is about half the length of the neck of the red tank. This raises the white tank 'up' so the fitting on the bottom of the white tank is is almost level with the bottom of the red tank.
A bit more obvious on this Propstore image.
.jpg)
But here on the Pat Lowery photograph the bottom of the two tanks look more level.
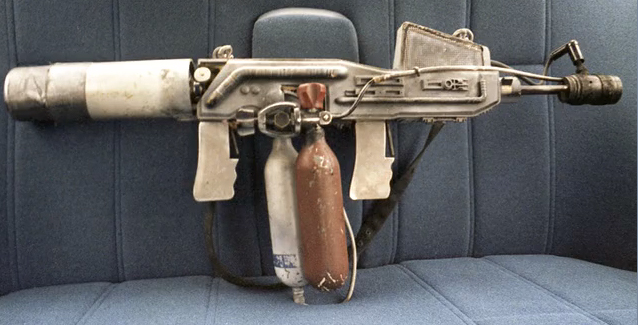
And again here on this picture of the fireing version Dallas uses.
.jpg)
I assume different makes of tank/bottle could be slightly different sizes.
Which style do I choose?
Also the fitting on the bottom suggests the contents of the tank exit the tank through the copper tube on the bottom and then up into the main unit. So is the top of the white tank blanked off!
Here's an update on the build.
Before I get back on with the body I need to resolve issues I have with the gas/pipe fittings I've recently bought.
I turned down the brass tail fitting which connects to the valve to make it a bit shorter.
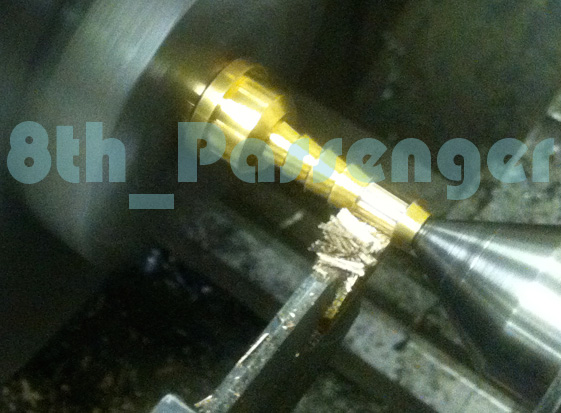
I then turned a brass sleeve (center picture) with a 6mm hole in one end and a tapped M5 hole in the other.
.jpg)
Which fits like this.

Before I solder it in position I think I can shorten the sleeve a bit.
So in position the valve assembly looks like this. Luckily it just fits above the trigger mechanism. But it needs to come forward a little to get the valve knob in the best position.
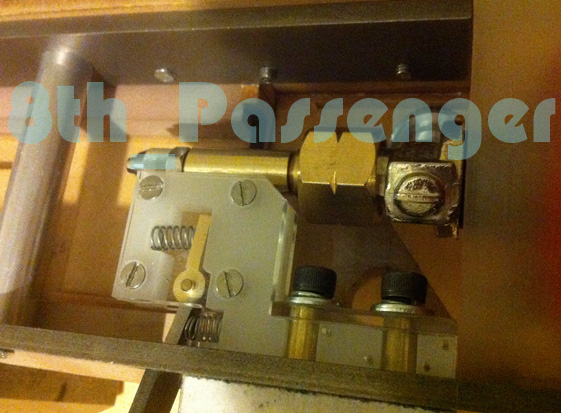
.jpg)
I need to re design the back of the rear trigger mechanism to sort this problem.
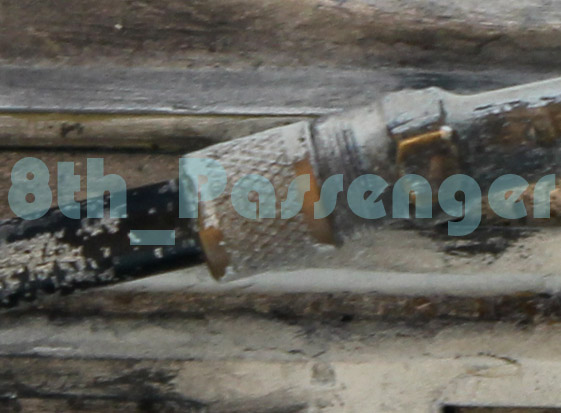
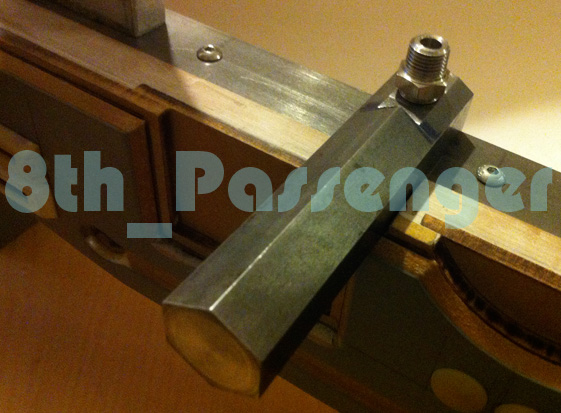
Due to the generous wall thickness of the copper tube I was able to tap an M5 hole in the end to connect the the diamond knurled fitting for the external pilot light gas feed.
.jpg)
I'm concerned the tube I bought may not be flexible enough so I might buy some neoprene tubing to see if that's better. To Disconnect the valve from the bottle I have to be able to remove the propane tank from the rear tube!
I milled a flat on the underside of the hex bar and drilled and tapped a hole to 1/8 BSP. Then screwed in the fitting.
It needs a bit of tweaking to sink it flush. These fitting have a taper which complicates thing!
In this picture the fitting which will be sunk into the tank is screwed on the hex bar fitting
.jpg)
I feel like I'm moving forward now, resolving some of the more difficult aspects of the build.
More soon.
Colin
_________________
Ripley: What's it key on?
Ash: Micro changes in air density. |
|
| Back to top |
|
|
|
|
|
|
|
|
|
|
|
| Author |
Message |
SKIN JOB 66
Community Member

Joined: 16 Jan 2008
Posts: 2724
Location: FRANCE
|
| Posted: Sun Nov 23, 2014 11:00 am Post subject: |
|
|
Great work and research, I'm amazed once again by what you've done so far on this project, Colin !
_________________
THE FUTURE IS A THING OF THE PAST |
|
| Back to top |
|
|
|
|
|
|
|
|
|
|
|
| Author |
Message |
8th_Passenger
Community Member
Joined: 28 Nov 2009
Posts: 443
Location: Hertfordshire, UK
|
| Posted: Sun Nov 23, 2014 12:15 pm Post subject: |
|
|
Thank You Fred.
Colin
_________________
Ripley: What's it key on?
Ash: Micro changes in air density. |
|
| Back to top |
|
|
|
|
|
|
|
|
|
|
|
| Author |
Message |
joberg
Community Member
Joined: 06 Oct 2008
Posts: 9447
|
| Posted: Sun Nov 23, 2014 5:17 pm Post subject: |
|
|
I like the tanks to be more of the same size. With the fitting and the pipe, the white tank will seem bigger anyway
Complicated stuff with the trigger and all of those fitting; you're doing a great job at it  |
|
| Back to top |
|
|
|
|
|
|
|
|
|
|
|
| Author |
Message |
Pro Mod
Community Member
Joined: 13 Aug 2010
Posts: 108
Location: Manchester, England
|
| Posted: Wed Nov 26, 2014 7:59 am Post subject: |
|
|
Looking really good Colin.
I'm sure with just a little bit more engineering you could get this to work properly.
Nothing ridiculous, maybe just 10m / 15m bursts!! Go on you know you want to  |
|
| Back to top |
|
|
|
|
|
|
|
|
|
|
|
| Author |
Message |
8th_Passenger
Community Member
Joined: 28 Nov 2009
Posts: 443
Location: Hertfordshire, UK
|
| Posted: Wed Nov 26, 2014 4:08 pm Post subject: |
|
|
Thanks Pro Mod,
At first I thought you said 10 -15 feet bursts which seemed realistic! Then I saw they were meters and laughed.
I think I'll stick with trying to make the pilot flame work. That's enough danger for me.
I might need to fireproof the wedge on the front as it's only styrene and wood!
Colin
_________________
Ripley: What's it key on?
Ash: Micro changes in air density. |
|
| Back to top |
|
|
|
|
|
|
|
|
|
|
|
| Author |
Message |
joberg
Community Member
Joined: 06 Oct 2008
Posts: 9447
|
| Posted: Thu Nov 27, 2014 7:17 pm Post subject: |
|
|
If working properly, Pro Mod is about right  ...I don't know if the front has to be protected with other material if you just do the pilot light. ...I don't know if the front has to be protected with other material if you just do the pilot light.
Now, if you do the whole "I'll toast you to a crisp" kinda thing, then o.k. 
do the front. |
|
| Back to top |
|
|
|
|
|
|
|
|
|
|
|
| Author |
Message |
8th_Passenger
Community Member
Joined: 28 Nov 2009
Posts: 443
Location: Hertfordshire, UK
|
| Posted: Mon Dec 22, 2014 4:19 am Post subject: |
|
|
Just a small update. I haven't had much time recently to work on the flamethrower.
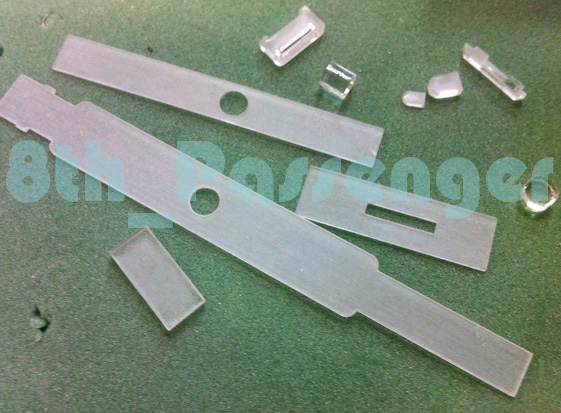
With what little time I have had I thought I would have a go at the detail on white tank.
I drew up some shapes in CAD using the reference I had. I came with this.
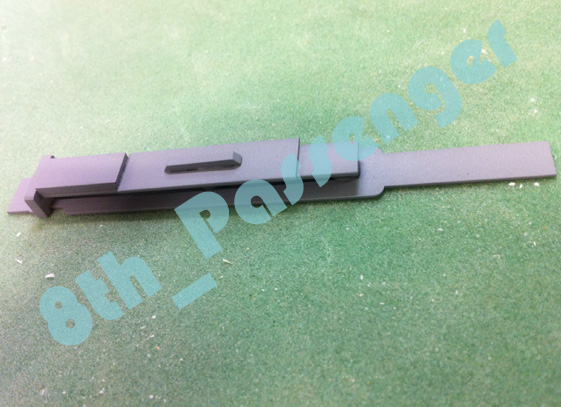
So I broke it down into parts I could laser cut in 1mm acrylic and slot together.
Assembled here.

A coat of primer on here.
So I'm getting there I think. A bit more shaping and some finer detailing at the base and several coats of thick paint and I should have it!!
.jpg)
More soon.
Colin
_________________
Ripley: What's it key on?
Ash: Micro changes in air density. |
|
| Back to top |
|
|
|
|
|
|
|
|
|
|
|
| Author |
Message |
joberg
Community Member
Joined: 06 Oct 2008
Posts: 9447
|
| Posted: Mon Dec 22, 2014 9:54 am Post subject: |
|
|
Your attention to details is great and it shows, once again, in this update
Keep up the great work, I'm eager to see it with, at least, a pilot light burning at the end of the nozzle |
|
| Back to top |
|
|
|
|
|
|
|
|
|
|
|
| Author |
Message |
8th_Passenger
Community Member
Joined: 28 Nov 2009
Posts: 443
Location: Hertfordshire, UK
|
| Posted: Tue Dec 23, 2014 4:38 am Post subject: |
|
|
Thanks joberg.
A pilot light is the aim.
Colin
_________________
Ripley: What's it key on?
Ash: Micro changes in air density. |
|
| Back to top |
|
|
|
|
|
|
|
|
|
|
|
| Author |
Message |
joberg
Community Member
Joined: 06 Oct 2008
Posts: 9447
|
| Posted: Tue Dec 23, 2014 7:21 am Post subject: |
|
|
| You're welcome Colin...btw, looking at that "greeblie" at the bottom reminds me of the part of an Revel Saturn nozzle |
|
| Back to top |
|
|
|
|
|
|
|
|
|
|
|
| Author |
Message |
ukwookie
Community Member
Joined: 30 Jul 2009
Posts: 23
Location: Northern England
|
| Posted: Tue Dec 23, 2014 7:38 am Post subject: |
|
|
It's more likely to be from the Airfix kit- specifically the second stage engine  |
|
| Back to top |
|
|
|
|
|
|
|
|
|
|
|
| Author |
Message |
8th_Passenger
Community Member
Joined: 28 Nov 2009
Posts: 443
Location: Hertfordshire, UK
|
| Posted: Wed Dec 24, 2014 4:58 am Post subject: |
|
|
Joberg, ukwookie are we talking Saturn V here?
Both Revel and Airfix have done one at the same scale, 1.144
Here are the parts circled I think you are talking about.
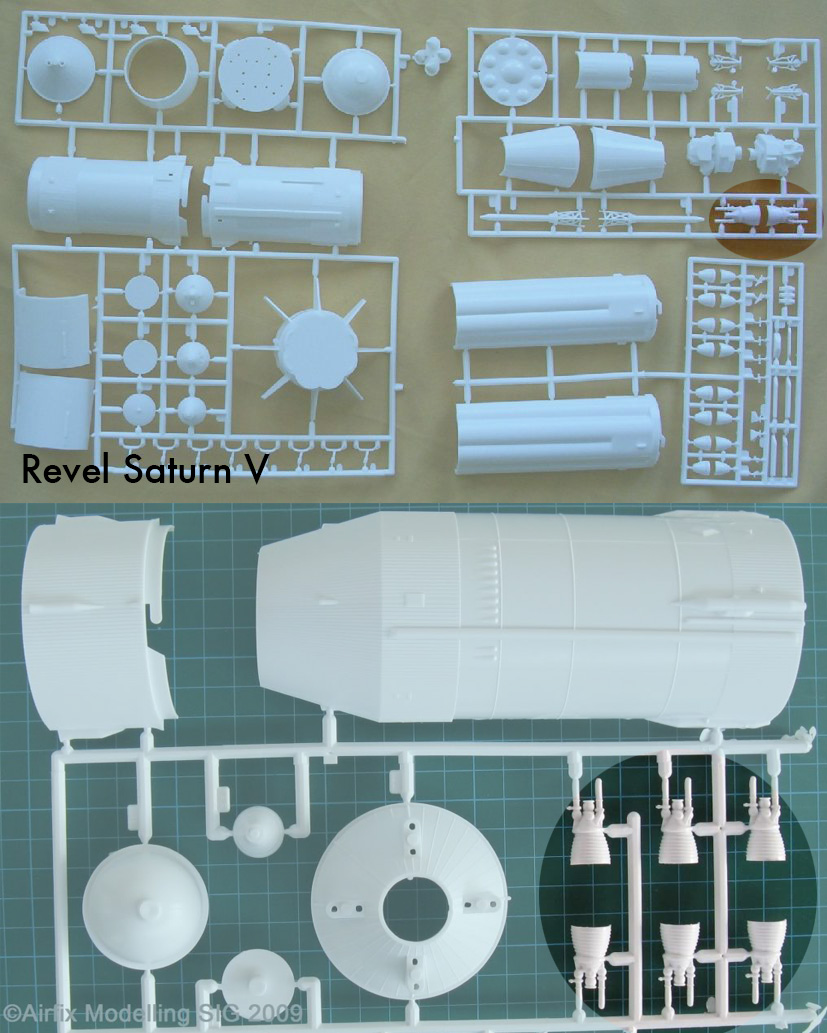
If anybody has these and know's what size they are it would be of great help.
The kit seems to be available for £25-£30.
Colin
_________________
Ripley: What's it key on?
Ash: Micro changes in air density. |
|
| Back to top |
|
|
|
|
|
|
|
|
|
|
|
| Author |
Message |
ukwookie
Community Member
Joined: 30 Jul 2009
Posts: 23
Location: Northern England
|
| Posted: Wed Dec 24, 2014 4:30 pm Post subject: |
|
|
Yes it's the Airfix Saturn V, the Revell version is the same scale but the Stage 2 engines are quite different in shape (btw the top pic is actually the Airfix Saturn 1B kit which has completely different engines!). I should be able to measure an engine for you once Christmas is out of the way if no-one else gets there first...
Tony |
|
| Back to top |
|
|
|
|
|
|
|
|
|
|
|
|
You cannot post new topics in this forum
You cannot reply to topics in this forum
You cannot edit your posts in this forum
You cannot delete your posts in this forum
You cannot vote in polls in this forum
|
|
|
|
|
|
|
|


