 |
 |
|
 |
|
| Author |
Message |
cratercritter
Community Member
Joined: 15 Jul 2009
Posts: 558
|
 Posted: Mon Nov 03, 2014 1:15 am Post subject: Posted: Mon Nov 03, 2014 1:15 am Post subject: |
 |
|
Well done.  Most impressive blaster finish. So pretty and shiny. Most impressive blaster finish. So pretty and shiny.  |
|
| Back to top |
|
|
|
|
 |
|
 |
|
|
|
|
| Author |
Message |
BeastMaster
Community Member

Joined: 19 Jul 2007
Posts: 994
Location: UK
|
| Posted: Fri Nov 07, 2014 4:09 am Post subject: |
|
|
What a fantastic finish! Thanks for the blueing tips.
_________________
"F*ck it, it's just a movie. Let him worry about it" Harrison Ford |
|
| Back to top |
|
|
|
|
|
|
|
|
|
|
|
| Author |
Message |
stonedog7563
Community Member

Joined: 19 Apr 2007
Posts: 66
Location: Norfolk UK
|
| Posted: Wed Nov 12, 2014 5:01 am Post subject: |
|
|
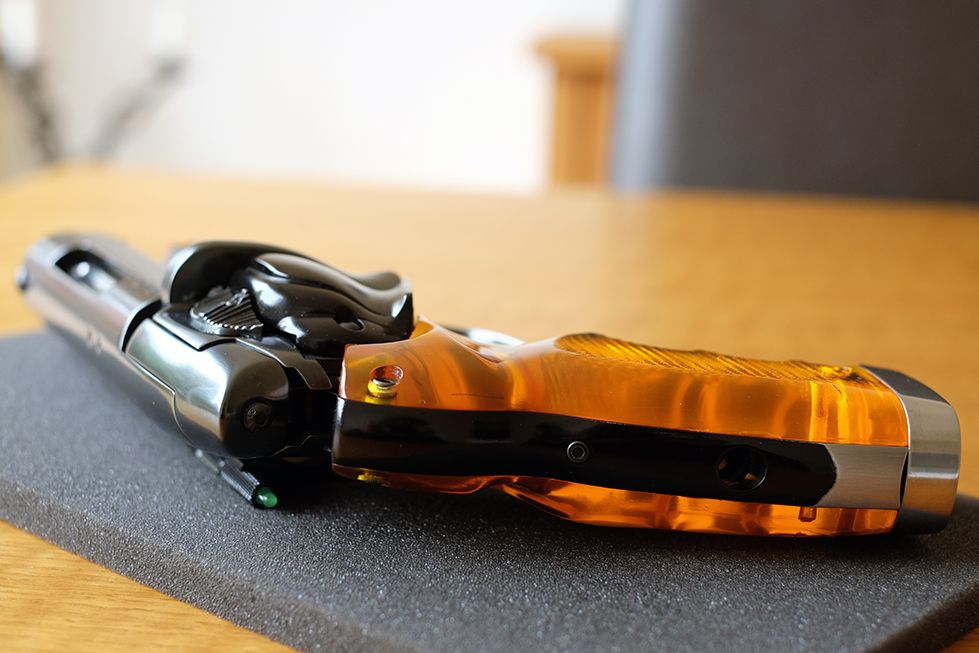
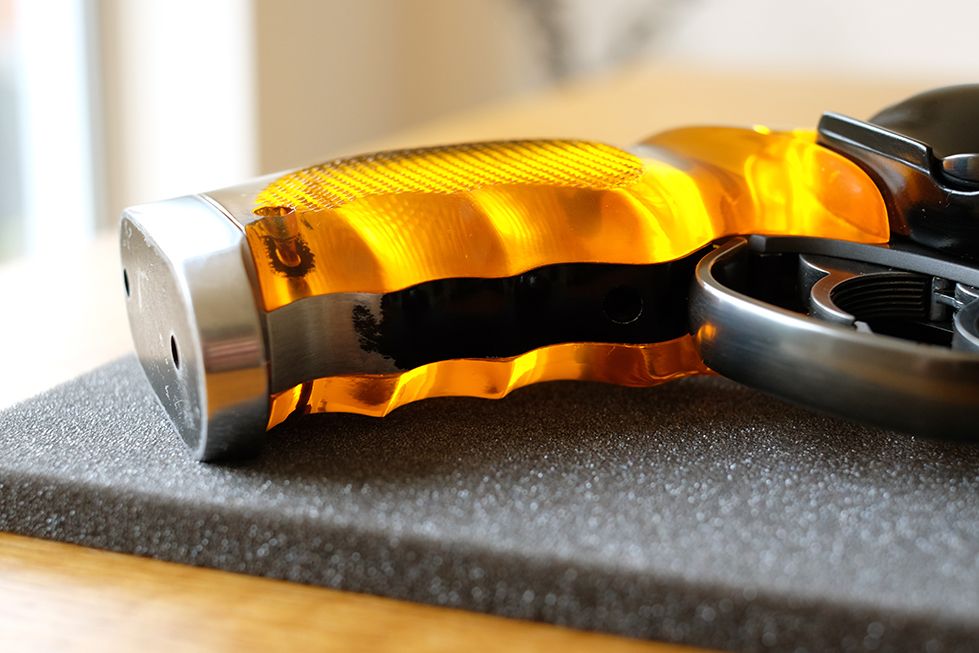
Thanks all for the kind comments 
Added some weathering/wear to the butt plate and grip frame.
 |
|
| Back to top |
|
|
|
|
|
|
|
|
|
|
|
| Author |
Message |
racprops
Community Member

Joined: 30 Oct 2006
Posts: 2450
Location: Phoenix AZ
|
| Posted: Wed Nov 12, 2014 6:11 am Post subject: |
|
|
One question, you did the whole model as super clean brand new, why the scuffed butt plate??It too should be like brand new.
Rich
_________________
I never have enough time to do all I want to do! |
|
| Back to top |
|
|
|
|
|
|
|
|
|
|
|
| Author |
Message |
stonedog7563
Community Member
Joined: 19 Apr 2007
Posts: 66
Location: Norfolk UK
|
| Posted: Wed Nov 12, 2014 6:37 am Post subject: |
|
|
Thought it resembled this more

 |
|
| Back to top |
|
|
|
|
|
|
|
|
|
|
|
| Author |
Message |
racprops
Community Member
Joined: 30 Oct 2006
Posts: 2450
Location: Phoenix AZ
|
| Posted: Wed Nov 12, 2014 6:45 am Post subject: |
|
|
OK That works..and I missed the missing paint above the butt plate on the grip frame..
I stand corrected.
GREAT job by the way.
Rich
_________________
I never have enough time to do all I want to do! |
|
| Back to top |
|
|
|
|
|
|
|
|
|
|
|
| Author |
Message |
stonedog7563
Community Member
Joined: 19 Apr 2007
Posts: 66
Location: Norfolk UK
|
| Posted: Wed Nov 12, 2014 6:55 am Post subject: |
|
|
| No need, your input is very much appreciated, thank you |
|
| Back to top |
|
|
|
|
|
|
|
|
|
|
|
| Author |
Message |
Buch
Community Member

Joined: 27 Feb 2014
Posts: 1184
Location: Copenhagen, Denmark
|
| Posted: Wed Nov 12, 2014 6:58 am Post subject: |
|
|
| stonedog7563 wrote: | Thanks all for the kind comments
Added some weathering/wear to the butt plate and grip frame.
|
Are you absolutely SURE you want to keep that??  
STUNNING!!
_________________
Monsieur, azonnal kövessen engem bitte |
|
| Back to top |
|
|
|
|
|
|
|
|
|
|
|
| Author |
Message |
Staar
Community Member

Joined: 04 Feb 2008
Posts: 757
Location: AUSTRALIA
|
| Posted: Wed Nov 12, 2014 10:23 am Post subject: |
|
|
A truly stunning blaster, warmest congratulations!
Highest regards
MARK
_________________
 |
|
| Back to top |
|
|
|
|
|
|
|
|
|
|
|
| Author |
Message |
joberg
Community Member
.jpg)
Joined: 06 Oct 2008
Posts: 9447
|
| Posted: Wed Nov 12, 2014 5:00 pm Post subject: |
|
|
| Love it! And the wear and tear is very well done also |
|
| Back to top |
|
|
|
|
|
|
|
|
|
|
|
| Author |
Message |
clutch
Community Member

Joined: 12 Dec 2006
Posts: 548
|
| Posted: Thu Nov 13, 2014 9:39 am Post subject: |
|
|
ok, how'd you weather the plate so nicely?  |
|
| Back to top |
|
|
|
|
|
|
|
|
|
|
|
| Author |
Message |
stonedog7563
Community Member
Joined: 19 Apr 2007
Posts: 66
Location: Norfolk UK
|
| Posted: Thu Nov 13, 2014 11:31 am Post subject: |
|
|
| clutch wrote: | | ok, how'd you weather the plate so nicely? |
O.k. might sound silly but it took three attempts, I was trying for a similar scratch pattern as seen on the real thing, I know I wasn't going to duplicate it scratch for scratch but I wanted it to resemble it if possible.
Wrapped the sides with masking tape, as close to the edge as possible (don't need to be too precise as most of the paint comes off anyway) keyed the surface with 320 grit paper to give the paint something to hold onto then gave it two light coats of matt black out of a rattle can.
After about an hour or so I removed the masking tape then left it overnight.
Then I cleaned up the edges using some fine paper (1000 grit I think) then gently sanded the flat painted area with 2000 grit to thin and flatten the paint out (all sanding was done dry)
For the bulk of the scratches I used 120 grit, gently scuffing the surface to get general background scratches and wearing the paint away so the metal ghosted through in areas.
For the edges and stand out scratches I just used the blade of a small flat head screwdriver to etch the pattern into the paint.
To finish I gave the whole bottom a very gentle sanding with 5000 grit to flatten it.
Hope that helps. |
|
| Back to top |
|
|
|
|
|
|
|
|
|
|
|
| Author |
Message |
joberg
Community Member
Joined: 06 Oct 2008
Posts: 9447
|
| Posted: Thu Nov 13, 2014 4:56 pm Post subject: |
|
|
| Thanks for the weathering tips! |
|
| Back to top |
|
|
|
|
|
|
|
|
|
|
|
| Author |
Message |
clutch
Community Member
Joined: 12 Dec 2006
Posts: 548
|
| Posted: Fri Nov 14, 2014 11:01 am Post subject: |
|
|
| excellent. thanks |
|
| Back to top |
|
|
|
|
|
|
|
|
|
|
|
| Author |
Message |
TomasVolley
Joined: 02 Dec 2014
Posts: 1
Location: Sweden
|
| Posted: Tue Dec 02, 2014 4:37 pm Post subject: |
|
|
Absolutely top notch. Best I have seen!
Thanks for great pics.
What about green LEDs. They work too? |
|
| Back to top |
|
|
|
|
|
|
|
|
|
|
|
| Author |
Message |
stonedog7563
Community Member
Joined: 19 Apr 2007
Posts: 66
Location: Norfolk UK
|
| Posted: Tue Dec 02, 2014 5:10 pm Post subject: |
|
|
| TomasVolley wrote: | Absolutely top notch. Best I have seen!
Thanks for great pics.
What about green LEDs. They work too? |
Your welcome, thank you for the comment.
Green LED's are not wired so don't work no.
John. |
|
| Back to top |
|
|
|
|
|
|
|
|
|
|
|
| Author |
Message |
Kalel76
Community Member
Joined: 12 Nov 2014
Posts: 10
Location: Charlotte, NC
|
| Posted: Tue Dec 02, 2014 8:18 pm Post subject: |
|
|
| Gorgeous. |
|
| Back to top |
|
|
|
|
|
|
|
|
|
|
|
| Author |
Message |
VFX Freak
Community Member

Joined: 31 Mar 2013
Posts: 18
Location: Los Angeles
|
| Posted: Thu Dec 04, 2014 8:14 pm Post subject: |
|
|
Wow! That is an absolutely stunning finish. I think it's a fantastic representation of what the gun would have looked like when Deckard first got it. That's what I was going for as well, but I didn't achieve nearly this good a result. Very well done!
_________________
"I shoot better when I move." - The Sundance Kid |
|
| Back to top |
|
|
|
|
|
|
|
|
|
|
|
| Author |
Message |
Noeland
Community Guide
Joined: 24 Oct 2006
Posts: 1328
|
| Posted: Fri Dec 05, 2014 11:01 am Post subject: |
|
|
Museum Quality indeed.
_________________
I don't have enough blasters! |
|
| Back to top |
|
|
|
|
|
|
|
|
|
|
|
| Author |
Message |
spinner 44
Community Member

Joined: 06 Nov 2006
Posts: 202
Location: Madrid, Spain
|
| Posted: Mon Dec 15, 2014 12:27 pm Post subject: Re: Blaster finally finished (pic heavy) |
|
|
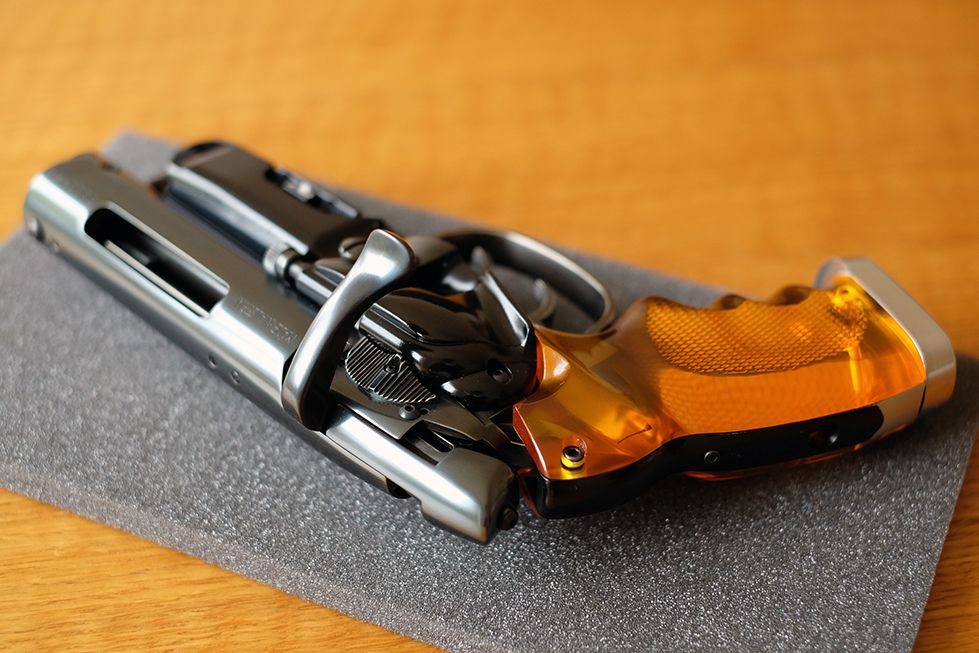
| stonedog7563 wrote: | Hi all, just finished my pro and thought I would post some pics, I would love to say it was fun, but it wasn't, if I never see a bottle of blue ever again it will be too soon.
Thanks for looking.
John.


 |
I get a picture deleted message.. the rest of you do too? |
|
| Back to top |
|
|
|
|
|
|
|
|
|
|
|
|
You cannot post new topics in this forum
You cannot reply to topics in this forum
You cannot edit your posts in this forum
You cannot delete your posts in this forum
You cannot vote in polls in this forum
|
|
|
|
|
|
|
|


