 |
 |
|
 |
|
| Author |
Message |
8th_Passenger
Community Member

Joined: 28 Nov 2009
Posts: 443
Location: Hertfordshire, UK
|
 Posted: Wed Dec 24, 2014 5:12 pm Post subject: Posted: Wed Dec 24, 2014 5:12 pm Post subject: |
 |
|
Thanks (Tony) ukwookie that will be helpful.
I'll look for a few more higher rez images on the web for a comparison.
Colin
_________________
Ripley: What's it key on?
Ash: Micro changes in air density. |
|
| Back to top |
|
|
|
|
 |
|
 |
|
|
|
|
| Author |
Message |
joberg
Community Member
.jpg)
Joined: 06 Oct 2008
Posts: 9447
|
| Posted: Sun Dec 28, 2014 4:19 pm Post subject: |
|
|
Yep, Tony is right Colin; mainly Airfix models were used by our U.K. model maker friends  |
|
| Back to top |
|
|
|
|
|
|
|
|
|
|
|
| Author |
Message |
8th_Passenger
Community Member
Joined: 28 Nov 2009
Posts: 443
Location: Hertfordshire, UK
|
| Posted: Thu Feb 26, 2015 2:54 pm Post subject: |
|
|
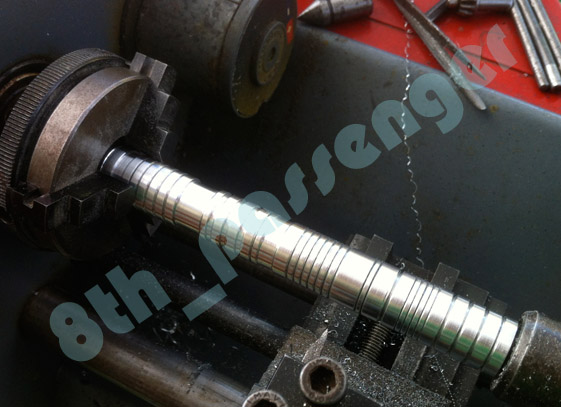
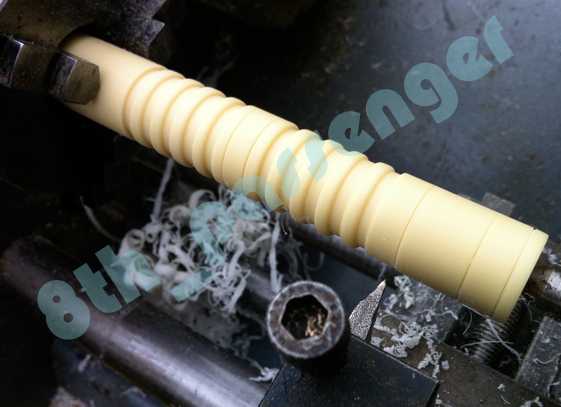
Here's a small update on the flamethrower.
I had chance to turn the rest of the pipe detail on the right hand side.
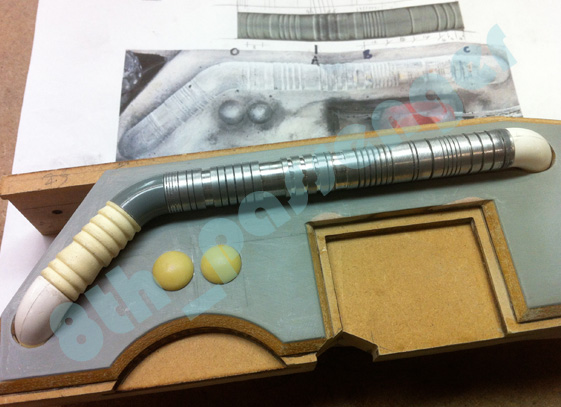
I'm reasonably happy with it. Just needs a bit of tweaking and then moulding and casting as one piece.
I hope to get back on with the build more seriously soon and I will post updates.
Hopefully it should start coming together as a finished piece over the next few months!
Colin
_________________
Ripley: What's it key on?
Ash: Micro changes in air density. |
|
| Back to top |
|
|
|
|
|
|
|
|
|
|
|
| Author |
Message |
joberg
Community Member
Joined: 06 Oct 2008
Posts: 9447
|
| Posted: Thu Feb 26, 2015 5:01 pm Post subject: |
|
|
| The piping sure looks sharp Colin...eager to see the next update |
|
| Back to top |
|
|
|
|
|
|
|
|
|
|
|
| Author |
Message |
8th_Passenger
Community Member
Joined: 28 Nov 2009
Posts: 443
Location: Hertfordshire, UK
|
| Posted: Fri Feb 27, 2015 5:13 am Post subject: |
|
|
Joberg, the shapness is the thing I'm thinking of changeing. I may go in a bit deeper with the grooves and then round off the edges.
Colin
_________________
Ripley: What's it key on?
Ash: Micro changes in air density. |
|
| Back to top |
|
|
|
|
|
|
|
|
|
|
|
| Author |
Message |
joberg
Community Member
Joined: 06 Oct 2008
Posts: 9447
|
| Posted: Sat Feb 28, 2015 8:37 am Post subject: |
|
|
| Do you think that could keep what you have already and simply put a small bevel on the edges. It could "open" your grooves |
|
| Back to top |
|
|
|
|
|
|
|
|
|
|
|
| Author |
Message |
8th_Passenger
Community Member
Joined: 28 Nov 2009
Posts: 443
Location: Hertfordshire, UK
|
| Posted: Sat Feb 28, 2015 1:47 pm Post subject: |
|
|
yes joberg my plan is to keep it pretty much as it stands now. I was only planing on making the grooves fractionally bigger. Maybe I'll try a needle file first.
Colin
_________________
Ripley: What's it key on?
Ash: Micro changes in air density. |
|
| Back to top |
|
|
|
|
|
|
|
|
|
|
|
| Author |
Message |
joberg
Community Member
Joined: 06 Oct 2008
Posts: 9447
|
| Posted: Sat Feb 28, 2015 10:39 pm Post subject: |
|
|
Ah, o.k. got it  |
|
| Back to top |
|
|
|
|
|
|
|
|
|
|
|
| Author |
Message |
LadyVengeance
Joined: 12 Feb 2015
Posts: 3
|
| Posted: Tue Mar 03, 2015 9:16 am Post subject: |
|
|
This looks amazing!  |
|
| Back to top |
|
|
|
|
|
|
|
|
|
|
|
| Author |
Message |
8th_Passenger
Community Member
Joined: 28 Nov 2009
Posts: 443
Location: Hertfordshire, UK
|
| Posted: Tue Mar 03, 2015 4:27 pm Post subject: |
|
|
Thank you LadyVengeance.
Colin
_________________
Ripley: What's it key on?
Ash: Micro changes in air density. |
|
| Back to top |
|
|
|
|
|
|
|
|
|
|
|
| Author |
Message |
joberg
Community Member
Joined: 06 Oct 2008
Posts: 9447
|
| Posted: Tue Mar 03, 2015 5:38 pm Post subject: |
|
|
| Welcome aboard LadyVengeance |
|
| Back to top |
|
|
|
|
|
|
|
|
|
|
|
| Author |
Message |
joberg
Community Member
Joined: 06 Oct 2008
Posts: 9447
|
| Posted: Tue Mar 03, 2015 5:38 pm Post subject: |
|
|
| Welcome aboard LadyVengeance |
|
| Back to top |
|
|
|
|
|
|
|
|
|
|
|
| Author |
Message |
8th_Passenger
Community Member
Joined: 28 Nov 2009
Posts: 443
Location: Hertfordshire, UK
|
| Posted: Sun Mar 15, 2015 1:37 pm Post subject: |
|
|
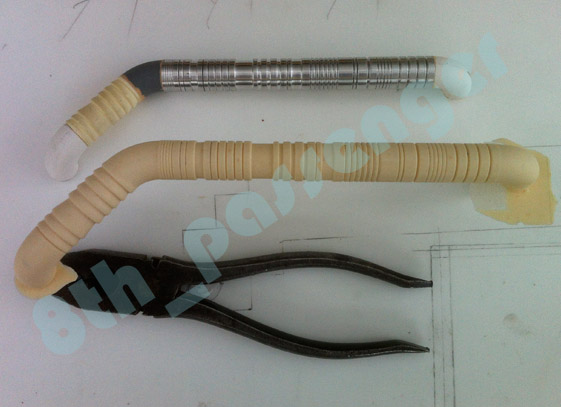
I did the adjustments on the turned pipe. I took joberg's suggestion and mostly used a needle file to open up the slots. Worked a treat.
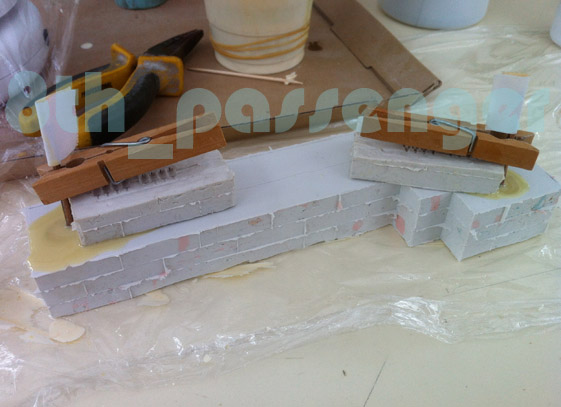
Using my trusty Lego I made a one piece mould.
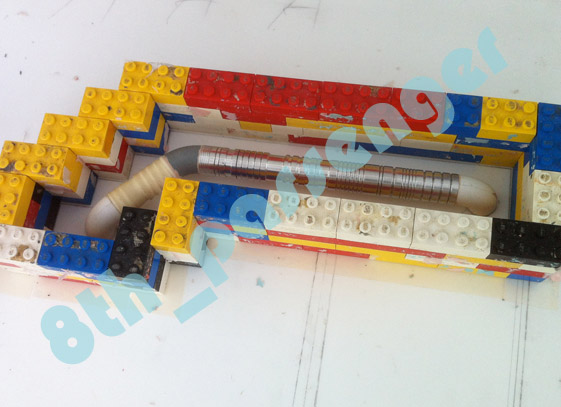
I cut the mould on the underside, so the seam will not be visible when it gets attached to the body.
I then bent up some 1/8th inch steel rod, to suspend in the mould, to give the piece a bit of extra strength.
The casting came out nice and clean.
This week I started working on the dummy white tank. Because I need a hole all the way through I decided to make the pattern in sections so I could drill a hole through each section comfortably.
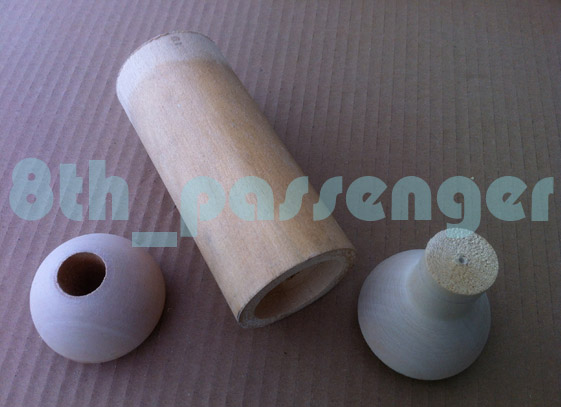
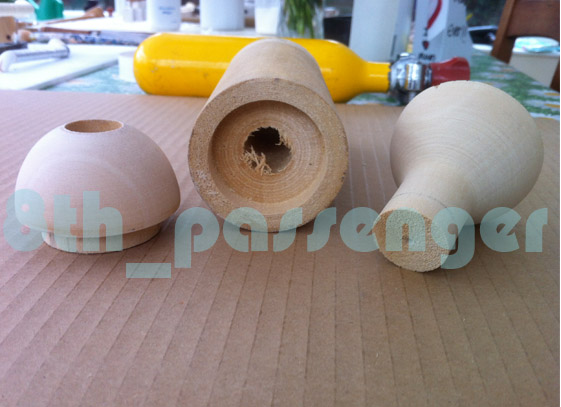
The top section still needs its hole drilling.
Here's a comparison to my real tank.
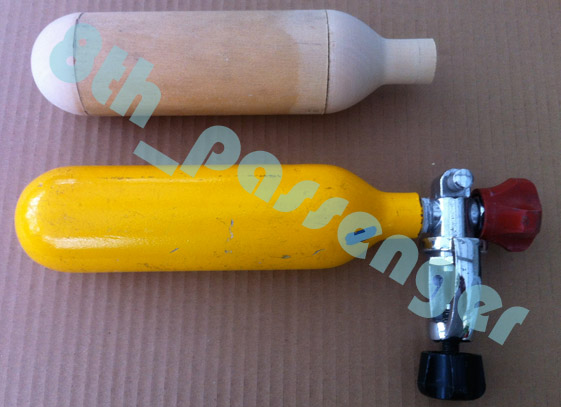
I plan on doing a two part glass fibre mould. A piece of hexagonal steel will run through the center of the tank to take the fittings at either end. The final cast will be glass fibre.
Colin
_________________
Ripley: What's it key on?
Ash: Micro changes in air density. |
|
| Back to top |
|
|
|
|
|
|
|
|
|
|
|
| Author |
Message |
joberg
Community Member
Joined: 06 Oct 2008
Posts: 9447
|
| Posted: Sun Mar 15, 2015 6:45 pm Post subject: |
|
|
| Glad I was of help Colin Love the pipe! As for your tank, doing it like this will surely reduce the weight of that baby |
|
| Back to top |
|
|
|
|
|
|
|
|
|
|
|
| Author |
Message |
8th_Passenger
Community Member
Joined: 28 Nov 2009
Posts: 443
Location: Hertfordshire, UK
|
| Posted: Mon Mar 23, 2015 2:47 pm Post subject: |
|
|
Spent some time last week sorting out some smaller jobs on the flamethrower.
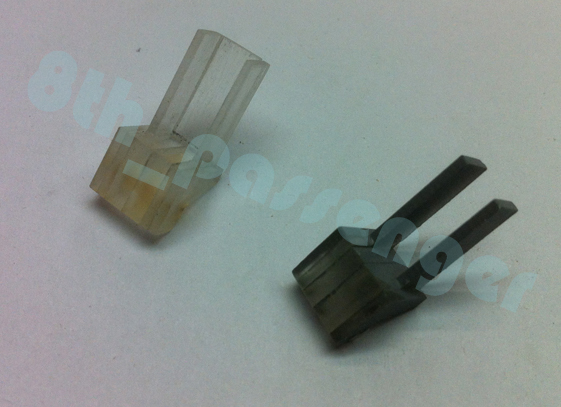
I decided to remake the small detail piece which hooks over one of the Hornby Piers on the right side. The perspex one I had 'pinged' off due to insufficient gluing surface.
I made it again but this time put a web across the base. Rather than gluing on the new perspex one, I moulded it and stuck a fast cast one on. It's still fragile but feels better!
You can see the fast cast one in the second picture.
I filled the semi circular cut out on the right side and blended it into my routed edge. Also I drilled the exit hole for the propane pilot flame feed.
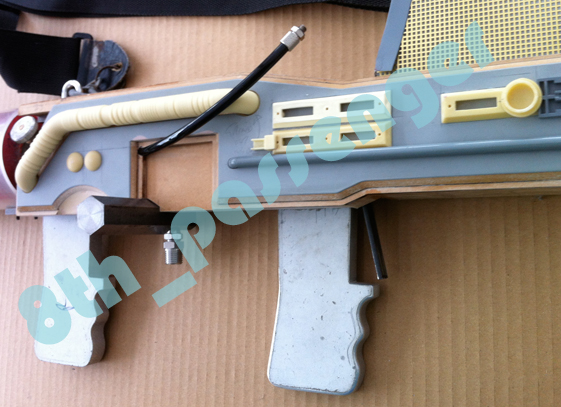
Then using some EMA I sketched in the pipe which runs on the forward lower right side.
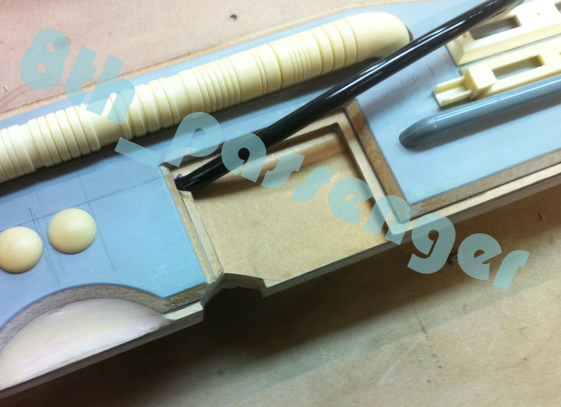
A wider shot.
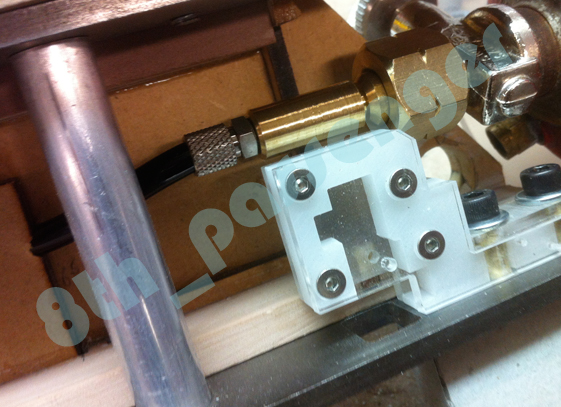
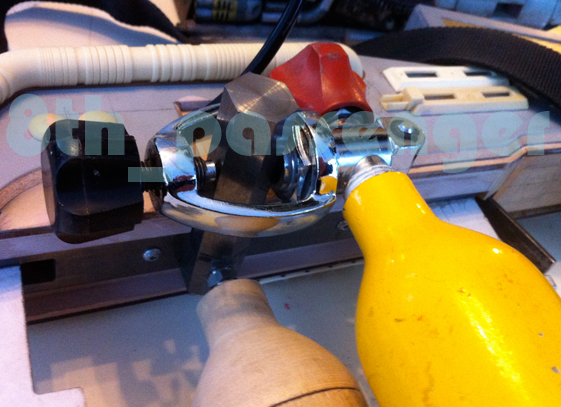
Here's an internal shot showing the polyurethane pipe connecting to the propane bottle. I shortened the turned brass connector I made and notched out the back of the trigger housing for a better fit.
I've drawn up some plans for the 'Nostromo Antenna' detail mounted on the left side. I'm making it in sections, these will slide onto a steel rod.
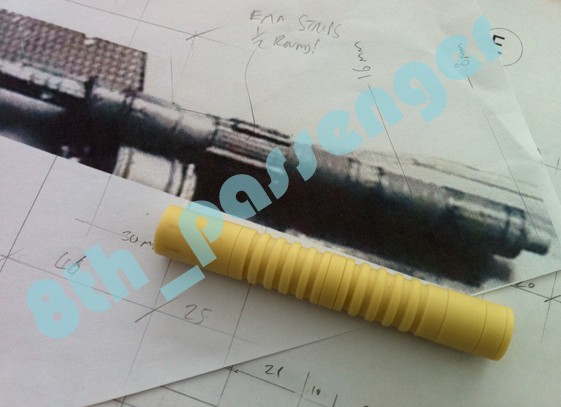
I've done some similar drawings for the pipe on the lower right side too. So these should start coming toghether in the next few weeks.
I got my hexagonal steel bar today to mount in the dummy tank. So I hope to get that cut to size, drilled and tapped this week. Then I will finally be able to hang two tanks off the unit.
The hex bar is quite heavy so I dont think it will be too light. I can always ad some ballast into the glass fibre tank.
Colin
_________________
Ripley: What's it key on?
Ash: Micro changes in air density. |
|
| Back to top |
|
|
|
|
|
|
|
|
|
|
|
| Author |
Message |
joberg
Community Member
Joined: 06 Oct 2008
Posts: 9447
|
| Posted: Mon Mar 23, 2015 5:03 pm Post subject: |
|
|
Great update Colin...eager to see that baby in all its beauty  |
|
| Back to top |
|
|
|
|
|
|
|
|
|
|
|
| Author |
Message |
SKIN JOB 66
Community Member

Joined: 16 Jan 2008
Posts: 2724
Location: FRANCE
|
| Posted: Tue Mar 24, 2015 3:33 pm Post subject: |
|
|
BRILLANT WORK as always, Colin !!!
Fred
_________________
THE FUTURE IS A THING OF THE PAST |
|
| Back to top |
|
|
|
|
|
|
|
|
|
|
|
| Author |
Message |
8th_Passenger
Community Member
Joined: 28 Nov 2009
Posts: 443
Location: Hertfordshire, UK
|
| Posted: Sun Apr 05, 2015 4:45 pm Post subject: |
|
|
Just a quick update.
I drilled and tapped the hex steel to run thru the dummy tank.
Here are a couple of pictures with the fittings screwed on and the tanks in place.

I still have a bit of alteration to do to the hex bar before I blend the tank together and mould it.
Colin
_________________
Ripley: What's it key on?
Ash: Micro changes in air density. |
|
| Back to top |
|
|
|
|
|
|
|
|
|
|
|
| Author |
Message |
SKIN JOB 66
Community Member
Joined: 16 Jan 2008
Posts: 2724
Location: FRANCE
|
| Posted: Tue Apr 28, 2015 1:49 am Post subject: |
|
|
wow wow WOW !
Well done Colin !
Fred
_________________
THE FUTURE IS A THING OF THE PAST |
|
| Back to top |
|
|
|
|
|
|
|
|
|
|
|
| Author |
Message |
8th_Passenger
Community Member
Joined: 28 Nov 2009
Posts: 443
Location: Hertfordshire, UK
|
| Posted: Tue Apr 28, 2015 7:56 am Post subject: |
|
|
Thank you, Fred.
_________________
Ripley: What's it key on?
Ash: Micro changes in air density. |
|
| Back to top |
|
|
|
|
|
|
|
|
|
|
|
|
You cannot post new topics in this forum
You cannot reply to topics in this forum
You cannot edit your posts in this forum
You cannot delete your posts in this forum
You cannot vote in polls in this forum
|
|
|
|
|
|
|
|


