 |
 |
|
 |
|
| Author |
Message |
SKIN JOB 66
Community Member

Joined: 16 Jan 2008
Posts: 2724
Location: FRANCE
|
 Posted: Fri Jun 05, 2009 3:06 am Post subject: Posted: Fri Jun 05, 2009 3:06 am Post subject: |
 |
|
Science officer SKIN JOB 66 here (no need for hypersleep for us artificial beings) !

OK JT, a good & a bad news...
First, the good one : A pic from D. Lowe's archives showing the front section of the docking module, similar to the ones Graham has posted above !
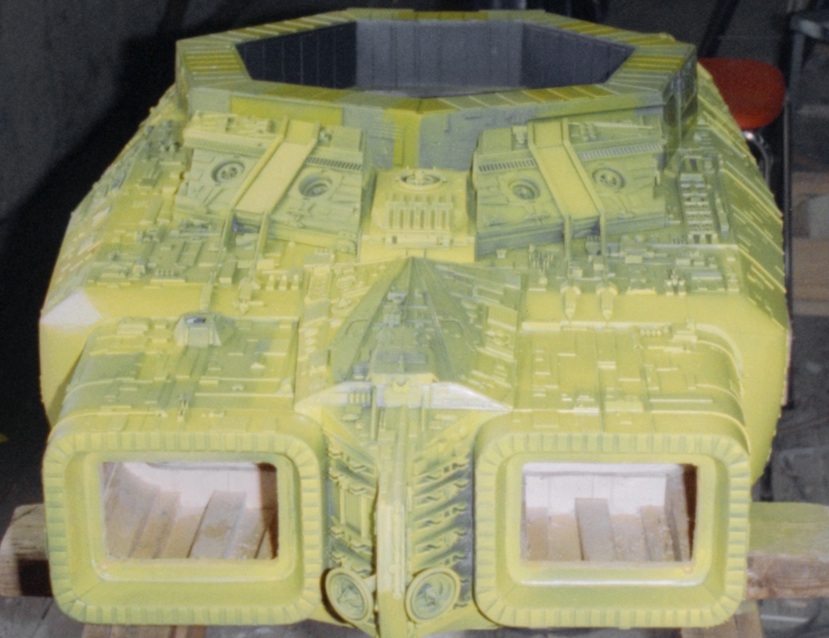
Now, the bad one : Searching for pics showing the front of the docking module, I found something about the REAR section... and unfrotunately your detailing of that part doesn't look too accurate anymore !

Really sorry I didn't found this pic sooner... I think I'm going to self destruct myself with an overdose of milk...

Fred
_________________
THE FUTURE IS A THING OF THE PAST |
|
| Back to top |
|
|
|
|
 |
|
 |
|
|
|
|
| Author |
Message |
joberg
Community Member
.jpg)
Joined: 06 Oct 2008
Posts: 9447
|
| Posted: Fri Jun 05, 2009 6:51 am Post subject: |
|
|
You'll notice that those pipes are the same as the ones used on the flame-thrower  |
|
| Back to top |
|
|
|
|
|
|
|
|
|
|
|
| Author |
Message |
Mark Sheppard
Community Member

Joined: 18 Apr 2009
Posts: 951
Location: In my office playing golf, pouring drinks, making deals.
|
| Posted: Fri Jun 05, 2009 9:12 am Post subject: |
|
|
I see the top docking module where you are talking about... I need to make a tapered rear corrugated part..up towards the top. That I never glued on because I never had that angle... but now I do!
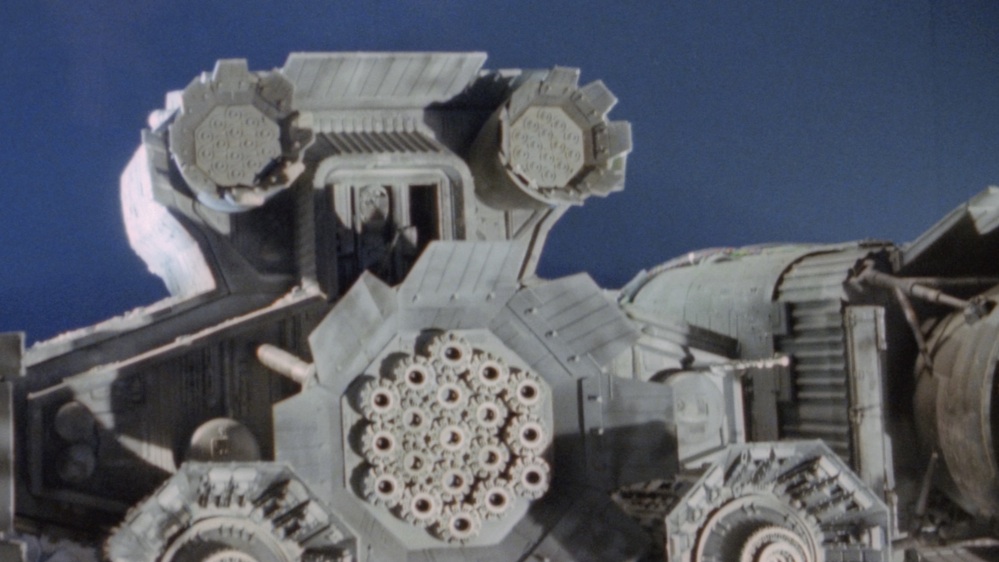
actually this is the mid-size model you are showing. used for the separation scene... Not the large one. What I am doing is combining details from all three into a composite... the kit is fairly less detailed on the rear.. and there is a difference between this smaller model and the large one. but the builder can basically do however they want. I just went for way more detail |
|
| Back to top |
|
|
|
|
|
|
|
|
|
|
|
| Author |
Message |
Mark Sheppard
Community Member
Joined: 18 Apr 2009
Posts: 951
Location: In my office playing golf, pouring drinks, making deals.
|
| Posted: Fri Jun 05, 2009 12:52 pm Post subject: |
|
|
ok, Here is the rear bulkhead on the original AEF kit... I will redo this tonight and remold it to correspond to Fred's Picture of the smaller model. Also I will add the beveled part to the upper corrugated part on the docking module.
This really will not be an AEF kit anymore, I am changing so much stuff, but I guess its all for the better...
 |
|
| Back to top |
|
|
|
|
|
|
|
|
|
|
|
| Author |
Message |
SKIN JOB 66
Community Member
Joined: 16 Jan 2008
Posts: 2724
Location: FRANCE
|
| Posted: Fri Jun 05, 2009 1:51 pm Post subject: |
|
|
| jtparker wrote: |
actually this is the mid-size model you are showing. used for the separation scene... Not the large one. |
Of course, should have noticed this... Jon Sorensen's model !!!

Sorry, JT...
Fred
_________________
THE FUTURE IS A THING OF THE PAST |
|
| Back to top |
|
|
|
|
|
|
|
|
|
|
|
| Author |
Message |
Mark Sheppard
Community Member
Joined: 18 Apr 2009
Posts: 951
Location: In my office playing golf, pouring drinks, making deals.
|
| Posted: Fri Jun 05, 2009 2:57 pm Post subject: |
|
|
| SKIN JOB 66 wrote: | | jtparker wrote: |
actually this is the mid-size model you are showing. used for the separation scene... Not the large one. |
Of course, should have noticed this... Jon Sorensen's model !!!
Sorry, JT...
Fred |
No problem Fred! Thats why we are all here! Ia am going to change the rear bulkhead to conform more with your picture here..Thanks for the great pic! with yours and Grahams help, this will be the most accurate Nostromo yet! |
|
| Back to top |
|
|
|
|
|
|
|
|
|
|
|
| Author |
Message |
SKIN JOB 66
Community Member
Joined: 16 Jan 2008
Posts: 2724
Location: FRANCE
|
| Posted: Fri Jun 05, 2009 5:37 pm Post subject: |
|
|
Thanks a lot for the kind words JT... but all REAL credit on this amazing kit goes to you !

Fred
_________________
THE FUTURE IS A THING OF THE PAST |
|
| Back to top |
|
|
|
|
|
|
|
|
|
|
|
| Author |
Message |
Mark Sheppard
Community Member
Joined: 18 Apr 2009
Posts: 951
Location: In my office playing golf, pouring drinks, making deals.
|
| Posted: Sun Jun 07, 2009 10:35 pm Post subject: |
|
|
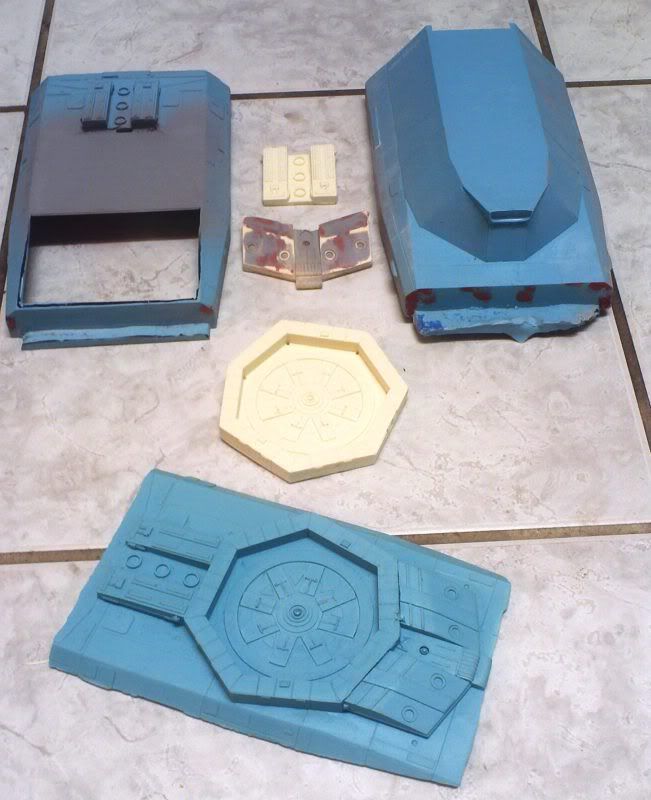
Here is a result of a days work "dissecting" the Nostromo docking module.
with a dremel tool I cut away the interlock mechanism, cut away the top panels of the module, ground down the incorrect AEF detailing on the "boxes" forward of the interlock, and actually remolded the circular part of the interlock (Not seen here).. I have a section of the old version in the foreground with the dissected and redone parts sitting in the background ready for re-detailing, repiping, re-assembly, and remolding. This was more work than I anticipated.
 |
|
| Back to top |
|
|
|
|
|
|
|
|
|
|
|
| Author |
Message |
furystorm
Joined: 04 Jun 2009
Posts: 7
Location: Las Vegas
|
| Posted: Sun Jun 07, 2009 10:54 pm Post subject: |
|
|
| Wow! Simply amazing! Cannot wait. |
|
| Back to top |
|
|
|
|
|
|
|
|
|
|
|
| Author |
Message |
Mark Sheppard
Community Member
Joined: 18 Apr 2009
Posts: 951
Location: In my office playing golf, pouring drinks, making deals.
|
| Posted: Sun Jun 07, 2009 11:10 pm Post subject: |
|
|
| furystorm wrote: | | Wow! Simply amazing! Cannot wait. |
Thanks Furystorm!
I know it looks tedious, it is LOL! but it is going to make for a much more accurate kit. I am making things "jibe" with Space-jockeys blueprints. its kinda a consensus thing among the great members here to make this complex ship something tangible. |
|
| Back to top |
|
|
|
|
|
|
|
|
|
|
|
| Author |
Message |
Space Jockey
Community Member

Joined: 13 Apr 2009
Posts: 559
Location: East Tennessee
|
| Posted: Mon Jun 08, 2009 12:03 am Post subject: |
|
|
| jtparker wrote: | Thanks Furystorm!
I know it looks tedious, it is LOL! but it is going to make for a much more accurate kit. I am making things "jibe" with Space-jockeys blueprints. its kinda a consensus thing among the great members here to make this complex ship something tangible. |
Yeah, the back of the docking module you can see those three small circles in a row... I took that detail off your kit. I haven't seen any photo's of that area and it looks cool.  |
|
| Back to top |
|
|
|
|
|
|
|
|
|
|
|
| Author |
Message |
SKIN JOB 66
Community Member
Joined: 16 Jan 2008
Posts: 2724
Location: FRANCE
|
| Posted: Mon Jun 08, 2009 2:15 am Post subject: |
|
|
Great work once more, JT... BRAVO !!!
Fred
_________________
THE FUTURE IS A THING OF THE PAST |
|
| Back to top |
|
|
|
|
|
|
|
|
|
|
|
| Author |
Message |
spinner 44
Community Member

Joined: 06 Nov 2006
Posts: 202
Location: Madrid, Spain
|
| Posted: Mon Jun 08, 2009 3:11 am Post subject: |
|
|
| OK, I wanted to resisit but now I need one Nostromo, seriously! |
|
| Back to top |
|
|
|
|
|
|
|
|
|
|
|
| Author |
Message |
joberg
Community Member
Joined: 06 Oct 2008
Posts: 9447
|
| Posted: Mon Jun 08, 2009 6:32 am Post subject: |
|
|
| Very good work (and dedication) JT! |
|
| Back to top |
|
|
|
|
|
|
|
|
|
|
|
| Author |
Message |
Mark Sheppard
Community Member
Joined: 18 Apr 2009
Posts: 951
Location: In my office playing golf, pouring drinks, making deals.
|
| Posted: Wed Jun 10, 2009 11:23 pm Post subject: |
|
|
Thank you Joberg!
here are all of the parts sitting basically the way it will look with the new "boxes" forward of the interlock mechanism and this will be much better aligned and more accurate. I basically had to cut a one-piece large part into several small parts, I even cut and remolded the "circular" umbilicus interlock to be able to realign. I spent several hours just dissecting and cleaning parts LOL! I added new panels to be able to retool the new master, and tomorrow night I will permanently align, measure, and adhere everything, add the tubing per the studio model and the plans in the correct geometry, and should be ready for final molding friday night... then there is only one more part to correct/remold and this baby is done...for now ...mark-II Nostromo kit!
 |
|
| Back to top |
|
|
|
|
|
|
|
|
|
|
|
| Author |
Message |
Space Jockey
Community Member
Joined: 13 Apr 2009
Posts: 559
Location: East Tennessee
|
| Posted: Thu Jun 11, 2009 12:19 am Post subject: |
|
|
Great work JTP, looking good!  |
|
| Back to top |
|
|
|
|
|
|
|
|
|
|
|
| Author |
Message |
SKIN JOB 66
Community Member
Joined: 16 Jan 2008
Posts: 2724
Location: FRANCE
|
| Posted: Thu Jun 11, 2009 2:09 am Post subject: |
|
|
It looks 100% screen accurate now, thank you for all your hard work, JT !!!
Fred
_________________
THE FUTURE IS A THING OF THE PAST |
|
| Back to top |
|
|
|
|
|
|
|
|
|
|
|
| Author |
Message |
joberg
Community Member
Joined: 06 Oct 2008
Posts: 9447
|
| Posted: Thu Jun 11, 2009 6:56 am Post subject: |
|
|
| This is lookin' better and better JT |
|
| Back to top |
|
|
|
|
|
|
|
|
|
|
|
| Author |
Message |
Mr Webber
Community Member

Joined: 13 Apr 2008
Posts: 1824
Location: Terra Australis
|
| Posted: Fri Jun 12, 2009 7:36 am Post subject: |
|
|
I really enjoy following this thread, great work 
_________________
Formerly offworld66 |
|
| Back to top |
|
|
|
|
|
|
|
|
|
|
|
| Author |
Message |
Mark Sheppard
Community Member
Joined: 18 Apr 2009
Posts: 951
Location: In my office playing golf, pouring drinks, making deals.
|
| Posted: Sat Jun 13, 2009 10:34 am Post subject: |
|
|
Here is the newly redone docking module top.. as you can see I just need to add a couple small conduits to the left side, make sure everything looks good as far as finish, and pour the silicon mold today.
This took me longer than I thought to get it all back together... pulled an all-nighter on this one.. but it is much closer to the studio version, and better than the AEF original
 |
|
| Back to top |
|
|
|
|
|
|
|
|
|
|
|
|
You cannot post new topics in this forum
You cannot reply to topics in this forum
You cannot edit your posts in this forum
You cannot delete your posts in this forum
You cannot vote in polls in this forum
|
|
|
|
|
|
|
|


