 |
 |
|
 |
|
| Author |
Message |
jinxed
Community Member
Joined: 28 Sep 2010
Posts: 50
|
 Posted: Fri Oct 22, 2010 11:12 am Post subject: Coyle Blaster #28 Build diary. Pic heavy. Posted: Fri Oct 22, 2010 11:12 am Post subject: Coyle Blaster #28 Build diary. Pic heavy. |
 |
|
I thought it might be nice to have a visual diary of sorts, start to finish. Being my first kit I expect to make mistakes, learn from them, and proceed. My goal is a worldcon weathered example. Some parts I will go for screen accuracy, some I will do as I enjoy. Like all of you this firearm has been an icon in my head for the majority of my life. It is amazing to have the parts in my hands with the prospect of holding the thing in the near future.
Thanks to Rich for the kit and continued support. Thanks to the forum for the passion.
Here are the major pieces out of the box. I will update with pictures as I progress. Grips and handles will be first up.
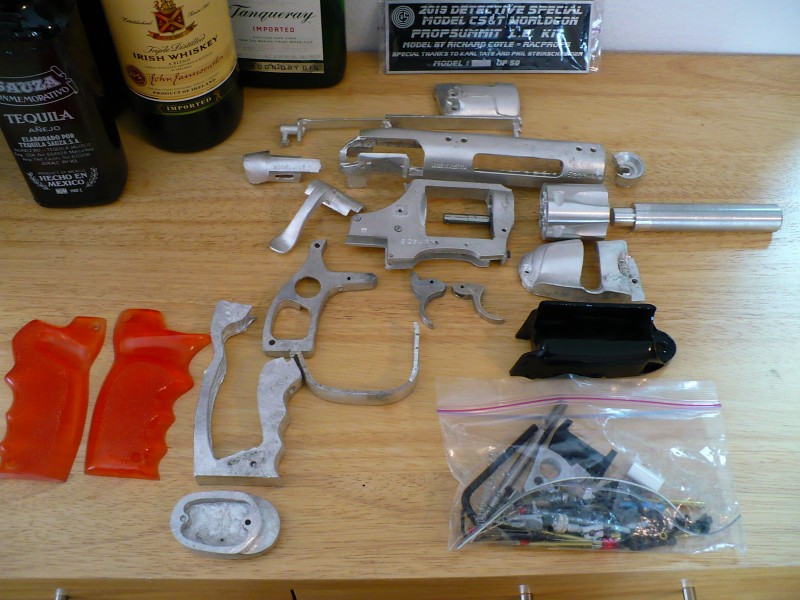


This is the only part I have started cleaning. I figured I would start with the inner frame to get a feel for the material. If I botch it, it's mostly hidden!
 |
|
| Back to top |
|
|
|
|
 |
|
 |
|
|
|
|
| Author |
Message |
propsjonnyb
Community Member
Joined: 16 Jul 2009
Posts: 476
Location: Helmdon, Northamptonshire UK
|
| Posted: Fri Oct 22, 2010 11:56 am Post subject: |
|
|
As your shots show it's a rough cast ( straight out of the mold) , I would always recommend building it from the inside out , starting with the gun frame - that way you have something to affix your parts to as you go along - I'd repeat the same thing with the bolt assembly as that fits inside the upper receiver and ditto the handle .
Lots of filing and sanding is needed to get all the parts smooth , concentrate especially on the gun frame, barrel , upper reciever and outer handle as they are the more visible parts on the gun.
From your photos , you need to finish all the parts to at least the same finish as the inner handle - if not more so, and especially smooth the bolt as you don't want it to snag and stick inside the receiver .
If I could offer one piece of advice - don't cut the back part of the upper receiver until the last possible moment, and when you do be extra careful in filing and sanding it down as it exposes the weakest point in the whole receiver , the small piece where the bolt handle rests.
Eventually you'll end up with four main parts , the handle , the gun frame and the upper reciever ( plus the ammo box which will be connected to the left hand shroud , as that's where the sight rod's LED's mounted). Bolt the handle on the gun frame and check for alignment, then on goes the grips , bolt the upper reciever to the barrel and gun frame adding the RHS shroud. Now bolt the ammo box to the barrel ( front Screw bolt) bolt the LHS shroud to the ejector rod pivot and slot the ammo box base into the magazine , it's a friction joint, so don't force it in to hard , as at some point you'll want to change the battery .
Members ask me "when do you 'weather' the gun?", well it all depends on how realistic you want your gun, I electroplate and parkerize (gun blue) all the parts after the final 'mirror' polish , then add the 'weathering etc , once the gun is built - if you've followed Rich's photo album you can paint and 'weather' the exposed pewter part's with 'pewter black' which should be sufficent for most .
As to what I use - Tamiya weathering powders as they are only a surface addition & I can always remove them at a later date , if I want a 'pristine' new look.
Bondo or P38 filler is your 'best friend' when it comes to fixing anything on the ammo box - ditto on both the shrouds as well, as you'll just sand smooth , prime and paint.
Now you've finished - polish and admire your work !! Clean with a soft lint free cloth and a light polish, every so often, will keep you blaster in good condition. Remember if you haven't sealed or painted your gun , Pewter will oxidize in the air and will go black eventually , so you must clean and polish regularly to keep it looking good. |
|
| Back to top |
|
|
|
|
|
|
|
|
|
|
|
| Author |
Message |
racprops
Community Member

Joined: 30 Oct 2006
Posts: 2450
Location: Phoenix AZ
|
| Posted: Fri Oct 22, 2010 3:45 pm Post subject: |
|
|
PropsjonnyB is 95% of the time: right.
BUT I will say that I have found that the fine pewter which is mostly tin, does not blacken as it ages, I have phaser parts that are 10 to 20 years old that are still bight and shinny and still look like polished aluminum.
Old pewter that had lead would blacken, without the lead it does not.
My 2 cents.
Rich
_________________
I never have enough time to do all I want to do! |
|
| Back to top |
|
|
|
|
|
|
|
|
|
|
|
| Author |
Message |
joberg
Community Member
.jpg)
Joined: 06 Oct 2008
Posts: 9466
|
| Posted: Sat Oct 23, 2010 7:22 am Post subject: |
|
|
Good stuff jinxed. As you can see you'll have plenty of help here as you continue your build.  |
|
| Back to top |
|
|
|
|
|
|
|
|
|
|
|
| Author |
Message |
propsjonnyb
Community Member
Joined: 16 Jul 2009
Posts: 476
Location: Helmdon, Northamptonshire UK
|
| Posted: Sat Oct 23, 2010 7:26 am Post subject: |
|
|
| Rich is of course quite right , I keep forgetting that his alloy has a higher tin content , I use a UK British Standard alloy which has a higher silver content for the same reason. But I see so many 'white metal ' cast parts of low quality pewter , eventually all pewter will oxidise only the material content determines how slowly that takes place - my apologies Rich , I did not mean to imply your casts darkened with age. |
|
| Back to top |
|
|
|
|
|
|
|
|
|
|
|
| Author |
Message |
racprops
Community Member
Joined: 30 Oct 2006
Posts: 2450
Location: Phoenix AZ
|
| Posted: Sat Oct 23, 2010 7:44 am Post subject: |
|
|
Some of my Phasers from the 80s had such pewter and I learned if I got Fine Pewter, lead free pewter then it will not blacken.
I made sure this is lead free.
Rich
_________________
I never have enough time to do all I want to do! |
|
| Back to top |
|
|
|
|
|
|
|
|
|
|
|
| Author |
Message |
jinxed
Community Member
Joined: 28 Sep 2010
Posts: 50
|
| Posted: Fri Dec 03, 2010 7:30 pm Post subject: |
|
|
Well, I am moving painfully slow.
But since I am learning on the way I am trying to be methodical. Plus with all the recent discussion and pictures it's just more to work with I suppose.
Since I got my inner and outer grip frames aligned and fitted, I wanted to have a go with the grips. I am fairly pleased so far and got it pretty clear. I may do a little more polishing before final assembly.
Before:

After:

Big thanks to Mark Raats for the moolah.

I have been working to fit the rear bolt nice and tight to the upper receiver. It's coming along...but not yet where I want it.

Worked on cleaning and shaping the cocking lever.

Kind of where I'm at.

I am going to try and sand the left side of the upper receiver to even up its profile next.
Bolt is assembled.
My ammo housing is awaiting sanding of the bondo. Back side was cracked so I need to figure a fix. Thinking a small metal strip with super glue.
Right cylinder cover is sanded and cleaned. Might do a bit of smoothing with bondo on that too.
This is fun. |
|
| Back to top |
|
|
|
|
|
|
|
|
|
|
|
| Author |
Message |
jameth
Community Member
Joined: 02 Feb 2010
Posts: 825
|
| Posted: Fri Dec 03, 2010 8:48 pm Post subject: |
|
|
Excellent work so far. I think your doing great. I was lazy and a little more flush with cash back then so I was one of the five who got the Deluxe.
I think yours looks great so far.
Marsattacks has a real detailed thread here about his kit build that would probably be of great help. I think that one has a lot from propsjohnnyb about his builds as well. Plus he has built several and is always happy to help. Although he should be busy building our VK machines  |
|
| Back to top |
|
|
|
|
|
|
|
|
|
|
|
| Author |
Message |
Staar
Community Member

Joined: 04 Feb 2008
Posts: 757
Location: AUSTRALIA
|
| Posted: Fri Dec 03, 2010 10:06 pm Post subject: |
|
|
| jameth wrote: | Excellent work so far. I think your doing great. I was lazy and a little more flush with cash back then so I was one of the five who got the Deluxe.
I think yours looks great so far.
Marsattacks has a real detailed thread here about his kit build that would probably be of great help. I think that one has a lot from propsjohnnyb about his builds as well. Plus he has built several and is always happy to help. Although he should be busy building our VK machines |
I agree.. a really great start with a lot of care and patience jinxed mate!
Thanks for sharing and I'll look forward to following your progress.
Kind regards
MARK
_________________
 |
|
| Back to top |
|
|
|
|
|
|
|
|
|
|
|
| Author |
Message |
Noeland
Community Guide
Joined: 24 Oct 2006
Posts: 1328
|
| Posted: Sat Dec 04, 2010 3:32 am Post subject: |
|
|
Nice build you have going! Pics like these make me want a stainless steel blaster!

_________________
I don't have enough blasters! |
|
| Back to top |
|
|
|
|
|
|
|
|
|
|
|
| Author |
Message |
racprops
Community Member
Joined: 30 Oct 2006
Posts: 2450
Location: Phoenix AZ
|
| Posted: Sat Dec 04, 2010 3:40 am Post subject: |
|
|
I too am happy to see it going well.
Looking very good so far.
Let me know if you need anything.
Rich
_________________
I never have enough time to do all I want to do! |
|
| Back to top |
|
|
|
|
|
|
|
|
|
|
|
| Author |
Message |
propsjonnyb
Community Member
Joined: 16 Jul 2009
Posts: 476
Location: Helmdon, Northamptonshire UK
|
| Posted: Sat Dec 04, 2010 6:30 am Post subject: |
|
|
| Yes I agree, make doubly sure you check clearances and alignment when fitting parts together , especially when you fit the cylinder drum as you want that to spin freely with no wobble, and also remember when you fit both shroulds, you still want the cylinder to spin and not touch on the sides , but all in all a good build so far , I would suggest some finer grit sanding is required on the upper receiver, just to get rid of the last spots and make it a real 'mirror' shine surface, you really want the same finish as the bolt handle . Well done so far ! |
|
| Back to top |
|
|
|
|
|
|
|
|
|
|
|
| Author |
Message |
Photech
Community Member
Joined: 05 May 2009
Posts: 207
Location: Australia
|
| Posted: Sun Dec 05, 2010 5:45 pm Post subject: |
|
|
How finer grit do you need to go?
_________________
No! 4, 2 - 2, 4. |
|
| Back to top |
|
|
|
|
|
|
|
|
|
|
|
| Author |
Message |
jinxed
Community Member
Joined: 28 Sep 2010
Posts: 50
|
| Posted: Sun Dec 05, 2010 6:57 pm Post subject: |
|
|
| propsjonnyb wrote: | | Yes I agree, make doubly sure you check clearances and alignment when fitting parts together , especially when you fit the cylinder drum as you want that to spin freely with no wobble, and also remember when you fit both shroulds, you still want the cylinder to spin and not touch on the sides , but all in all a good build so far , I would suggest some finer grit sanding is required on the upper receiver, just to get rid of the last spots and make it a real 'mirror' shine surface, you really want the same finish as the bolt handle . Well done so far ! |
Yea, so far my fitting of the drum has it spinning free, but I will revisit once I get the shrouds fixed.
I have not done any finish polishing yet. I only took the lever as far as I did since it will not really need any further tweaking. It's only hand polished, I have yet to take it to the buffing wheel with rouge.
The rear bolt and upper receiver are still in progress so I have not done any finish sanding yet.
I use fairly heavy grit for removing material fast. Maybe 150-200. Then when I get basic shaping done I shift to 300-400. For final shaping cleaning I use 600. It seems 800-1000 will get a pretty nice surface that will shine well with even just a hand rub with chrome or metal polish. I tested with brasso, and another generic chrome polish with good results. I imagine once I move to the buffing wheel it should mirror up fast.
I was thinking of using some of the pitting in the cast to serve as a base for some world con weathering. Plan is to rub paint into those, rub off the excess, then add some surface layers for depth.
Before all that, I plan to blue the appropriate parts.
Hopefully my plan is sound...I am stalling a bit because I'm really hesitant on the drilling. I really need to just bite the bullet so I can move forward. My fear is drilling the holes to mount the upper receiver to the barrel, then the bottom screw for the ammo holder.
Do you guys drill all the way into the barrel? I cannot tell from the pictures, but it doesnt look like it. I assume they could be seen looking down the barrel? However, if you dont drill all the way through, how do you get the tap in far enough to cut the threads properly?
I hope that makes sense. |
|
| Back to top |
|
|
|
|
|
|
|
|
|
|
|
| Author |
Message |
propsjonnyb
Community Member
Joined: 16 Jul 2009
Posts: 476
Location: Helmdon, Northamptonshire UK
|
| Posted: Mon Dec 06, 2010 6:48 am Post subject: |
|
|
The grit types you've used are great although the finer you go eg 1200 the better the finish , and again I would compliment you on hand polishing the parts , you do get a better finish and have greater control.
I would suggest drilling and tapping all the holes before you try to 'blue' any part and again I would strongly suggest hand drilling and tapping ( use a cutting compound), use the upper reciever offered up to the barrel in final position, to mark the barrel drill points then drill each side and bottom, you may find it better to use a bench press drill and a vice to secure the barrel, but whatever you do, tap the holes by hand that way you'll be able to 'feel' when the tap bit goes through, clean, file and polish all the holes before proceeding. I do drill all the way through , but tend to drill out or file down the screw and bolts so that when looking down the barrel it looks clear & therefore real.
Tamiya weathering powders , particularly aged rust are good for the pits , but weather as a final resort
As I have said many times before, some pewter alloy's do not take a true gunsmith's 'blue' or 'parkerization' so I would suggest using ' Pewter Black' as Rich does available from most hobby or art stores . Wear adequate eye protection and use gloves and an apron to protect yourself, as most chemicals are irritants. Degrease the parts well and allow to dry , then apply the Pewter Black following the instructions that come with the product. Be very careful when handling the parts as you don't want to leave finger smudges even with gloves on. You can repeat the process , to get a slightly darker finish , but you will quickly reach a point where it willl not darken any further and the chemicals will start to deposit a residue on the surface , if that happens polish off the surface lightly with scotchbrite or a slight abrasive cloth , if you remove too much don't worry you can re-dip , allow the piece to dry and then use jade oil or any gun treatment oil to seal the surface and allow to dry completely before handling again. I prefer to use jade oil, as professional gun smiths do, as it makes the surface water repellant. Since you are only adding a surface treatment, do not use any abrasive polish after you blacken the parts ever , as you'll return the part to the pewter polish stage and will have to repeat the process all over again . A rub with a slightly damp cloth and a polish with a lint free cloth is all that'll be needed in the future to keep it pristine. |
|
| Back to top |
|
|
|
|
|
|
|
|
|
|
|
| Author |
Message |
joberg
Community Member
Joined: 06 Oct 2008
Posts: 9466
|
| Posted: Mon Dec 06, 2010 8:27 am Post subject: |
|
|
So far it's looking good! Don't worry, the title of this topic is not: "how fast I built my gun" ) Take your time, as you can see you have plenty of experts here to help you get the results you'll want. Keep up the good work. ) Take your time, as you can see you have plenty of experts here to help you get the results you'll want. Keep up the good work. |
|
| Back to top |
|
|
|
|
|
|
|
|
|
|
|
| Author |
Message |
BR12819
Community Member
Joined: 31 Oct 2006
Posts: 180
Location: Atlanta, GA
|
| Posted: Sat Dec 25, 2010 3:09 am Post subject: |
|
|
I know you've probably been busy with the holidays. Any progress on this?
_________________
full tilt boogie baby
 |
|
| Back to top |
|
|
|
|
|
|
|
|
|
|
|
| Author |
Message |
darkknight
Community Member
Joined: 10 Jan 2011
Posts: 28
|
| Posted: Tue Jan 11, 2011 10:45 am Post subject: |
|
|
| looks beautiful, cant wait to see more |
|
| Back to top |
|
|
|
|
|
|
|
|
|
|
|
|
You cannot post new topics in this forum
You cannot reply to topics in this forum
You cannot edit your posts in this forum
You cannot delete your posts in this forum
You cannot vote in polls in this forum
|
|
|
|
|
|
|
|


