 |
 |
|
 |
|
| Author |
Message |
joberg
Community Member
.jpg)
Joined: 06 Oct 2008
Posts: 9447
|
 Posted: Wed Mar 13, 2013 6:52 am Post subject: Posted: Wed Mar 13, 2013 6:52 am Post subject: |
 |
|
Real wooden grips...great idea and as Rep13 said, never saw it sold with such grips before. I think you're on to something Dave  |
|
| Back to top |
|
|
|
|
 |
|
 |
|
|
|
|
| Author |
Message |
DaveG
Community Member
Joined: 13 Mar 2011
Posts: 373
Location: Southern Calif.
|
| Posted: Wed Mar 13, 2013 9:09 am Post subject: Re: GRIPPING! |
|
|
| Replicant 13 wrote: | Beautiful idea, beautifully executed!
Nicely done. Rather surprised no one has thought of marketing something like these before (to my knowledge).
I realize some might think it detracts from the beauty of the woodgrain, but will any of these have the medallion insert?
- R13 |
Thanks! Yes, I am working on Goldberg Arms medallion inserts. First I need to get acceptable metal castings on them which requires some new molds. In the works!
_________________
Dave
"I just want to say people... Get A Life! Move out of your parent's basement! It's just a movie!" |
|
| Back to top |
|
|
|
|
|
|
|
|
|
|
|
| Author |
Message |
DaveG
Community Member
Joined: 13 Mar 2011
Posts: 373
Location: Southern Calif.
|
| Posted: Sun Mar 17, 2013 11:30 am Post subject: |
|
|
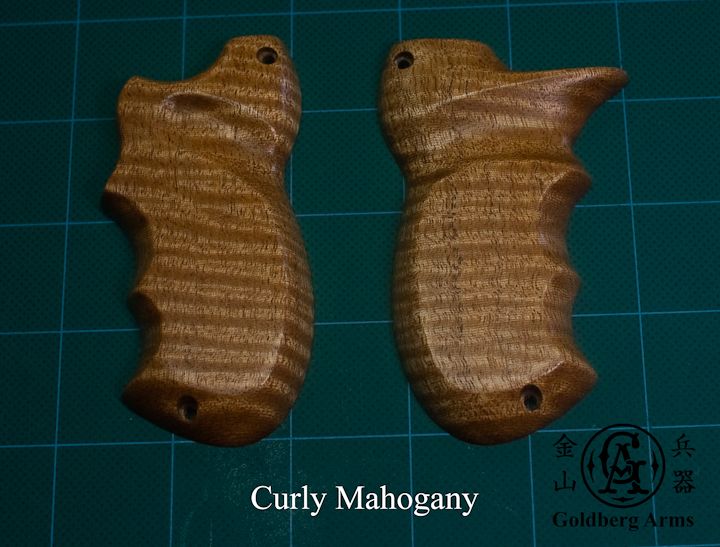
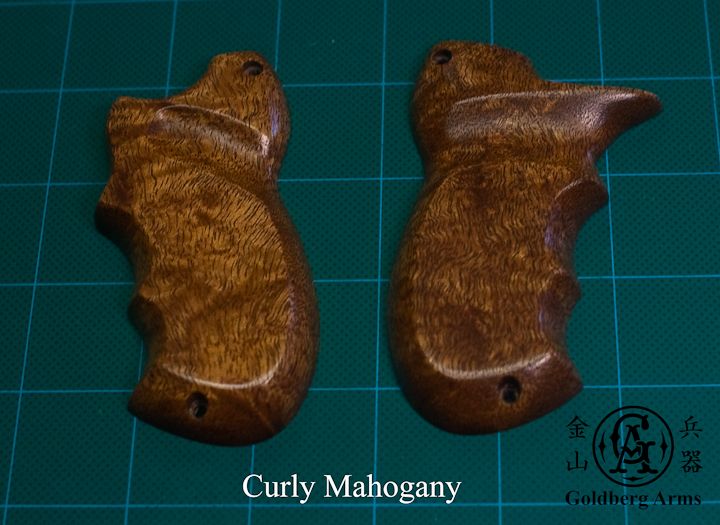
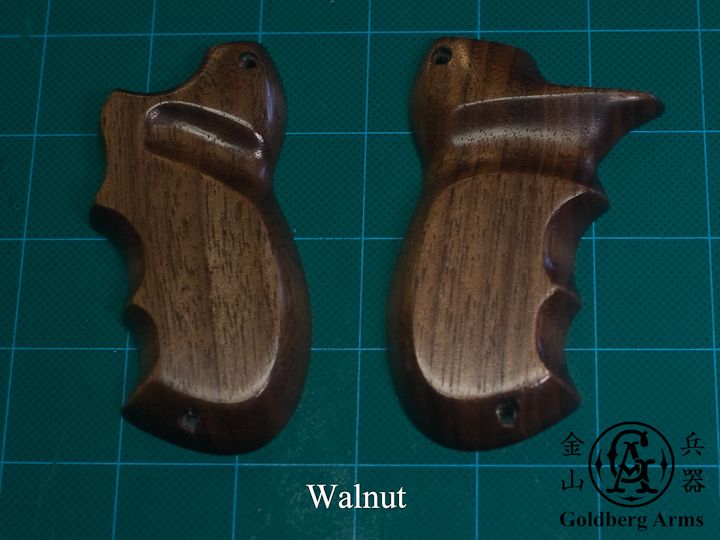
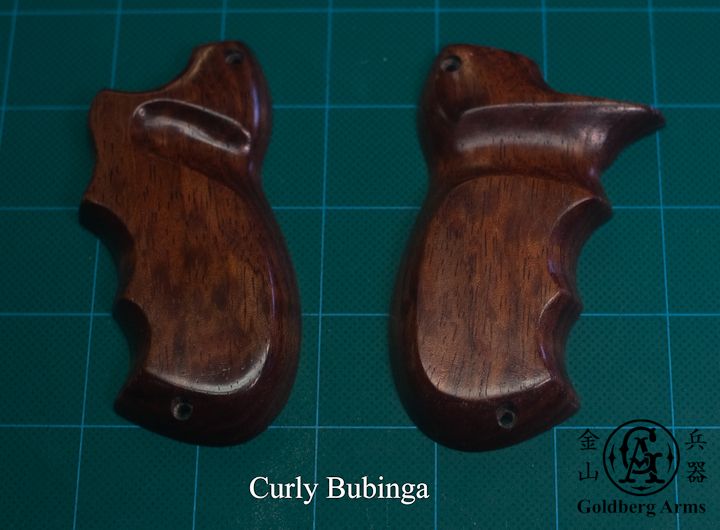
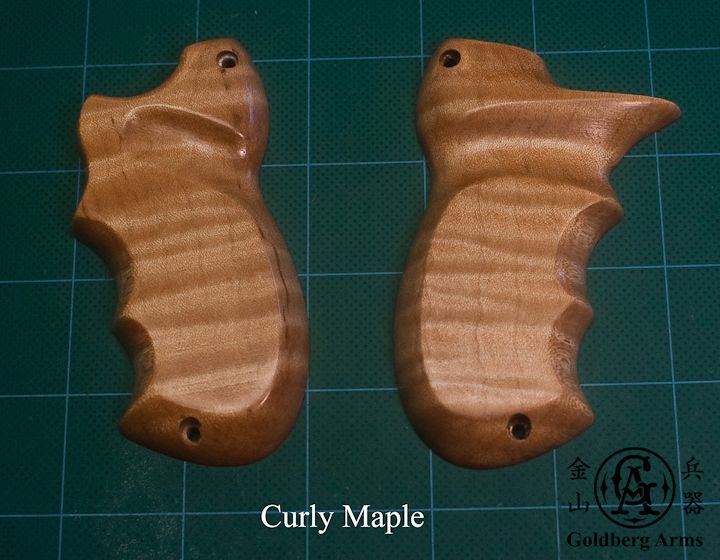
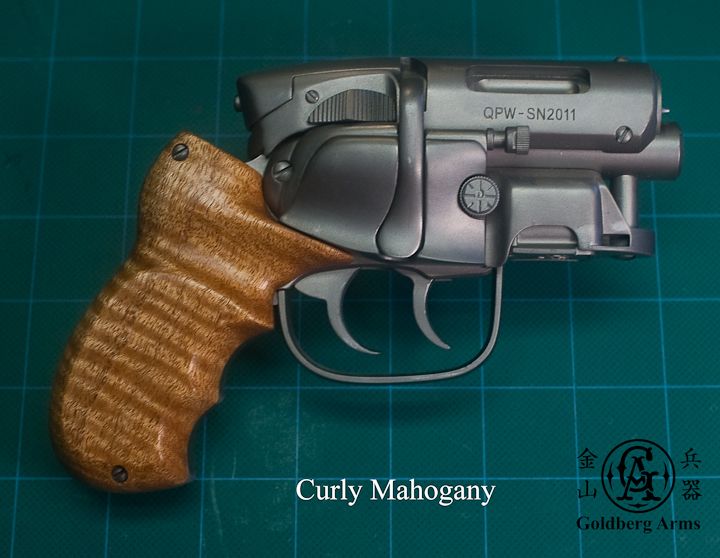
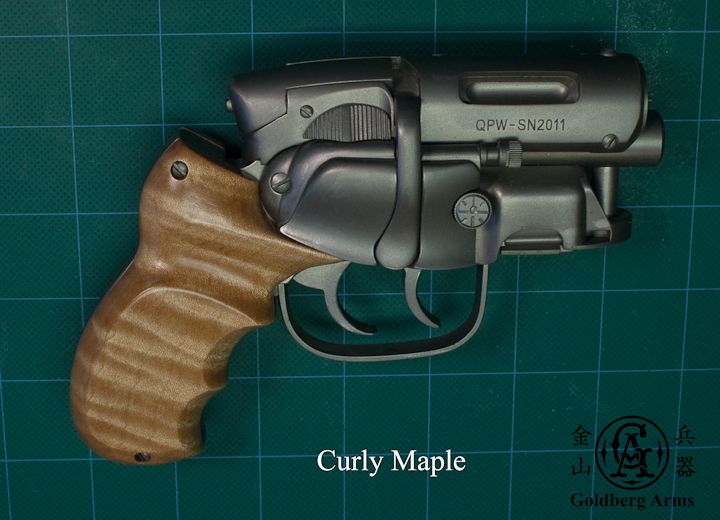
Here is a more complete set of pics of the grips I've been making, including some made from curly mahogany. In time the mahogany will age to a much deeper reddish brown.
_________________
Dave
"I just want to say people... Get A Life! Move out of your parent's basement! It's just a movie!" |
|
| Back to top |
|
|
|
|
|
|
|
|
|
|
|
| Author |
Message |
DaveG
Community Member
Joined: 13 Mar 2011
Posts: 373
Location: Southern Calif.
|
| Posted: Sun Mar 17, 2013 11:35 am Post subject: |
|
|
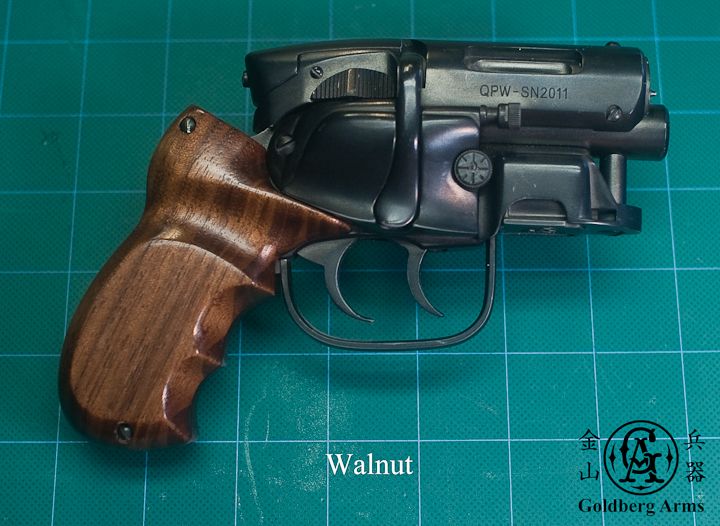
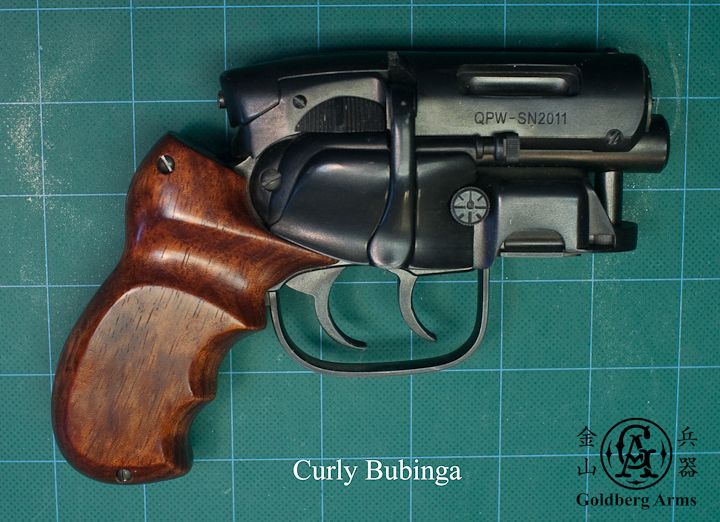
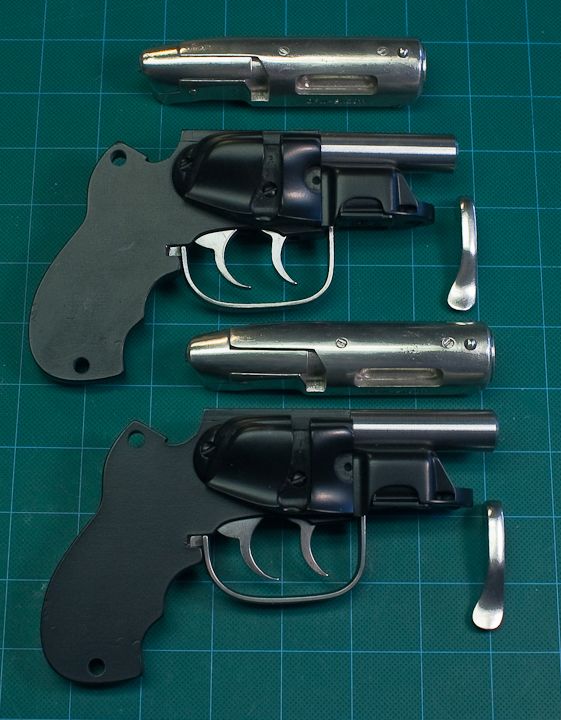
And on the blasters.
_________________
Dave
"I just want to say people... Get A Life! Move out of your parent's basement! It's just a movie!" |
|
| Back to top |
|
|
|
|
|
|
|
|
|
|
|
| Author |
Message |
joberg
Community Member
Joined: 06 Oct 2008
Posts: 9447
|
| Posted: Sun Mar 17, 2013 4:44 pm Post subject: |
|
|
| So many beautiful guns to choose from Fantastic Dave! |
|
| Back to top |
|
|
|
|
|
|
|
|
|
|
|
| Author |
Message |
DaveG
Community Member
Joined: 13 Mar 2011
Posts: 373
Location: Southern Calif.
|
|
| Back to top |
|
|
|
|
|
|
|
|
|
|
|
| Author |
Message |
DaveG
Community Member
Joined: 13 Mar 2011
Posts: 373
Location: Southern Calif.
|
| Posted: Tue Mar 26, 2013 10:00 pm Post subject: |
|
|
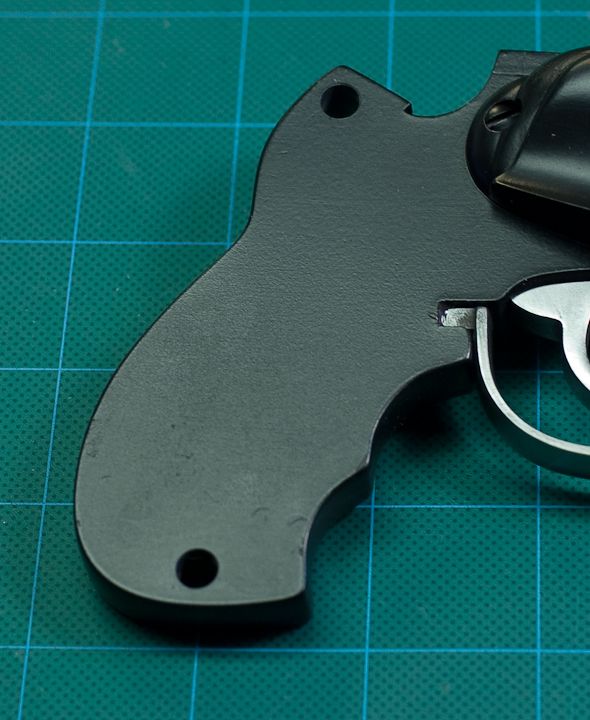
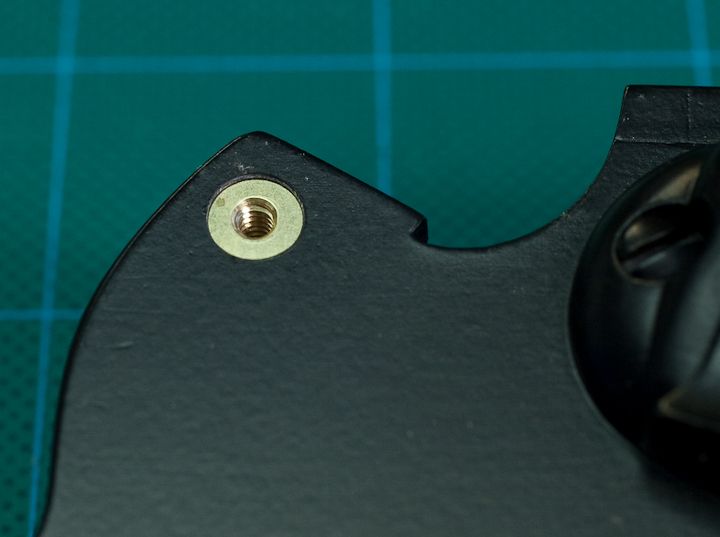
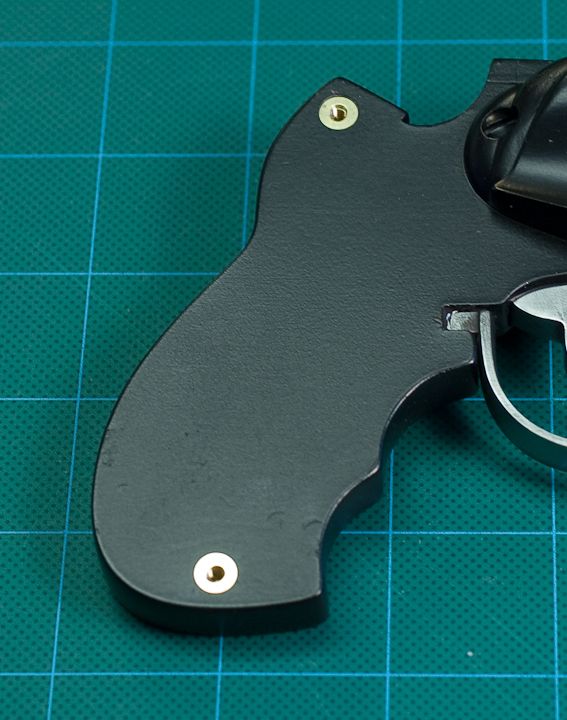
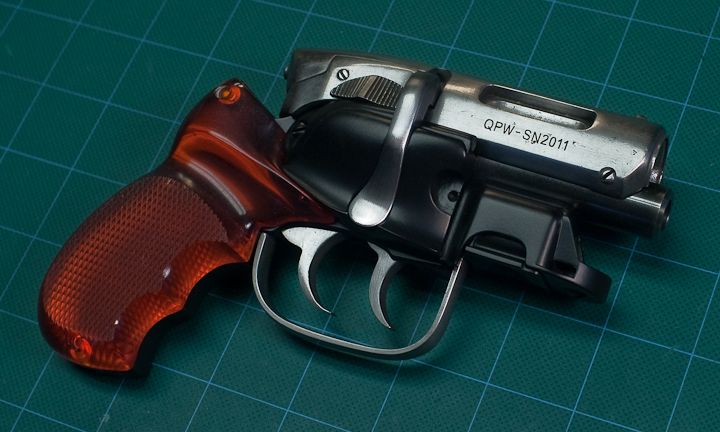
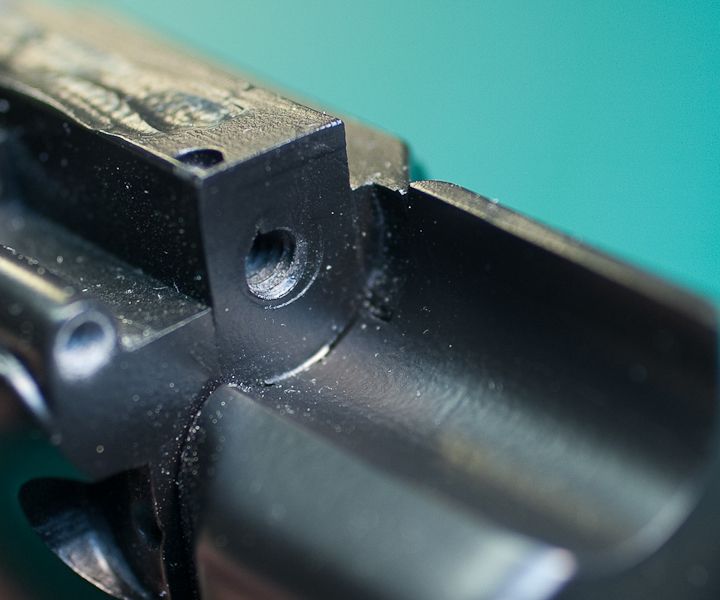
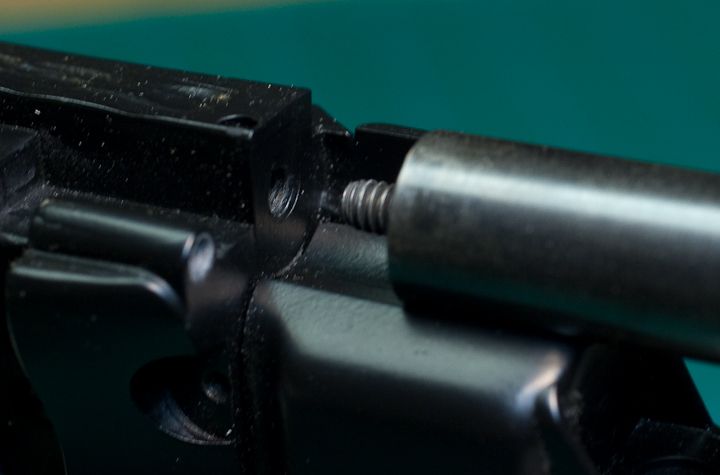
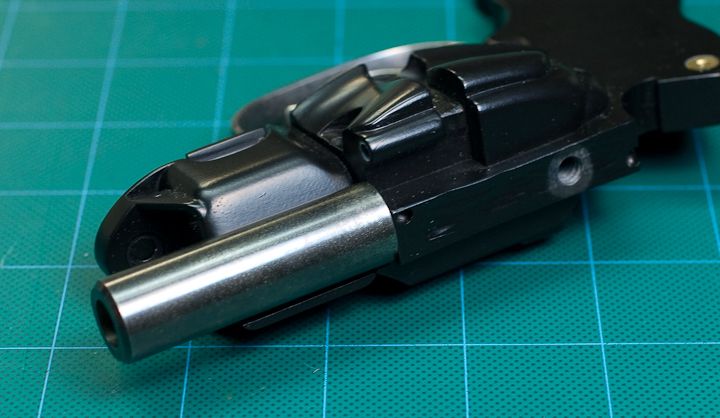
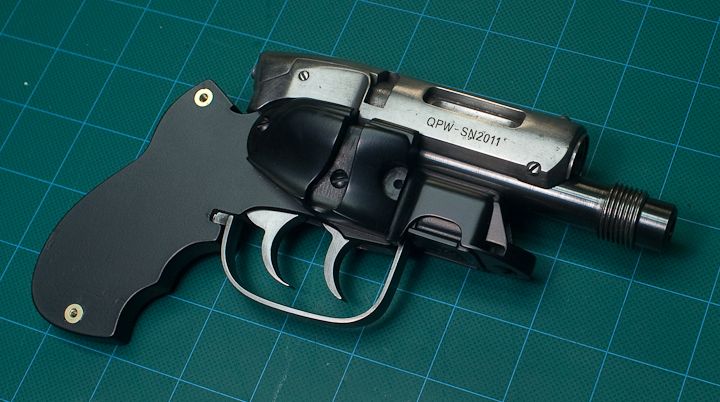
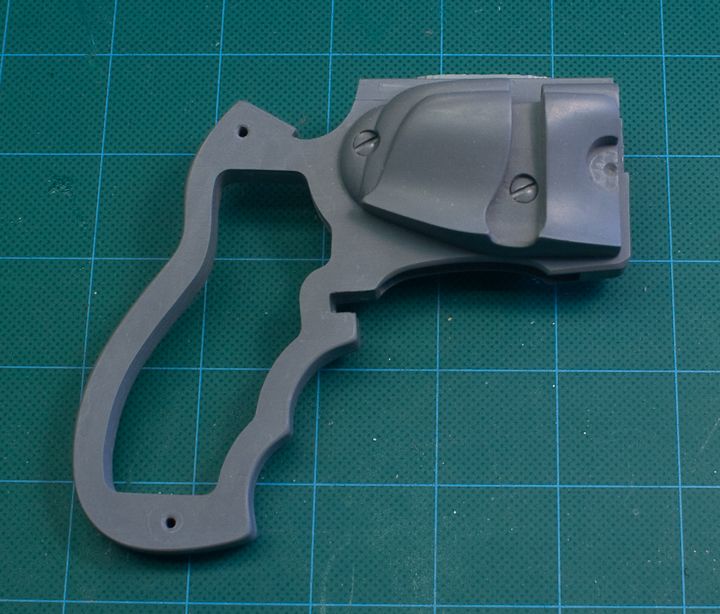
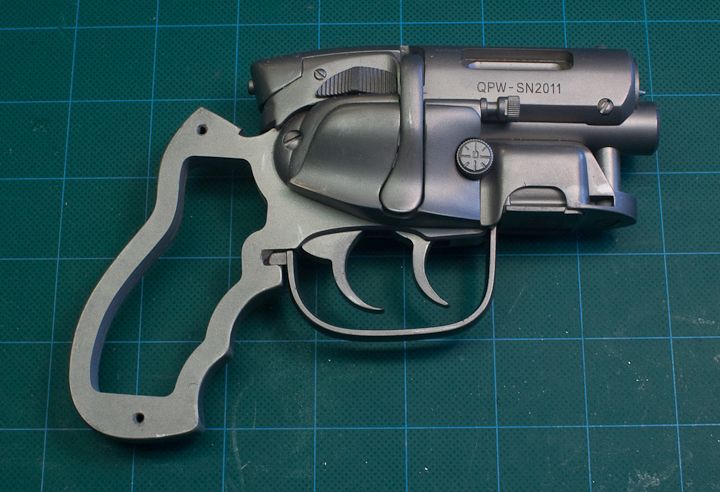
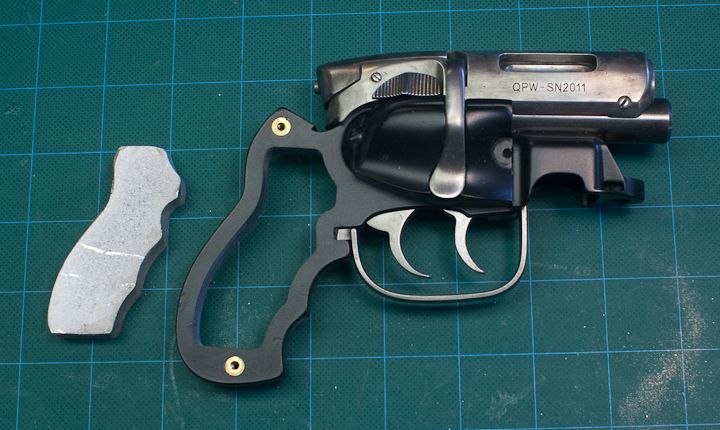
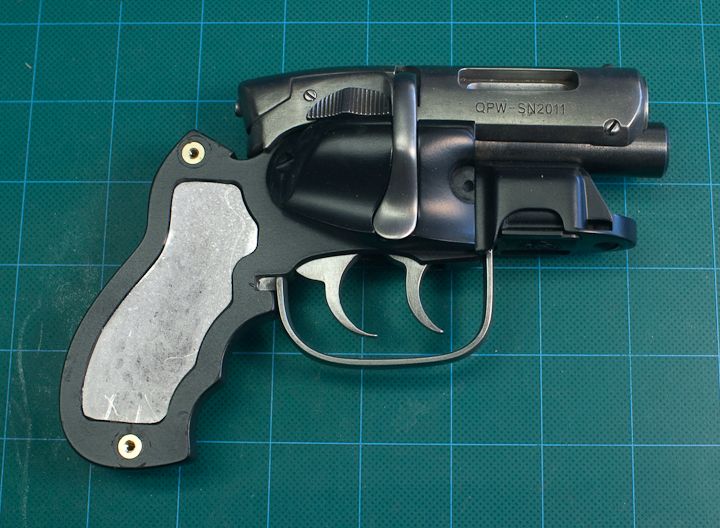
More work on the metal Snubbies! I've cleaned up and painted the resin frame and clip casting with Krylon Semi-Flat black. The cast metal parts were sanded smooth with 320 grit sandpaper, then tumbled with fine abrasive media. The barrel are turned steel.
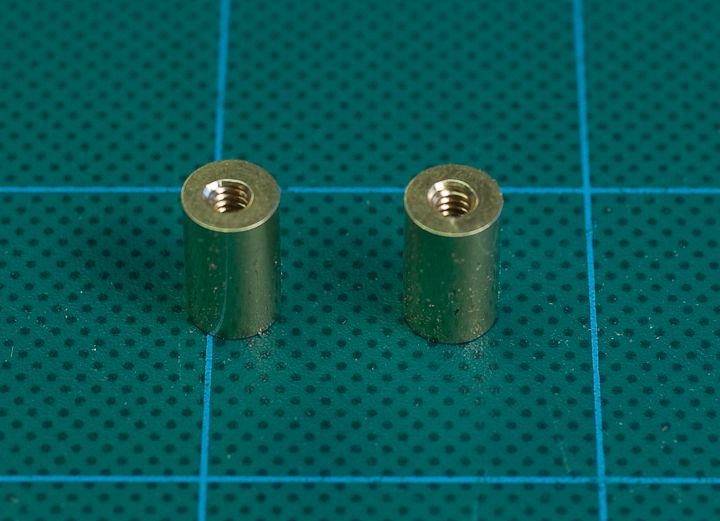
One of the thing I'm doing differently on these build ups is to insert threaded brass bushings in the the frame for the grip attachment screws. As I started to trade grips back and forth (what with the new cool hardwood grips and all!) the threads started to strip out of the resin castings. Unfortunately, since the frames are slightly less than 1/2 inch thick. I couldn't use off the shelf electronics stand offs. So custom ones had to be machined in brass. The holes in the frame were drilled out to 1/4 inch and the inserts epoxied in place.
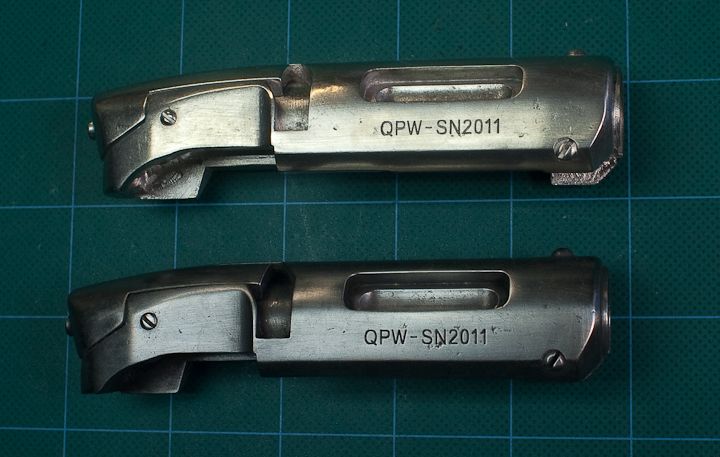
Here is a comparison of the plain polished receiver (top) and one chemically blackened with Jax Pewter Black (bottom).
And a test assembly of the parts. The steel barrel has been treated with gun bluing.
_________________
Dave
"I just want to say people... Get A Life! Move out of your parent's basement! It's just a movie!" |
|
| Back to top |
|
|
|
|
|
|
|
|
|
|
|
| Author |
Message |
andy
Community Guide

Joined: 01 Nov 2006
Posts: 6237
Location: Rochester, NY
|
| Posted: Wed Mar 27, 2013 1:02 am Post subject: |
|
|
Just gorgeous. Nothing else I can say at the moment.
Andy |
|
| Back to top |
|
|
|
|
|
|
|
|
|
|
|
| Author |
Message |
hirohawa
Community Member

Joined: 18 May 2006
Posts: 1067
|
| Posted: Wed Mar 27, 2013 5:26 am Post subject: |
|
|
| Beautiful! |
|
| Back to top |
|
|
|
|
|
|
|
|
|
|
|
| Author |
Message |
Countrypaul
Community Member
Joined: 08 Feb 2013
Posts: 27
|
| Posted: Wed Mar 27, 2013 5:36 am Post subject: |
|
|
These just get better & better
It's amazing to see something that looked pretty perfect in the first place actually get improved
Awesome |
|
| Back to top |
|
|
|
|
|
|
|
|
|
|
|
| Author |
Message |
joberg
Community Member
Joined: 06 Oct 2008
Posts: 9447
|
| Posted: Wed Mar 27, 2013 6:45 am Post subject: |
|
|
| Yep, I'm in the same place as Andy right now...I thought these were already perfect, but you managed to go a step further and it's just...WOW Dave |
|
| Back to top |
|
|
|
|
|
|
|
|
|
|
|
| Author |
Message |
DaveG
Community Member
Joined: 13 Mar 2011
Posts: 373
Location: Southern Calif.
|
| Posted: Wed Mar 27, 2013 11:02 pm Post subject: |
|
|
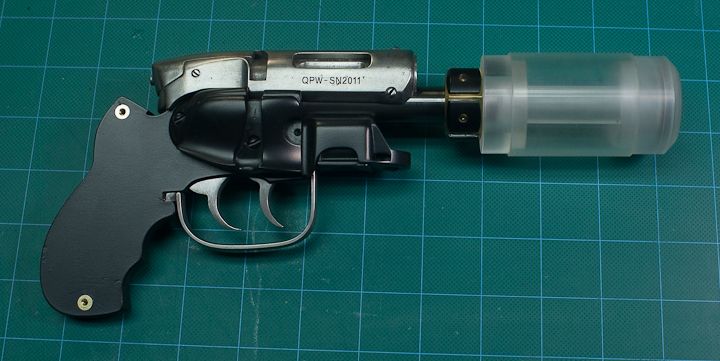
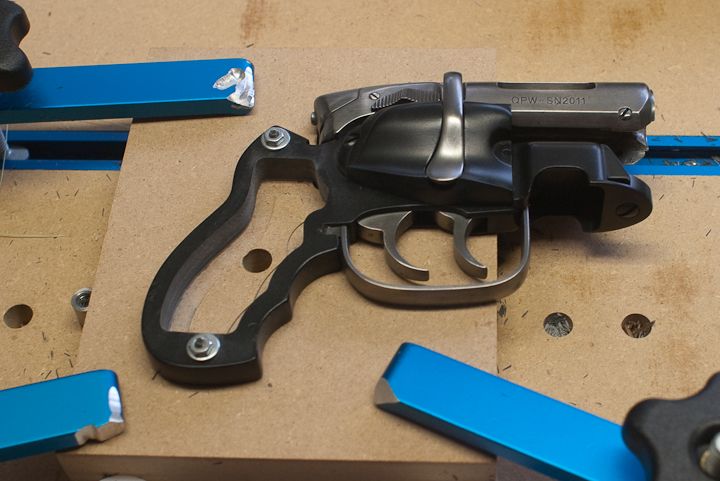
Rather than epoxy the steel barrel in place I've elected to secure it with a cap screw through the butt end, into a threaded hole in the front of the frame.
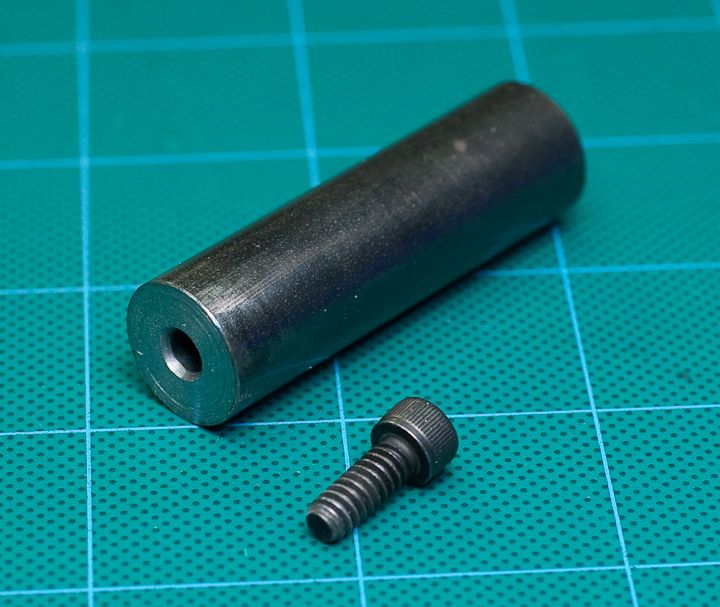
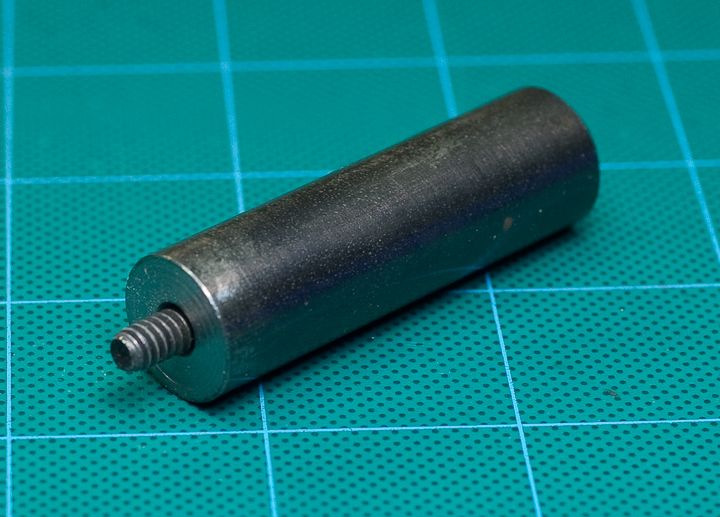
In addition to being a clean elegant way to secure the barrel, it also makes it removable and interchangable with other barrels. Rick Ross has been kind enough to allow me to make a supressor for my Snub Nose based on his design for the Pflager Katsumata Enforcer. This is 100% Rick's design and I give him full credit for how cool it looks! This is also a one off just for my collection. Sorry, I promised Rick I wouldn't make them for sale.
Here is a machined steel barrel, extended with the threaded end. Rick was also gracious enough to send me the digital model file for his barrel adapter which I am going to scale down (Rick's Enforcer is .44 cal, my Sub Nose is .38 cal) and have 3D printed to go at the front of the receiver, just behind the threaded portion of the barrel.

The body of the supressor is turned in acrylic and will be painted. Although the metal parts are looking so cool I might have to try to machine one in steel!
_________________
Dave
"I just want to say people... Get A Life! Move out of your parent's basement! It's just a movie!" |
|
| Back to top |
|
|
|
|
|
|
|
|
|
|
|
| Author |
Message |
Robotprops
Community Member
Joined: 11 Apr 2010
Posts: 280
Location: Vancouver, B.C.
|
| Posted: Thu Mar 28, 2013 1:42 am Post subject: |
|
|
Outstanding Dave!
The threaded bushings for mounting the grips is a great idea. I plan to steal it promptly. 
Any plans to offer metal upgrades? I have your snub nosed kit yet to be assembled and would love your metal parts to add to what I have already planned to replace.
Tom |
|
| Back to top |
|
|
|
|
|
|
|
|
|
|
|
| Author |
Message |
Staar
Community Member

Joined: 04 Feb 2008
Posts: 757
Location: AUSTRALIA
|
| Posted: Thu Mar 28, 2013 6:26 am Post subject: |
|
|
Heavens above Dave - what a magnificent looking build sir.
Highest regards
MARK
_________________
 |
|
| Back to top |
|
|
|
|
|
|
|
|
|
|
|
| Author |
Message |
joberg
Community Member
Joined: 06 Oct 2008
Posts: 9447
|
| Posted: Thu Mar 28, 2013 6:45 am Post subject: |
|
|
As they say in French: Mon Dieu Dave! (My God Dave!)  Wow again on that marvelous build (and thanks to Rick for being so gracious ). Wow again on that marvelous build (and thanks to Rick for being so gracious ).
Would love to see that supressor in metal! |
|
| Back to top |
|
|
|
|
|
|
|
|
|
|
|
| Author |
Message |
DaveG
Community Member
Joined: 13 Mar 2011
Posts: 373
Location: Southern Calif.
|
| Posted: Thu Mar 28, 2013 9:13 am Post subject: |
|
|
Thank you all! Building up metal version of the Snub Nose is turning out to be a really satisfying project. Holding one that has the look, weight and cool surface feel of real metal just brings the fun to a whole new level!
Several of you have inquired about the availability of metal kits, metal upgrade parts or finished build ups. I am not going to be offering either metal kits or parts. Casting metal parts to a standard I am happy with takes a lot of time and effort. Doing a few sets is fun, doing a bunch for kits... not so much! As of now I have cast four sets of the parts as you've seen here and am currently working on two built up Snubbies from those parts. I will certainly build up the others later. Some of these finished Snub Noses will be offered for sale, but I have no idea what the price will be or how and where I will sell them. There is no list, or pre-ordering. If you are interested in one, please keep watching this thread.
One of the fun things is going to be exploring variations in finishes and details. These first two are based on the hero "World Con" blaster but I'm toying with some other ideas including nickel and gold plating.
Stay tuned!
_________________
Dave
"I just want to say people... Get A Life! Move out of your parent's basement! It's just a movie!" |
|
| Back to top |
|
|
|
|
|
|
|
|
|
|
|
| Author |
Message |
joberg
Community Member
Joined: 06 Oct 2008
Posts: 9447
|
| Posted: Thu Mar 28, 2013 9:22 am Post subject: |
|
|
My Lord Dave, gold plating I mean REALLY  These pics are already into my box "Gun Porn", but with each and every post you're upping the ante by a big notch These pics are already into my box "Gun Porn", but with each and every post you're upping the ante by a big notch  ...I don't know if I can take that type of abuse ...I don't know if I can take that type of abuse  |
|
| Back to top |
|
|
|
|
|
|
|
|
|
|
|
| Author |
Message |
Skin-Job
Community Member

Joined: 05 Mar 2007
Posts: 900
Location: London, England
|
| Posted: Thu Mar 28, 2013 9:27 am Post subject: |
|
|
The work is amazing, Dave, very cool indeed.
Congratulations.
Any plans to offer real wood grips for the standard blaster, say a Coyle or Sidkit?
I would certainly be up for a pair for my upcoming Frankenblaster...
Karl |
|
| Back to top |
|
|
|
|
|
|
|
|
|
|
|
| Author |
Message |
DaveG
Community Member
Joined: 13 Mar 2011
Posts: 373
Location: Southern Calif.
|
| Posted: Thu Mar 28, 2013 9:11 pm Post subject: |
|
|
| proper wrote: | | Any plans to offer real wood grips for the standard blaster, say a Coyle or Sidkit? |
Stay tuned...

_________________
Dave
"I just want to say people... Get A Life! Move out of your parent's basement! It's just a movie!" |
|
| Back to top |
|
|
|
|
|
|
|
|
|
|
|
| Author |
Message |
DaveG
Community Member
Joined: 13 Mar 2011
Posts: 373
Location: Southern Calif.
|
| Posted: Sat Mar 30, 2013 4:33 pm Post subject: Adding Weight |
|
|
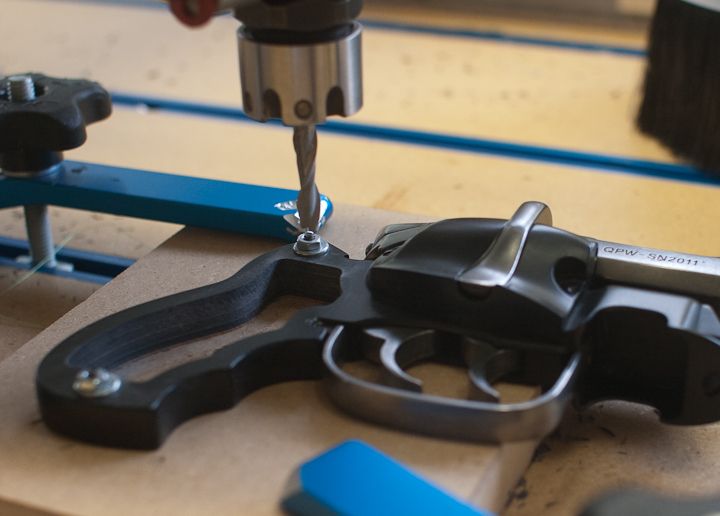
The metal parts made the Snub Nose very front heavy and un-balanced. Not comfortable to hold. The solution was to add weight to the frame, sandwiched between the grips.
The first step was to mill out a hole in the frame using the CNC router. A jig was made to hold the frame in precisely the correct position using the threaded holes for the grip screw. It would have be nice to have done this before paint and assembly but in the end it really didn't make any difference and didn't harm any of the visible painted surfaces. In fact it worked so well I went ahead and milled out some raw castings and the all resin build-ups I had done.
The same hole profile was used on the CNC to route out a mold from MDF.
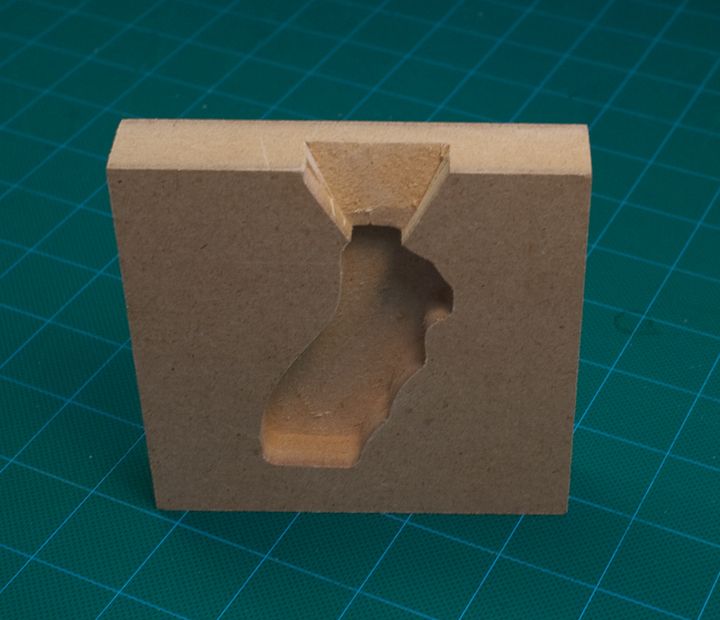
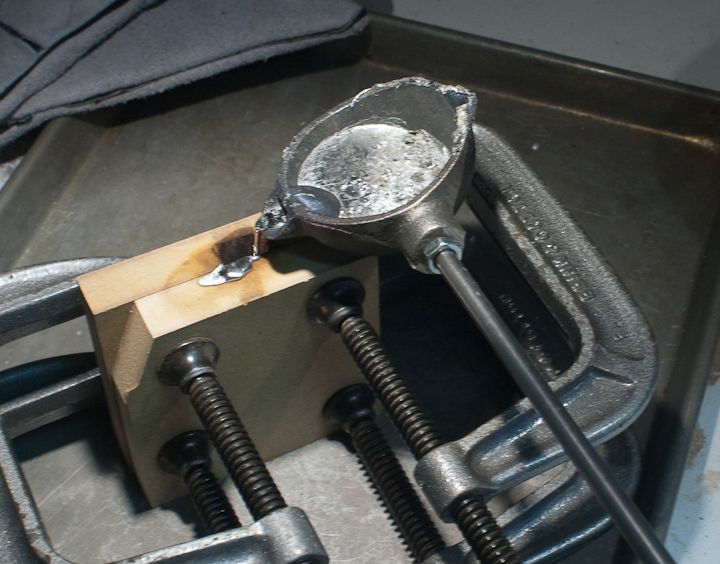
The mold block was clamped to a plain flat block of MDF and molten lead poured into the cavity.
Here's the finished weight and milled frame. The lead weight adds about 200 grams, just under 7 ounces, to the Snub Nose.
And the weight epoxied in place. Since the grips on these build ups are clear amber I'll have to paint the weight black so it doesn't show through. It really balances out the Snubby, and adds a nice little heft to the all resin version too.
All future kits are going to include this upgrade as a standard feature and I'll be offering the milling service and weight as an upgrade for those who already have a kit, built up or not.
_________________
Dave
"I just want to say people... Get A Life! Move out of your parent's basement! It's just a movie!" |
|
| Back to top |
|
|
|
|
|
|
|
|
|
|
|
|
You cannot post new topics in this forum
You cannot reply to topics in this forum
You cannot edit your posts in this forum
You cannot delete your posts in this forum
You cannot vote in polls in this forum
|
|
|
|
|
|
|
|


