 |
 |
|
 |
|
| Author |
Message |
pulseriflefan
Community Member
Joined: 12 Apr 2007
Posts: 19
|
 Posted: Fri Oct 19, 2007 5:20 am Post subject: My steel Blaster project Posted: Fri Oct 19, 2007 5:20 am Post subject: My steel Blaster project |
 |
|
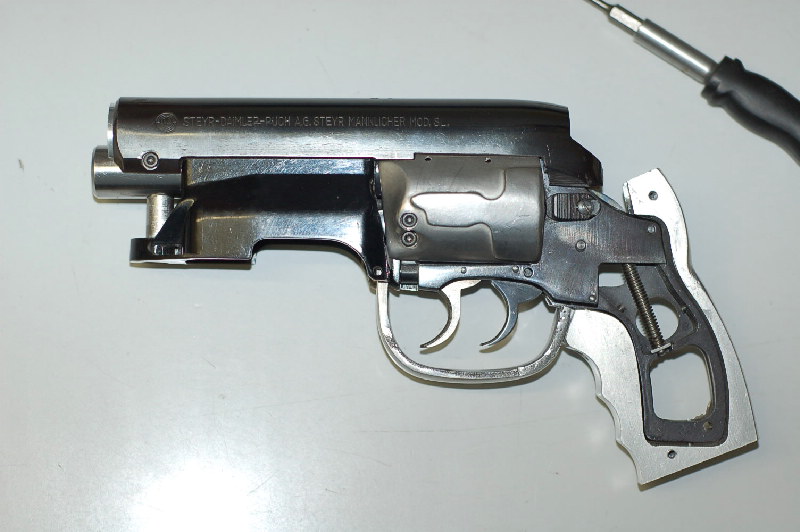
I just did some work on my BRB : Steyr end cap, metal front block and bolt handle. Still working on the steel trigger guard.
What do you think so far ?


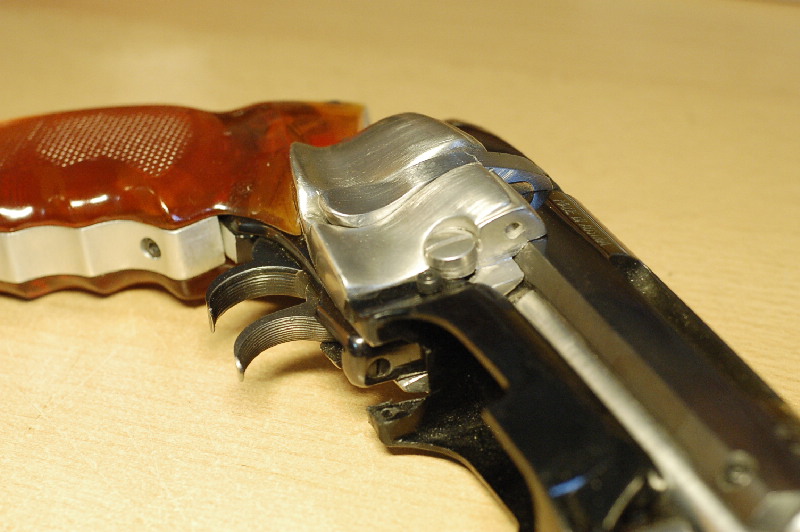
The bolt handle was the later version and totally off the correct one, so I tried to re-shape it as good as I can.
Stephan |
|
| Back to top |
|
|
|
|
 |
|
 |
|
|
|
|
| Author |
Message |
BeastMaster
Community Member

Joined: 19 Jul 2007
Posts: 994
Location: UK
|
| Posted: Fri Oct 19, 2007 5:48 am Post subject: |
|
|
nice work! are you going to replace the screw head with a weaver knob?
How did you make the buttplate? was it cut from alluminium? |
|
| Back to top |
|
|
|
|
|
|
|
|
|
|
|
| Author |
Message |
pulseriflefan
Community Member
Joined: 12 Apr 2007
Posts: 19
|
| Posted: Fri Oct 19, 2007 5:56 am Post subject: |
|
|
not sure about the Weaver knob (still waiting on the screw diameter of the Weaver knob from someone here) - to check the possibility that the screw holds the cylinder arm of the bulldog; after cutting the cylinder rod the guide isn`t really well on a real Revolver.
Yes, I made the buttplate out of a alu block. |
|
| Back to top |
|
|
|
|
|
|
|
|
|
|
|
| Author |
Message |
jf
Community Member
Joined: 21 Sep 2007
Posts: 22
|
| Posted: Fri Oct 19, 2007 6:28 am Post subject: |
|
|
Looking all kinds of awesome Stephan. If it wasn't for the LEP barrel diameter I'd think it was Deckard's gun. Keep it up man! I just posted some pics today on my scratch build ("Blaster Dimensions?"); if you want to feel better about your build, check it out!
Just kidding, it's not totally hopeless yet; I just haven't found my donor revolver yet. I've been occupying the time thinking about what the rifle receiver is supposed to do anyway. I think I have it figured out, something having to do with gunfights off world...what do you think?
Anybody wanna swap the gutted remains of a UTG sniper rifle for an airsoft wheel gun?
jf
they're my friends...i make them! |
|
| Back to top |
|
|
|
|
|
|
|
|
|
|
|
| Author |
Message |
pulseriflefan
Community Member
Joined: 12 Apr 2007
Posts: 19
|
| Posted: Fri Oct 19, 2007 6:43 am Post subject: |
|
|
LOL yeah the diameter sucks but don`t panic, I`ll drill it up to the correct size later 
Why not buying a cheap Undercover or Pathfinder Revolver ? These have the same gripframe. Just put on a bigger barrel - never mind the small cylinder which noone can see when the gun isn`t open.
I don`t know anything about american firearm laws but just bought a deactivated Pathfinder for spares - these should be cheap over there right ? |
|
| Back to top |
|
|
|
|
|
|
|
|
|
|
|
| Author |
Message |
amish
Community Guide
Joined: 11 Apr 2006
Posts: 1433
Location: Outside Philadelphia
|
| Posted: Fri Oct 19, 2007 7:27 am Post subject: |
|
|
Stephan,
That is looking amazing! I just want to be certain, you are using a Pathfinder revolver?
One of the best scratch builds I have seen!
Tom
PS: JF I really dig your build as well!
_________________
www.propsummit.com
www.bladerunnerprops.com |
|
| Back to top |
|
|
|
|
|
|
|
|
|
|
|
| Author |
Message |
pulseriflefan
Community Member
Joined: 12 Apr 2007
Posts: 19
|
| Posted: Fri Oct 19, 2007 8:22 am Post subject: |
|
|
Thanks Tom !
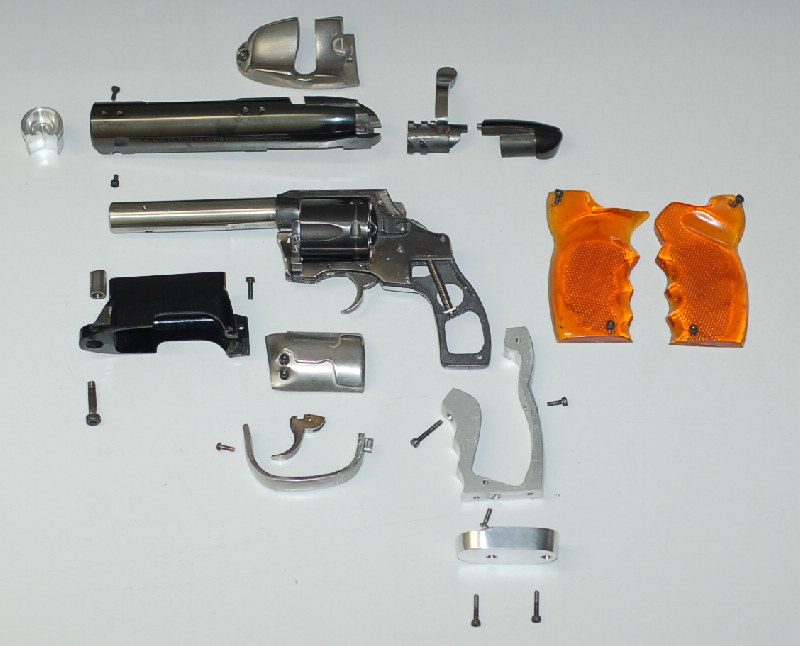
Nope, I am using a 44er Bulldog in that prop. Will post a stripped parts image asap.
Sorry bout my english, I just meant that I bought a cheap Pathfinder as spare parts if I ever need another cylinder arm, gripframe etc.
Here is the parts list of the prop so far :
bought parts :
- Charter Arms Bulldog Cal .44 special
- new 4" steel 6,5mm LEP barrel
- Steyr SL receiver, clip, mag housing etc.
- metal side plates/covers
- grip pair
- S&W trigger
manufactored parts :
- alu gripframe
- alu butt plate
- alu front block
- steel tube (under barrel)
- steel trigger guard
Bolt section is next after I finished the trigger guard. |
|
| Back to top |
|
|
|
|
|
|
|
|
|
|
|
| Author |
Message |
Noeland
Community Guide
Joined: 24 Oct 2006
Posts: 1328
|
| Posted: Fri Oct 19, 2007 9:29 am Post subject: |
|
|
Damn.
Damn.
DAMN.

That's very cool. Too bad you could not make use of the original bolt handle that it came with. It's the only part I don't like, as it's a little short. And when I say "I don't like" what I really mean is I love the blaster overall, because it's seriously bad ass. Make sense?
I'd talked with Craig once about that and he said heating and bending the original bolt handle to the right shape was one of the hardest parts of his hero build(s) since he did 2, one for himself and one for Phil S.
All in all, I'm jealous as hell. Thanks to my recent root canal I won't be able to start on my hero blaster until well into next year.  Even though I have insurance, it ain't cheap! Even though I have insurance, it ain't cheap!
I'll live vicariously through you!
I'm going to work on all my resin builds in the meantime (and there are a few) to keep myself distracted.
Njc----------
_________________
I don't have enough blasters! |
|
| Back to top |
|
|
|
|
|
|
|
|
|
|
|
| Author |
Message |
andy
Community Guide

Joined: 01 Nov 2006
Posts: 6237
Location: Rochester, NY
|
| Posted: Fri Oct 19, 2007 9:54 am Post subject: |
|
|
| Hot Damn!...Love it |
|
| Back to top |
|
|
|
|
|
|
|
|
|
|
|
| Author |
Message |
superjedi
Community Member

Joined: 02 Apr 2007
Posts: 389
Location: Newport News, VA
|
| Posted: Fri Oct 19, 2007 12:05 pm Post subject: |
|
|
Oh man. . . that is amazing! 
You're doing a fantastic job! Keep posting more progress.
_________________
I find your lack of faith disturbing. . . |
|
| Back to top |
|
|
|
|
|
|
|
|
|
|
|
| Author |
Message |
Mr_Creepy
Community Member

Joined: 24 Nov 2006
Posts: 201
Location: Kansas
|
| Posted: Fri Oct 19, 2007 9:45 pm Post subject: |
|
|
Just amazing Stephen
_________________
- Brian (formerly ToothTech)
 |
|
| Back to top |
|
|
|
|
|
|
|
|
|
|
|
| Author |
Message |
pulseriflefan
Community Member
Joined: 12 Apr 2007
Posts: 19
|
| Posted: Sat Oct 20, 2007 1:22 am Post subject: |
|
|
Thanks to everyone
Noeland : hope you`ll getting better soon to start your blaster. I hope to replace the handle against a correct one in the future. I totally agree with Craig about bending the handle. If you look close to my images you`ll see a fine line on it  YES, I cracked that damn`d thing Anyway god thanks I JB weld`ìt YES, I cracked that damn`d thing Anyway god thanks I JB weld`ìt  I really recommand that stuff. I machined it after I glued both parts together without any trouble I really recommand that stuff. I machined it after I glued both parts together without any trouble
Now the tricky part is to drill the hole in front of the Bulldog frame to attach the trigger guard - not many space there. And no, I won`t fix the trigger guard inclined as on the real prop LOL |
|
| Back to top |
|
|
|
|
|
|
|
|
|
|
|
| Author |
Message |
racprops
Community Member

Joined: 30 Oct 2006
Posts: 2450
Location: Phoenix AZ
|
| Posted: Sun Oct 21, 2007 9:27 pm Post subject: |
|
|
Looking real good.
Rich
_________________
I never have enough time to do all I want to do! |
|
| Back to top |
|
|
|
|
|
|
|
|
|
|
|
| Author |
Message |
pulseriflefan
Community Member
Joined: 12 Apr 2007
Posts: 19
|
| Posted: Mon Oct 22, 2007 8:16 am Post subject: trigger guard attachment |
|
|
worked on the trigger guard attachment last weekend :


Very good attachment, no movment to the sides, attached with only one screw drilled through the Bulldog frame near the cylinder arm axis.
Now I have to trim it through it`s final shape and have to find a nice screw to replace my odd slot head screw |
|
| Back to top |
|
|
|
|
|
|
|
|
|
|
|
| Author |
Message |
Nexus6
Community Member

Joined: 15 May 2006
Posts: 473
Location: Off-World Colonies
|
| Posted: Mon Oct 22, 2007 12:28 pm Post subject: |
|
|
| Noeland wrote: | Damn.
Damn.
DAMN.
|
x 100.
This piece is turning out INCREDIBLE.
  |
|
| Back to top |
|
|
|
|
|
|
|
|
|
|
|
| Author |
Message |
The Loyalizer
Community Member
Joined: 08 Oct 2007
Posts: 742
Location: Down in 4th Sector, Chinatown
|
| Posted: Mon Oct 22, 2007 6:27 pm Post subject: |
|
|
I'd be willing to gnaw off a couple of fingers to get a piece like this.
Top shelf all the way.
_________________

"We began to recognize in them a strange obsession..."
http://fcomin.cgsociety.org/gallery/ |
|
| Back to top |
|
|
|
|
|
|
|
|
|
|
|
| Author |
Message |
phase pistol
Community Member
Joined: 04 Nov 2006
Posts: 1147
|
| Posted: Tue Oct 23, 2007 12:35 am Post subject: |
|
|
| Exceptional work. |
|
| Back to top |
|
|
|
|
|
|
|
|
|
|
|
| Author |
Message |
DeckB26354
Community Member
Joined: 24 Oct 2007
Posts: 212
|
| Posted: Thu Oct 25, 2007 4:34 pm Post subject: |
|
|
Hi there,
Great work! I too am building a blaster from all original gun parts. I really love your aluminium butt plate and your side plate with the space for the bolt. You have done an excellent job. Quite inspiring. Where did you get the Amber grips from? Mine I bought from Rich Coyle. They are the new ones which are the right size and very nice but still not the right colour. Too orange, not Amber.
I wanted to ask you how did you cut the magazine housing to fit the custom barrel? I have my barrel fitted to the bulldog and have started to cut the original magazine to fit but have now stopped as I can't be sure of how to do it. And you only get one go!
http://propsummit.com/upload/303/steyr_magazine_housing.jpg
Any help or suggestions would be much appreciated! Maybe we can help each other out on other points as we are roughly at the same point of construction? Well done again with your work in aluminium. Very nice! |
|
| Back to top |
|
|
|
|
|
|
|
|
|
|
|
| Author |
Message |
pulseriflefan
Community Member
Joined: 12 Apr 2007
Posts: 19
|
| Posted: Mon Oct 29, 2007 12:04 pm Post subject: |
|
|
Cool ! Great to see that I am not the only weird person on this planet 
The Steyr clip housing was not hard to do. First I used a hacksaw and my casing looks a bit like yours.
Take a round file for the raw shape and use round rod which has the same diameter as the barrel. Put a piece of sand paper on the rod and trim it down.
Make sure you have ready your Steyr receiver first for test fitting (and make sure the Bulldog will go deep enough in it).
You can contact me at kontakt(@)foto-schemkes.de, so we can talk about "our" project
Cheers,
Stephan |
|
| Back to top |
|
|
|
|
|
|
|
|
|
|
|
| Author |
Message |
pulseriflefan
Community Member
Joined: 12 Apr 2007
Posts: 19
|
| Posted: Sat Nov 03, 2007 6:12 am Post subject: soome more images |
|
|
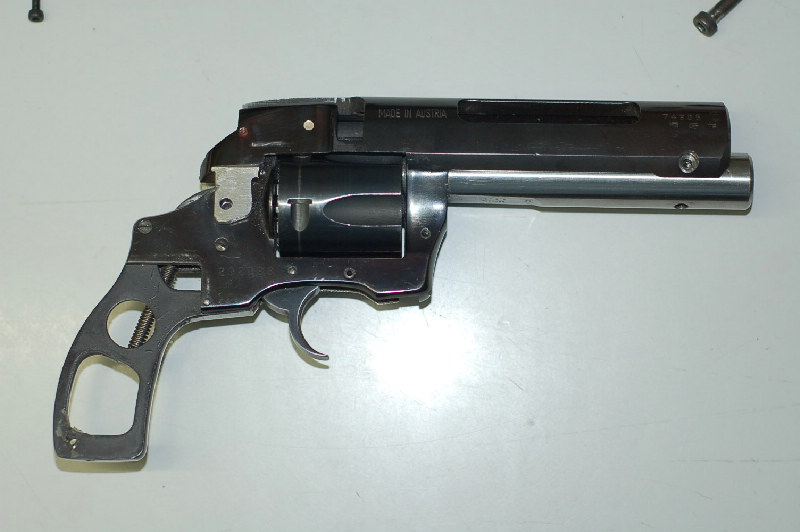
here are some shots more.
Single parts I have so far :
and step by step mounted together :


 [/img] [/img] |
|
| Back to top |
|
|
|
|
|
|
|
|
|
|
|
|
You cannot post new topics in this forum
You cannot reply to topics in this forum
You cannot edit your posts in this forum
You cannot delete your posts in this forum
You cannot vote in polls in this forum
|
|
|
|
|
|
|
|


