 |
 |
|
 |
|
| Author |
Message |
darthwolf7
Community Member
Joined: 26 Dec 2012
Posts: 267
Location: Humboldt County,CA
|
 Posted: Sat May 04, 2013 2:26 pm Post subject: Posted: Sat May 04, 2013 2:26 pm Post subject: |
 |
|
| Thanks Andy! Sorry I'm such an internet moron...but I'm glad films can see my mods...I will post close ups of the final blaster soon...I appreciate your help Andy! Cheers! I'm willing to do this mod for anyone who's interedted ...PM me if so or if you have any questions! |
|
| Back to top |
|
|
|
|
 |
|
 |
|
|
|
|
| Author |
Message |
darthwolf7
Community Member
Joined: 26 Dec 2012
Posts: 267
Location: Humboldt County,CA
|
| Posted: Sat May 04, 2013 8:13 pm Post subject: |
|
|
| Oh yeah, I wanted to mention that I used the original plastic site rod...I did not replace it at all...I drilled it out easily using a drill press and a very heavy shop fox vise. The deal with drilling it out is you have to go very quickly or the plastic will heat up and melt. So I just set the site rod vertical in the fox and drilled it out very quickly to a depth of a 1/4 inch or so just before the holes for the mounting screws...then I bored them out a bit more VERY carefully by hand using a Fordham drill with a speed control...afterwards I ran the black wires I ran to the Green LED's through the holes and wired the live wires and grounds together... then I pulled out the green board and wired 4 red 3mm and 1 red 5mm into place positive to positive negative to negative and got ready to solder a lead line out to the green lights from the housing...also, I had to route out the upper ammo housing to make room for the two AAA batteries and the housing... |
|
| Back to top |
|
|
|
|
|
|
|
|
|
|
|
| Author |
Message |
joberg
Community Member
.jpg)
Joined: 06 Oct 2008
Posts: 9463
|
| Posted: Sun May 05, 2013 8:21 am Post subject: |
|
|
Thanks for the tips Darthwolf7...yeah, drilling plastics (some don't react the same ways as others). If I have something to drill and know that the plastic might melt, I'll put the piece inside the freezer for 24 hours straight; that way, it'll be cold enough not to melt while I'm working on it  |
|
| Back to top |
|
|
|
|
|
|
|
|
|
|
|
| Author |
Message |
Christian Jones
Community Member
Joined: 06 Apr 2013
Posts: 25
Location: Europe
|
| Posted: Sun May 05, 2013 9:02 am Post subject: |
|
|
| joberg wrote: | | Thanks for the tips Darthwolf7...yeah, drilling plastics (some don't react the same ways as others). If I have something to drill and know that the plastic might melt, I'll put the piece inside the freezer for 24 hours straight; that way, it'll be cold enough not to melt while I'm working on it |
Hey, good to know that. Thanks ! 
I will do this with my Off World before cutting the barrel because the plastic really is ç*%& and melts very quickly. |
|
| Back to top |
|
|
|
|
|
|
|
|
|
|
|
| Author |
Message |
darthwolf7
Community Member
Joined: 26 Dec 2012
Posts: 267
Location: Humboldt County,CA
|
| Posted: Sun May 05, 2013 10:18 am Post subject: |
|
|
| Hey, what are you replacing the barrel with? I'm looking for a metal barrel and a metal receiver slide for my Off World if you know of anyone making them?! I would be interested to see what you do to your blaster as well so please post some pictures for us!!! Thanks! |
|
| Back to top |
|
|
|
|
|
|
|
|
|
|
|
| Author |
Message |
Christian Jones
Community Member
Joined: 06 Apr 2013
Posts: 25
Location: Europe
|
|
| Back to top |
|
|
|
|
|
|
|
|
|
|
|
| Author |
Message |
joberg
Community Member
Joined: 06 Oct 2008
Posts: 9463
|
| Posted: Sun May 05, 2013 5:45 pm Post subject: |
|
|
| You're welcome Christian; I cannot take all the credit for myself, my Father showed me that trick when I was 6 years old and starting to build my own models |
|
| Back to top |
|
|
|
|
|
|
|
|
|
|
|
| Author |
Message |
darthwolf7
Community Member
Joined: 26 Dec 2012
Posts: 267
Location: Humboldt County,CA
|
| Posted: Wed May 08, 2013 11:56 am Post subject: A few more photos of the finished product... |
|
|
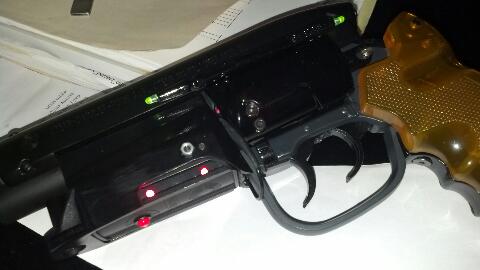
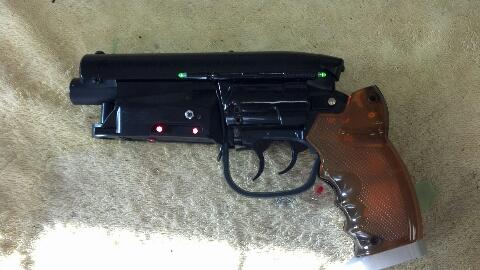
Here you go! Nice and clean...I used black wires so they wouldn't show as much...cheers! |
|
| Back to top |
|
|
|
|
|
|
|
|
|
|
|
| Author |
Message |
joberg
Community Member
Joined: 06 Oct 2008
Posts: 9463
|
| Posted: Wed May 08, 2013 6:56 pm Post subject: |
|
|
Nice and clean (du boulot propre ) and thanks again for the tutorial.
Btw, those black wires are a great idea! |
|
| Back to top |
|
|
|
|
|
|
|
|
|
|
|
| Author |
Message |
darthwolf7
Community Member
Joined: 26 Dec 2012
Posts: 267
Location: Humboldt County,CA
|
| Posted: Wed May 08, 2013 7:06 pm Post subject: thanks! |
|
|
| Thanjz! I used black wires to thread the sight rod and then soldered red & black to the + & - ...then used black shrinkwrap to hide the red & black wires as best I could. They are still slightly exposed so I may shorten them so only black can be seen...cheers! |
|
| Back to top |
|
|
|
|
|
|
|
|
|
|
|
| Author |
Message |
joberg
Community Member
Joined: 06 Oct 2008
Posts: 9463
|
| Posted: Thu May 09, 2013 6:46 am Post subject: |
|
|
| You're welcome |
|
| Back to top |
|
|
|
|
|
|
|
|
|
|
|
| Author |
Message |
darthwolf7
Community Member
Joined: 26 Dec 2012
Posts: 267
Location: Humboldt County,CA
|
| Posted: Mon Jun 03, 2013 1:42 pm Post subject: More mods coming as well... |
|
|
Soon, I'm going to break the whole blaster down and give it a better paint job as well as sand down the Steyer receiver to match the hero prop better...going to repaint all the black metal parts a flatter black and the actual gun parts to a more steel, blued look...it's going to be a bit but as usual, I will post pictures. Plus I'm getting parts from Oz soon and the CNC metal frame set should be here soon! When it's all done I should have one hell of a cool blaster to play with!
I'm also considering adding sound effects as well...just wondering where to put all the electronics? I enjoy making this prop my own...what a "blast"...hee,hee!  |
|
| Back to top |
|
|
|
|
|
|
|
|
|
|
|
| Author |
Message |
joberg
Community Member
Joined: 06 Oct 2008
Posts: 9463
|
| Posted: Mon Jun 03, 2013 5:49 pm Post subject: |
|
|
| The modifs will add a lot to it for sure; eager to see what will be with all those transformations |
|
| Back to top |
|
|
|
|
|
|
|
|
|
|
|
| Author |
Message |
darthwolf7
Community Member
Joined: 26 Dec 2012
Posts: 267
Location: Humboldt County,CA
|
| Posted: Mon Jun 03, 2013 5:59 pm Post subject: |
|
|
It will be slow going as I only have this one blaster and don't want to ruin it!! First will be to sand the Steyer receiver with some 150 grit sandpaper then buff it out with either steel wool or a scotchbrite pad or something to smooth it out! It should expose the silver color underneath the black paint...then to paint the arm bar and end cap etc the same tones...that's first...then to install the CNC frame when it arrives...that's step two....when Oz's parts arrive those will be the final steps before the whole repaint..
Then this will be a good costume prop I can use out of the house and in a holster...when I get my Coyle and my Tomenosuke those won't be put in any holster!!! Someday, I will get those two for myself... oh yes, it will be mine! |
|
| Back to top |
|
|
|
|
|
|
|
|
|
|
|
|
You cannot post new topics in this forum
You cannot reply to topics in this forum
You cannot edit your posts in this forum
You cannot delete your posts in this forum
You cannot vote in polls in this forum
|
|
|
|
|
|
|
|


 :
: