 |
 |
|
 |
|
| Author |
Message |
racprops
Community Member

Joined: 30 Oct 2006
Posts: 2450
Location: Phoenix AZ
|
 Posted: Wed Feb 24, 2010 1:32 pm Post subject: Posted: Wed Feb 24, 2010 1:32 pm Post subject: |
 |
|
Thanks again.
Rich
_________________
I never have enough time to do all I want to do! |
|
| Back to top |
|
|
|
|
 |
|
 |
|
|
|
|
| Author |
Message |
ironfist
Community Member

Joined: 10 Feb 2009
Posts: 310
Location: East Hartford,CT
|
| Posted: Wed Feb 24, 2010 8:10 pm Post subject: |
|
|


_________________
The other Karl! |
|
| Back to top |
|
|
|
|
|
|
|
|
|
|
|
| Author |
Message |
ironfist
Community Member
Joined: 10 Feb 2009
Posts: 310
Location: East Hartford,CT
|
| Posted: Wed Feb 24, 2010 8:11 pm Post subject: |
|
|
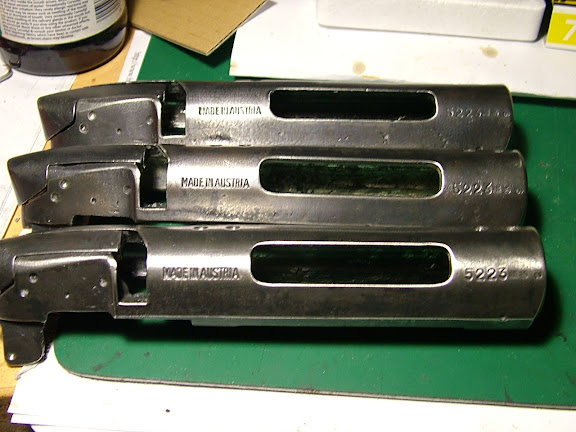
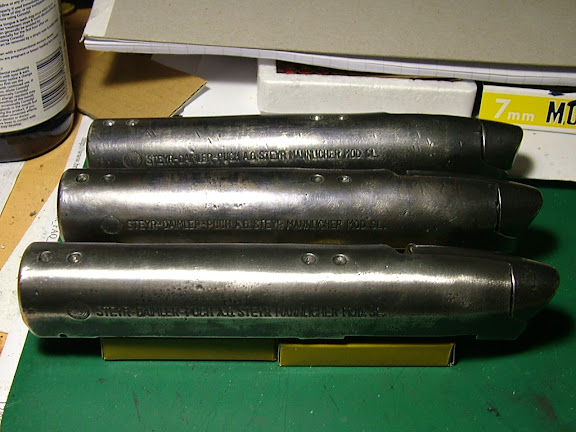
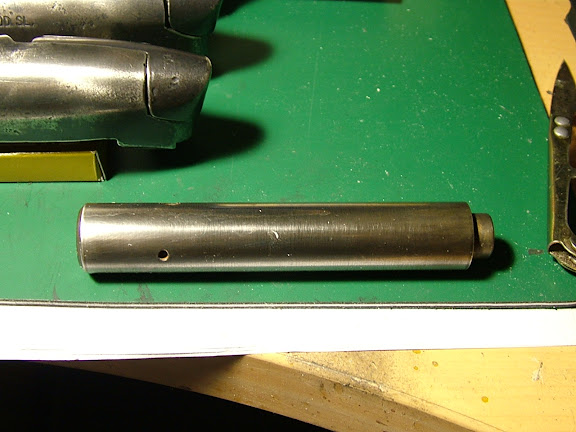
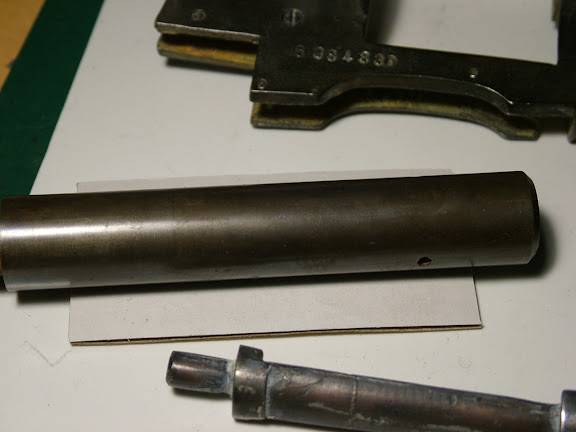
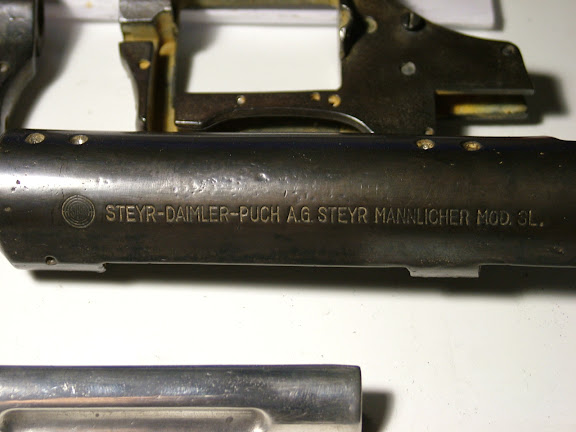
I just noticed the 3 small holes on the top of the real laser sight rod? Wonder what was up with that.
_________________
The other Karl! |
|
| Back to top |
|
|
|
|
|
|
|
|
|
|
|
| Author |
Message |
ironfist
Community Member
Joined: 10 Feb 2009
Posts: 310
Location: East Hartford,CT
|
| Posted: Wed Feb 24, 2010 8:15 pm Post subject: |
|
|

_________________
The other Karl!
Last edited by ironfist on Fri Feb 26, 2010 7:31 pm; edited 1 time in total |
|
| Back to top |
|
|
|
|
|
|
|
|
|
|
|
| Author |
Message |
racprops
Community Member
Joined: 30 Oct 2006
Posts: 2450
Location: Phoenix AZ
|
| Posted: Wed Feb 24, 2010 8:31 pm Post subject: |
|
|
| ironfist wrote: | | I just noticed the 3 small holes on the top of the real laser sight rod? Wonder what was up with that. |
Don't know don't even know if they are really there.
Are you going to up load here all the pictures I am doing, it will take a lot of pages...
I though letting them down load things would be better.
Rich
_________________
I never have enough time to do all I want to do! |
|
| Back to top |
|
|
|
|
|
|
|
|
|
|
|
| Author |
Message |
racprops
Community Member
Joined: 30 Oct 2006
Posts: 2450
Location: Phoenix AZ
|
| Posted: Wed Feb 24, 2010 8:38 pm Post subject: |
|
|
Just looked at the oringinal picture and they could be light hits, there are light reflections all over this rod in this shot.
Spots all over the rod.
Rich
_________________
I never have enough time to do all I want to do! |
|
| Back to top |
|
|
|
|
|
|
|
|
|
|
|
| Author |
Message |
andy
Community Guide

Joined: 01 Nov 2006
Posts: 6237
Location: Rochester, NY
|
| Posted: Wed Feb 24, 2010 10:52 pm Post subject: |
|
|
Yep. Those "holes" are spot reflections from the lights. That is also the area where we think we could see the "Made in the USA", that is probably just paint globs.
Andy |
|
| Back to top |
|
|
|
|
|
|
|
|
|
|
|
| Author |
Message |
E-Wan
Community Member
Joined: 07 Dec 2009
Posts: 22
Location: Los Angeles, CA
|
| Posted: Thu Feb 25, 2010 2:53 pm Post subject: |
|
|
I was thinking about this last night and had a couple of ideas:
1. Post a guide to the baggie of screws and small parts, with drill/tap size and where they go on the blaster.
2. Post the pics like Ironfist did above in a new "Instructions" thread in the correct order.
Started sanding down and preparing my receiver - very exciting! |
|
| Back to top |
|
|
|
|
|
|
|
|
|
|
|
| Author |
Message |
racprops
Community Member
Joined: 30 Oct 2006
Posts: 2450
Location: Phoenix AZ
|
| Posted: Thu Feb 25, 2010 2:56 pm Post subject: |
|
|
Those are my pictures of the instructions, pictures with note and tips.
I am working on them right now.
TONS of pictures.
Please stand by...
RIch
_________________
I never have enough time to do all I want to do! |
|
| Back to top |
|
|
|
|
|
|
|
|
|
|
|
| Author |
Message |
ItalianNinja86
Community Member
Joined: 11 Feb 2009
Posts: 49
|
| Posted: Fri Feb 26, 2010 1:18 am Post subject: |
|
|
| what size drill bit should we use to drill out the holes for the leds in the ammo box? |
|
| Back to top |
|
|
|
|
|
|
|
|
|
|
|
| Author |
Message |
racprops
Community Member
Joined: 30 Oct 2006
Posts: 2450
Location: Phoenix AZ
|
| Posted: Fri Feb 26, 2010 10:41 am Post subject: |
|
|
# 34 for the small ones and # 11 for the large one.
That will give you a snug fit.
Rich
_________________
I never have enough time to do all I want to do! |
|
| Back to top |
|
|
|
|
|
|
|
|
|
|
|
| Author |
Message |
racprops
Community Member
Joined: 30 Oct 2006
Posts: 2450
Location: Phoenix AZ
|
|
| Back to top |
|
|
|
|
|
|
|
|
|
|
|
| Author |
Message |
racprops
Community Member
Joined: 30 Oct 2006
Posts: 2450
Location: Phoenix AZ
|
| Posted: Fri Feb 26, 2010 6:54 pm Post subject: |
|
|
Lets try to keep building questions on the oringinal thread and leave this for showing off builds.
Rich
_________________
I never have enough time to do all I want to do! |
|
| Back to top |
|
|
|
|
|
|
|
|
|
|
|
| Author |
Message |
ironfist
Community Member
Joined: 10 Feb 2009
Posts: 310
Location: East Hartford,CT
|
| Posted: Wed Mar 17, 2010 5:42 am Post subject: |
|
|
Wave 2 in about 2 weeks people. Please remember to PM me when you have paid Rich so I can update the first post. Thank you.
_________________
The other Karl! |
|
| Back to top |
|
|
|
|
|
|
|
|
|
|
|
| Author |
Message |
propsjonnyb
Community Member
Joined: 16 Jul 2009
Posts: 476
Location: Helmdon, Northamptonshire UK
|
| Posted: Tue Apr 06, 2010 8:59 am Post subject: |
|
|
Ok as promised, here's my start on the Propsummit Limited Edition build , I don't intend this to be a tutorial , Rich has done an excellent job in his photo album's rather some tips and hints gained building props and studio scale models over the last 30 odd years.
I'm going to split this into stages for those who need it and I'll also post some pictures at the various stages as well.
Firstly the kit , don't be put off by what looks like a very 'raw' finish , this can be an advantage - I'll explain as I go along .
Stage one - Prepping - layout all the pieces first like an exploded diagram, and check you have no pieces missing - now use riffer files or a good heavy craft knife blade or both to 'clean' each piece of 'flashing' these are the bits of unwanted metal that seep out of the joins of the molds during casting - Rich has done a first past - but you need to make sure all pieces are free of flash - test fit them - as you go along . Once all the flash is gone - you can start filing each piece edge's smooth .
Now you can do the drilling and tapping in each piece - if you want to at this stage - I personally prefer to drill and tap after I've prepared all the pieces , but you can do what ever you want.
Now separate all the parts that are going to be 'blued' in one group and the rest into another - don't forget the small detailed parts that want 'blueing' as well.
Now you want to start sanding your pieces smooth - use whatever method suits you best , belt sander, dremmel tool, sanding blocks and sheets or a combination of all, you want to get to a final 'mirror' polish on most pieces - that 's a 240/440 grit smooth finish prior to polishing with mops - now you don't need to invest in a bench polisher to get a final mirror like finish - but you do need some metal polish and a couple of soft polishing mops , those that know about metal polishing will use grey, green and blue compound , or a car metal polish set like Autoglym , but do invest a few pounds or dollars in three polishing mops and a spindrel collet for your normal power drill or dremmel it's well worth the money! , Rich has a picture of the rhs cover in various stages of polishing - use one mop for each stage- fix your drill to your workbench with a vice or G clamp and polish each piece in turn using the three mops so you have first stage , second stage and third stage mirror finish - especially those that are going to be blued , but and here's the first tip , I said at the beginning the 'raw' look will benefit you , well this is where it comes in handy for example - on the upper receiver , if you don't polish selected area's to a perfect mirror finish but say different degrees of closeness - when you 'blue' it or to be more correct use ' pewter black' on it these will darken according to the alloy content and the degree of polishing - producing a very convincing 'aged ' effect .
So when you are happy you have all pieces polished , now we degrease and wash all the pieces that are to be 'blued' . Degrease with white spirit , or Acetone or Cilit Bang or any degreasing agent -all the pieces , then wash the piece again in warm soapy water and leave to dry overnight in an airing cuboard or any dry warm place.
Now put on a set of rubber gloves and don't take them off and touch any piece during the 'Blueing process' as the natural grease on your fingers will 'taint' and 'spoil' the piece.
Stage 2 'Blueing'
OK now you want to replicate the 'gunmetal blue' colour seen on most real weapons . You can achieve this in a number of ways, I'm going to talk about the most simplest - but first a little lesson about pewter , pewter is an alloy of various metals , made up of specific different ratios - the predominant metal in pewter is copper . Pewter 'oxidises' naturally in air over the years going black. We can use this oxidation process to our advantage - there are a number of products available to the hobbyist to 'age' pewter the most common is known as 'Pewter Black' and since copper is the most predominant metal , you can also use ferric oxide known as ' photo etchant' to also turn it 'black' or to be more accurate a 'deep dark browny tinged black' , now most chemical oxidants are toxic so use gloves, mask and eye protection - take great care and have copious amounts of water available for washing.
To 'blue' a part fix it to a dowel rod or in a vice so you can isolate it ,take a cotton swab or q-tip and dip it into the Pewter Black or etchant solution and liberally wipe it over the surface of the piece - the chemical reaction shoud be immediate and you'll see the piece start to change colour - you can accelerate the process using a hairdryer, but be careful not to heat the metal too much as pewter is very succeptable and you can easily damage a piece , continue to dip and swab untill the desired degree of 'blackness' is reached - now wash the piece thoroughly and dry it completely .
Repeat the process for all the pieces, remember each piece will colour according to it's specific metal content so , some pieces will need a lot of swabbing , some not so much - to reach the level of 'blackness' you want , washing each piece stops the 'colouring' process.
It's much easier to write about it that doing it - so pictures to follow later tonight.
Ok after a quick tutiorial on image loading from Andy here they are the first three show the prepping stage , the remaining phot0s show my 'blueing' or blackening process at various stages.
Last edited by propsjonnyb on Tue Apr 06, 2010 2:51 pm; edited 7 times in total |
|
| Back to top |
|
|
|
|
|
|
|
|
|
|
|
| Author |
Message |
racprops
Community Member
Joined: 30 Oct 2006
Posts: 2450
Location: Phoenix AZ
|
| Posted: Tue Apr 06, 2010 9:20 am Post subject: |
|
|
I will add a little to propsjonnyb's report.
You can also take down or lighten the blacking with a metal polish.
So if a part comes out too dark, polish it down. This is a rub on rub off polishing, not machines.
This may take a few trys to get the hang of it.
I am told that the pewter I am using is 98% TIN with some trace metals.
Rich
_________________
I never have enough time to do all I want to do! |
|
| Back to top |
|
|
|
|
|
|
|
|
|
|
|
| Author |
Message |
propsjonnyb
Community Member
Joined: 16 Jul 2009
Posts: 476
Location: Helmdon, Northamptonshire UK
|
| Posted: Wed Apr 07, 2010 4:46 am Post subject: |
|
|
| Cheers Rich , Nice tip , I'll be providing another installment soon, but here's another handy tip as pewter is a 'soft' metal it can be easily cut with a knife, so don't machine drill it , you can of course machine it , but it is unforgiving and if you make a mistake , it's very difficult to put right - so my tip is to hand drill and hand tap all the holes , it just takes a little time , about 2 to 3 hours to do one gun - but the results are worth it ! |
|
| Back to top |
|
|
|
|
|
|
|
|
|
|
|
| Author |
Message |
joberg
Community Member
.jpg)
Joined: 06 Oct 2008
Posts: 9471
|
| Posted: Wed Apr 07, 2010 7:25 am Post subject: |
|
|
| Thanks for the instructions propsjohnnyb! Looking good so far. |
|
| Back to top |
|
|
|
|
|
|
|
|
|
|
|
| Author |
Message |
propsjonnyb
Community Member
Joined: 16 Jul 2009
Posts: 476
Location: Helmdon, Northamptonshire UK
|
| Posted: Wed Apr 07, 2010 9:23 am Post subject: |
|
|
Thanks Joberg it's appreciated !
Onwards to the next stage ,
Drilling and tapping
Rich has done an excellent job photographing then parts, all I have to add is I find hand drilling ( put the drill bit in a pin vice) and hand tapping , gives better control over the process and ultimately gives the best results than using a drill press or dremmel , but again it's personal choice.
Now drill and tap all the holes in all your pieces , I start with the smallest drill bit , drill out all the holes for that, then swap for the smallest tap and do the same working up with drill bit and matching tap each time until you've done all the holes, in folowing Rich's photo's you'll have automatically countersunk all the holes that need doing .
Since you've now been handling the parts degrease, wash and dry all parts in a warm place .
Other than to say prep , spray with grey primer let dry and then spray with satin black the outer RHS and LHS covers and the ammo box , I then tackle the electronics, fit them and pre assemble the ammobox once dry .
Pre Assembly
I like to pre-assemble the relevant parts into their sub-sections before I detail the piece with 'weathering' , so assemble the gun frame and inner handle , the bolt assembly , into the upper reciever and the ammo box with LHS cover with sight rod and the RHS cover with binding post and Weaver Scope or Slotted Screw leaving the outer grip handle, the trigger guard, butt plate and amber grips 'til last
At this stage I also add all the detail bits ,screws, saftey catch, ejector rod , drum , triggers & hammer .
Photos to follow here |
|
| Back to top |
|
|
|
|
|
|
|
|
|
|
|
| Author |
Message |
marsattack
Community Member
Joined: 08 Feb 2009
Posts: 63
Location: Melbourne , Australia
|
| Posted: Thu Apr 08, 2010 9:26 am Post subject: |
|
|
If I may add, pewter is made up of a combination of alloy ,zinc and antimony . Very soft and unturnable, only good for casting.
Screws will more than likely cross thread prior to tightening.
I found that if the holes are drilled correctly , the actual screw may be used for tapping the hole as the tap may loosen the thread.
Try not to screw and unscrew these screws, test fit and leave it alone.
Also noticed that super glue or cyanoacrylate based glues will fuse this material , so if cross threading occurs dot the screw with super glue prior to screwing......however this will secure the screw in place, making it harder to remove later on.
Hope this helps and great help thread BTW
Marcel |
|
| Back to top |
|
|
|
|
|
|
|
|
|
|
|
|
You cannot post new topics in this forum
You cannot reply to topics in this forum
You cannot edit your posts in this forum
You cannot delete your posts in this forum
You cannot vote in polls in this forum
|
|
|
|
|
|
|
|


